If you’ve ever wanted to add solar to a flat roof without drilling any holes, this might be the simplest way to do it.
I’ve been meaning to install these two 200W Renogy solar panels (Use code TECHMAN8 for 8% off across the site) on the roof of my home office for a while now. There’s the obvious benefit of the solar power they’ll produce, but there’s another advantage too, which I’ll come back to later.
Rather than drilling into my felt roof—which, no matter how well it’s done, is always going to compromise the waterproofing—I’ve gone for what I think is a far safer solution.
I’ll also show you just how easy it is to make up your own MC4 cables and connect everything to a portable power station—my EcoFlow Delta 3 Max Plus that I reviewed recently, but this would work with pretty much any portable power station.
If you’ve already got a portable power station that’s sitting around for emergencies or only comes out for camping, this is a great way to get much more use out of it. You can even have it acting as a UPS for your PC while charging from solar at the same time.
The whole installation took me less than half a day from start to finish.

I started off attaching four Renogy Z brackets to each panel. The brackets come with all the hardware for attaching the brackets to the panels. I installed two on each long side.

I used concrete blocks as ballast – I decided half a block per bracket would be plenty. Each block weighs around 17 kg so that’d still be 34 kg per panel. I split the blocks with a bolster chisel – it doesn’t have to be perfect since the rough end can face inside.
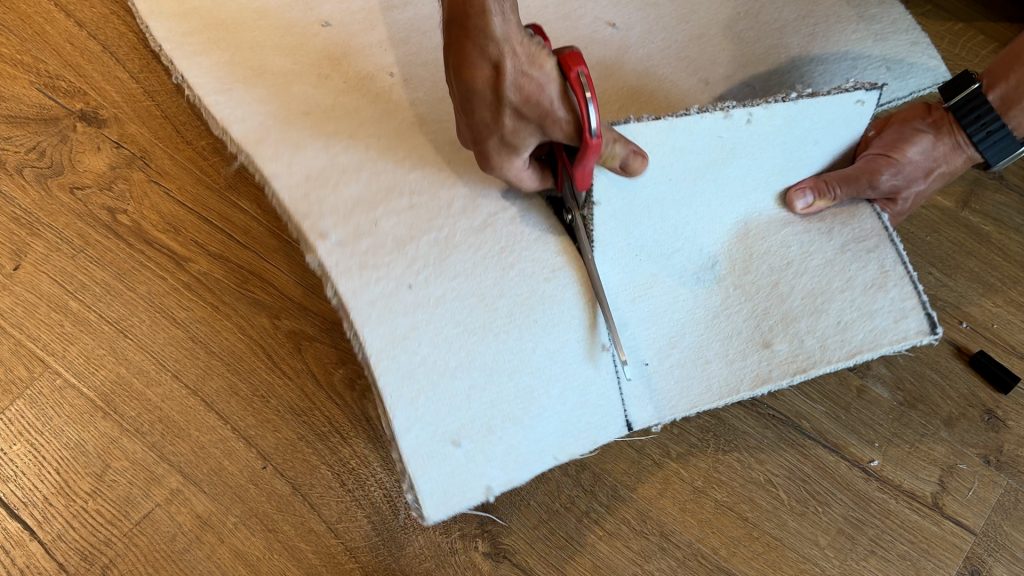
To protect the shed felt and provide additional grip, I cut 22 × 22 cm squares from some old carpet I had lying around. If you don’t have any old carpet, a few offcuts of shed roofing felt should work just as well.
Before fixing everything together, I positioned the panels centrally and towards the back of my 7.5 × 4 metre shed roof. There are large trees on either side, so this seemed like the best compromise. Positioning them towards the back also keeps the cable run shorter, reducing the amount of cable I needed. It also leaves me more room to add more panels in the future.

I placed the carpet squares pile-side down to give the blocks extra grip on the felt. I then marked out the position of the Z-brackets on each concrete block, drilled the holes and pushed in Fischer DuoPower wall plugs. The supplied lag bolts that come with the brackets come with a plastic washer, but you can remove them for this installation.
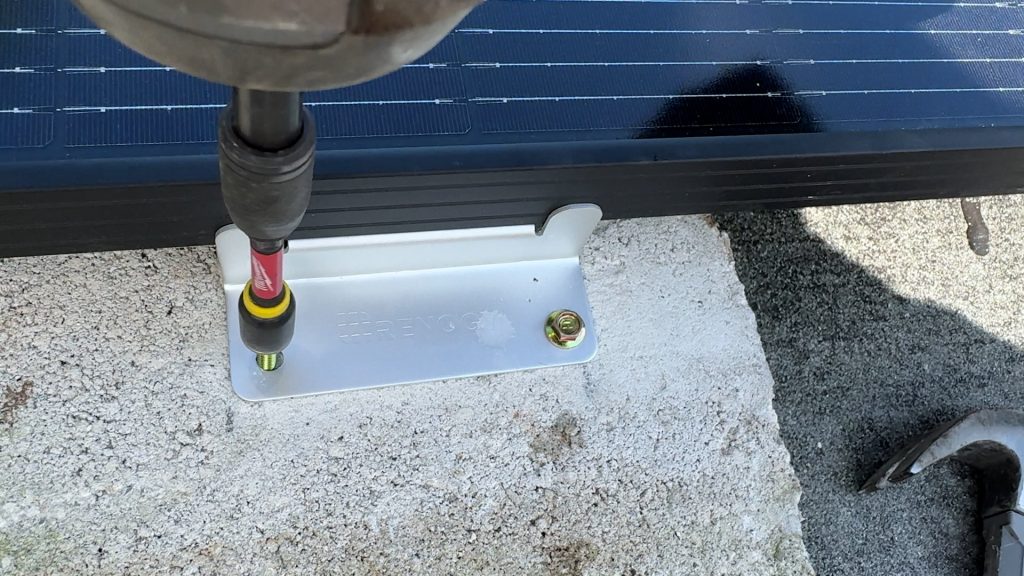
It’s worth taking your time positioning the blocks before drilling any holes, because once the panels are bolted down the whole assembly becomes quite awkward to move on your own. You certainly can’t just drag it across the roof—which is exactly what you want, because it means it’s going to stay put.

That’s the installation finished. It really is a straightforward job and, although I’m certainly no roofer, I did run this past a friend who owns a roofing business. He confirmed that this is a perfectly legitimate way of mounting panels on a flat roof without drilling through the waterproof membrane.
Of course, it’s up to you whether you want to add additional ballast depending on your roof, panel size and local weather conditions, but this setup has already been through some very windy weather without any issues.

The panels already have MC4 connectors fitted, so you’ll just need to make up some extension cables to reach your power station. I’m using 4 mm² solar cable – there’s links to everything I used for the installation at the bottom of this article.

Although you might be able to do it without, you’ll also really need an MC4 crimping tool. I’ve used iCrimp tools for various connectors and have found them to be good quality and good value.

I have no connection with the company—I’ve just had good results with them. These are the MC4 connectors I used.
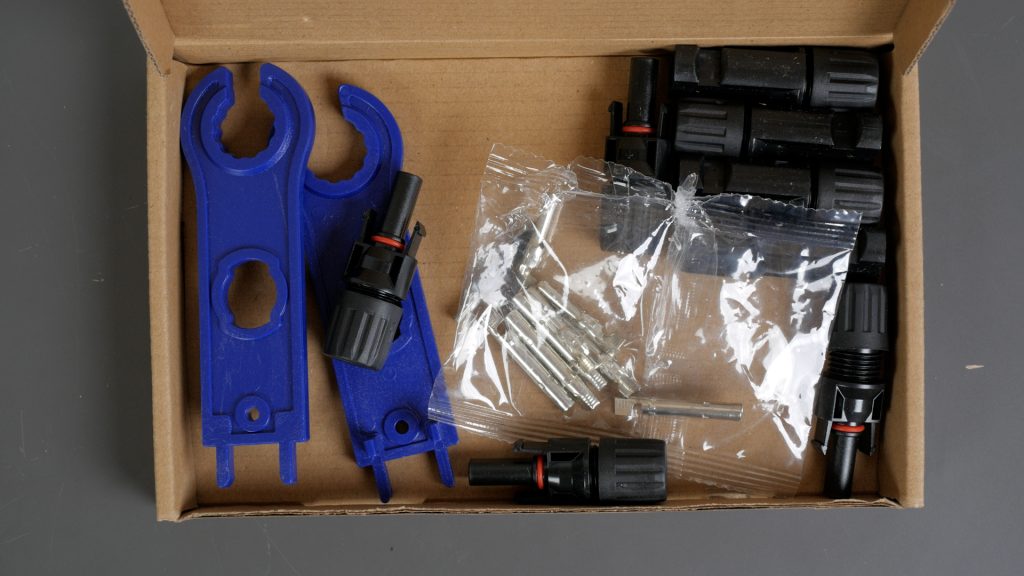
I’ll just show you how to fit one MC4 connector because they’re both assembled in almost exactly the same way. This is a female MC4 connector, which uses a male crimp pin. The male MC4 connector uses a female crimp pin. Start by stripping around 10 mm of insulation from the end of the cable and give the strands a slight twist so they don’t catch.

Place the pin into the crimp tool until it clicks into the first position, then feed the cable into the back of the pin and squeeze the handles until the crimp is complete. Give the cable a firm tug to make sure it’s secure.
Don’t forget to slide the gland nut onto the cable before assembling the connector. Push the crimped pin into the main body of the MC4 connector until it clicks into place. Give it another tug to check it’s fully locked in, then tighten the gland nut to compress the seal around the cable and you’re done. You’ll need to make up two cables in total—one for the positive connection and one for the negative.

I then drilled two 6 mm holes through the wall of my home office, angled slightly downwards towards the outside to prevent any water ingress, and passed the cables through. I’ll tidy this up properly later and seal them with some silicone, but the cables are already a snug fit, so it’s perfectly fine for the time being.

Once you’ve fed the cables through, you’ll need to crimp on the MC4 connectors at the other end. If you’re using a typical MC4-to-XT60 adapter, you’ll need a male MC4 connector on the positive cable and a female MC4 connector on the negative.
In my case, I’ve done it the other way around because I’m using separate male-to-male and female-to-female MC4 adapters to connect to my MC4-to-XT60 lead.
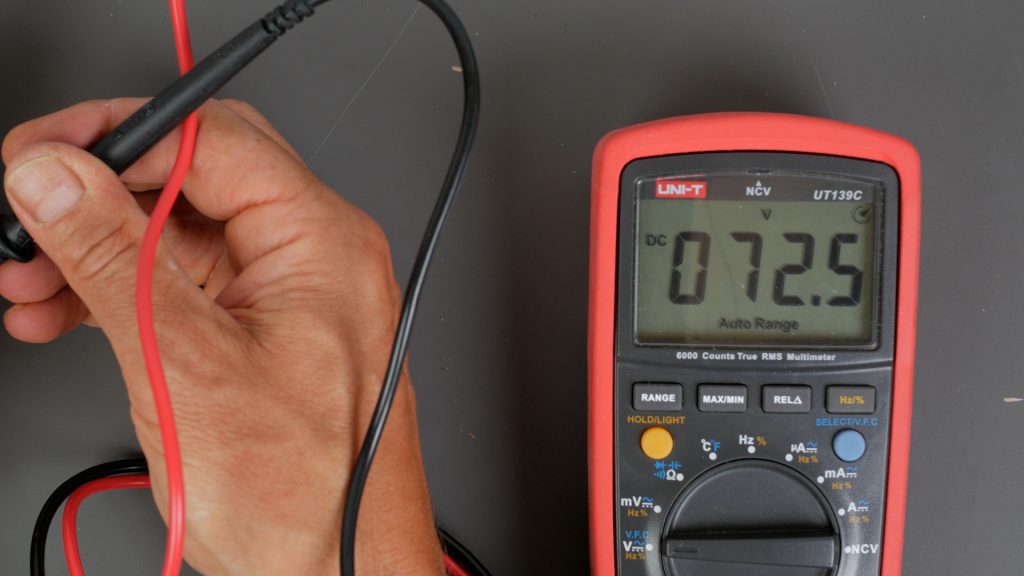
Before plugging everything together, this is a good time to measure the open-circuit voltage of your panels and decide how you’re going to wire them. Here you can also just double check your positive and negative are the right way around. My Renogy panels produce around 36 V open circuit each, while the EcoFlow Delta 3 Max Plus has a maximum solar input voltage of 60 V. Unfortunately, that means I can’t connect the two panels in series, as they’d produce around 70 V, exceeding the EcoFlow’s limit. Instead, I have to connect them in parallel.

To do that, I’m using these three-way MC4 branch connectors. They’ll also make it easy to add a third panel in the future. Ideally, you should fit sealing caps to any unused connectors to keep out water and dirt. For now, though, I’ve simply tucked the unused connectors underneath the panels until I decide whether I’m adding another panel.
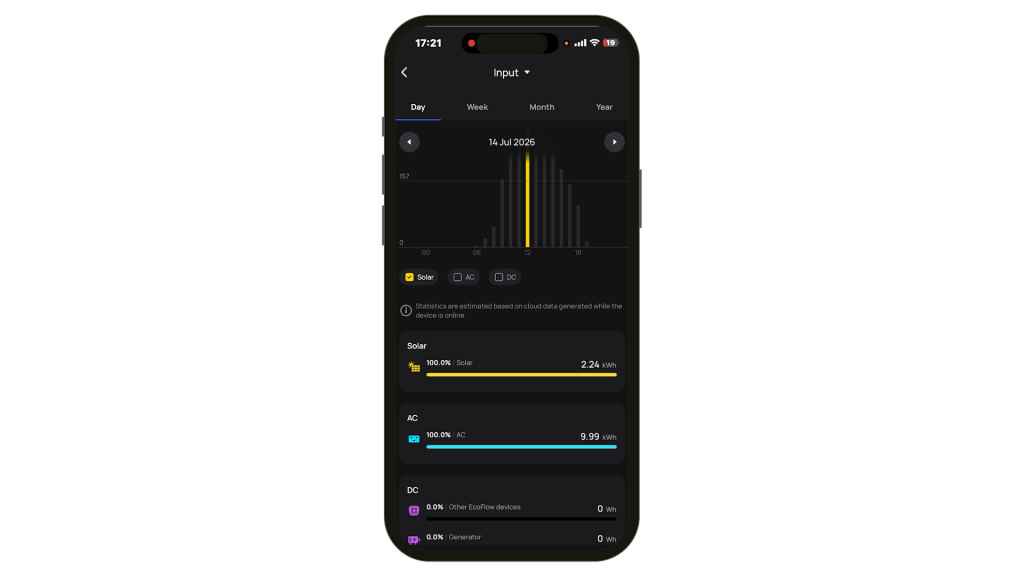
Connecting everything up to my EcoFlow, I’m seeing a peak solar input of over 300 W around lunchtime under good conditions. The EcoFlow app is really useful because it lets you track your solar generation over time. So far, the best day’s generation I’ve seen from this setup is 2.24 kWh, which is enough to fully charge the 2 kWh EcoFlow on its own.
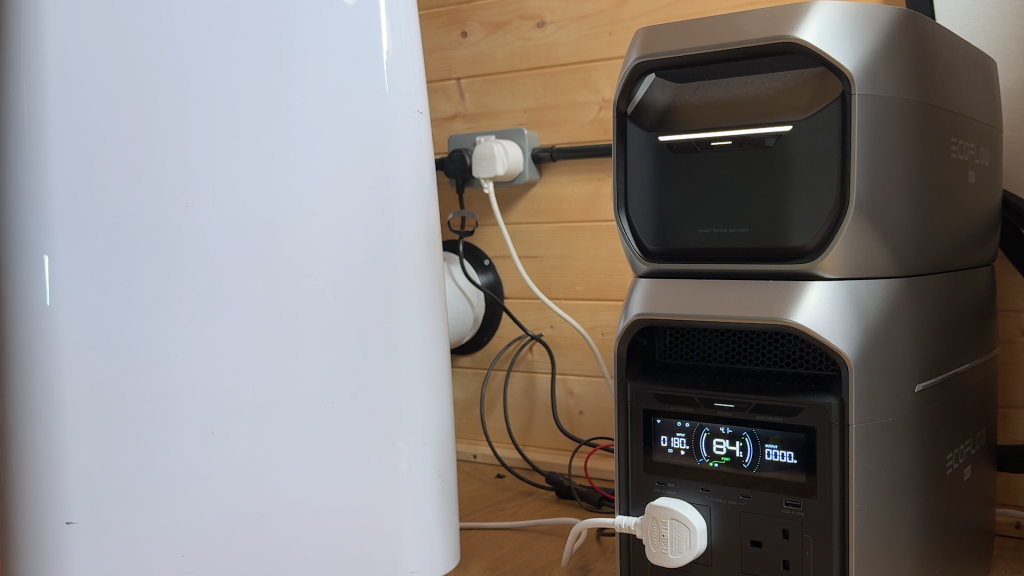
With the extra battery connected, it would take a little over two days of similar sunshine to fully recharge the whole system.
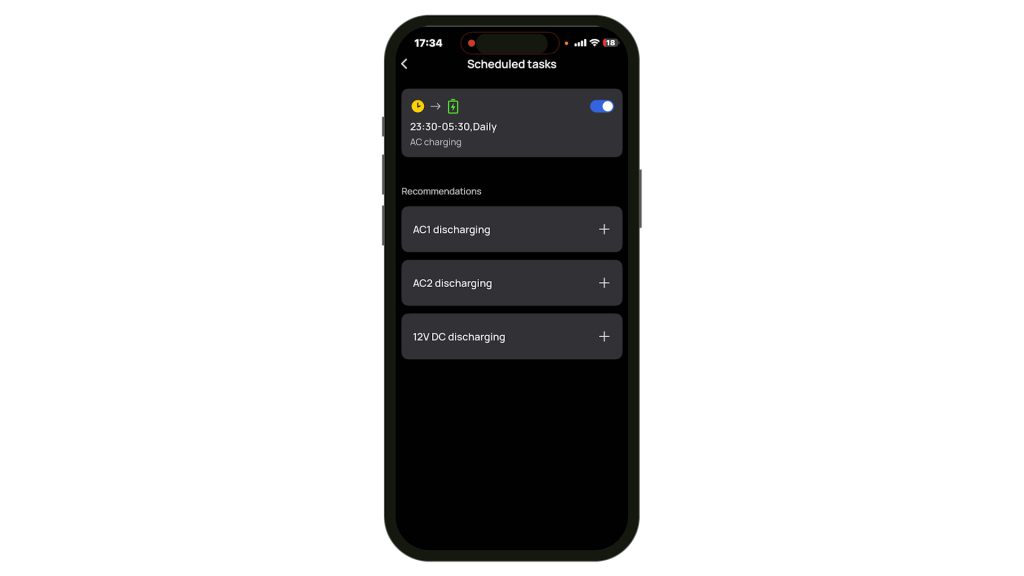
I’m using EcoFlow’s scheduled charging task to charge the batteries overnight during the cheap-rate window on my Octopus Intelligent Go tariff, when electricity costs me just 7p per kWh. During the day, I’m running my portable air conditioner from the batteries, with the solar panels topping them up whenever the sun is shining.
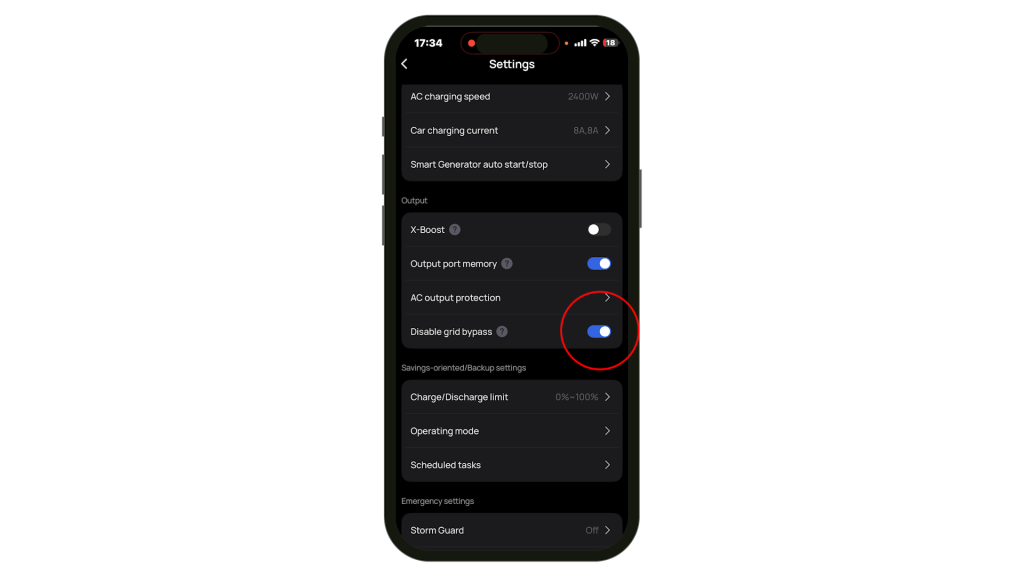
One important thing to note is that you’ll need to enable Disable Grid Bypass in the EcoFlow app. Otherwise, it will simply pass mains power through to your appliances instead of using the battery, so you won’t make the most of your solar generation.
There is another benefit to installing solar panels on this shed roof. The roof is constructed from particle board with an inch of insulation beneath it and a felt covering on top, but even so, the temperature of the ceiling inside can still get very high.

Using my thermal imaging camera, I found that where the panels are mounted there is a noticeable reduction in the amount of heat coming through the roof. With just two panels the effect isn’t huge, but if I add more panels, it should make a bigger difference and my air conditioning unit won’t have to work as hard.
This home office gets incredibly hot. Even this 12,000 BTU portable air conditioning unit—which isn’t very efficient because it only has a single hose—really struggles to keep it cool.
So, if I did add more panels in the future, I’ll not only get the extra solar power, but I’ll also reduce the amount of heat coming into the office.
Don’t forget to take a look at my YouTube video at the top of the page, and again please subscribe to my YouTube channel where I’m releasing videos every week on the latest technology and how to get the most out of it. If you tap the bell icon when you subscribe you’ll get a notification as soon as I release a video, and there’ll be a link to my site here for the written article. YouTube is also the best place to leave a comment. I read all of them and respond to as many as I can!
☀️ EVERYTHING I USED
Purchase directly from Renogy — and Renogy have given me an 8% discount code:
Renogy 200W ShadowFlux Anti-Shading N-Type Solar Panel:
https://renogy.sjv.io/en5bkO
Use code TECHMAN8 for 8% off across the Renogy site.
AMAZON LINKS:
Renogy 200W ShadowFlux Anti-Shading N-Type Solar Panel:
https://geni.us/PhatG
Renogy Mounting Z Brackets:
https://geni.us/UXqc
4 mm² Solar Cable:
https://geni.us/yHazoLq
MC4 Connectors:
https://geni.us/A3B99QS
MC4 Crimping Tool:
https://geni.us/NeQKdF2
Parallel Branch Connector:
https://geni.us/uzl510D
EcoFlow Delta 3 Max Plus:
https://geni.us/okX7Dbv
Some of the links above are affiliate links. If you buy through them, I may earn a small commission at no extra cost to you. It really helps support the website and channel, so thank you!
Leave a Reply