Bambu’s X2D promises to be one of the most capable 3D printers I’ve ever looked at, and it’s very competitively priced.
It’s the first 3D printer I’ve been interested in reviewing in over three years – so much so that I decided to buy one myself and see whether it lived up to the hype.
I wanted to find out whether its new features are genuinely useful, and whether some of the criticism surrounding one feature in particular is actually justified.
In this review I’ll briefly cover the setup process, including some of the issues I encountered, run through the features that make the X2D stand out, and then give my final verdict on whether it might be the right printer for you.
So let’s take a closer look.
Setup

You can buy the X2D on its own or bundled with the AMS 2 Pro. Unboxing and setting everything up took a little longer than I was expecting, particularly with the AMS 2 Pro version.
Everything is packed incredibly tightly and efficiently, with protective parts, shipping screws and cable ties throughout the printer that need to be removed in the correct order.
I’d strongly recommend watching the official setup video all the way through before you start, as there are different setup instructions depending on whether you’ve bought the printer on its own or with the AMS 2 Pro.
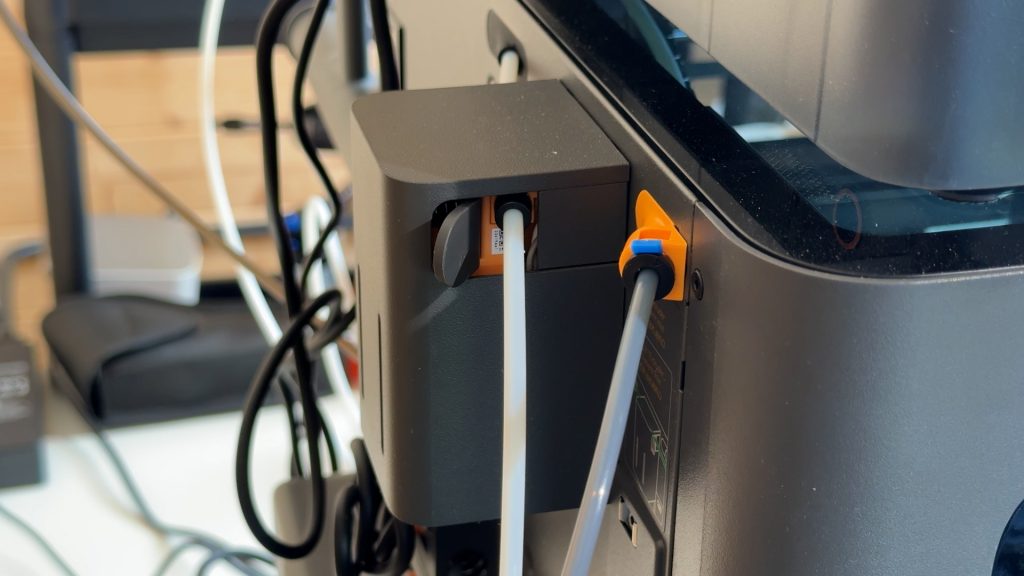
Once it’s all unpacked, you need to remove the heatbed screw, lead screw protectors and cable ties from the linear rods. You then attach the screen and connect the auxiliary extruder for the second nozzle and its PTFE tube.
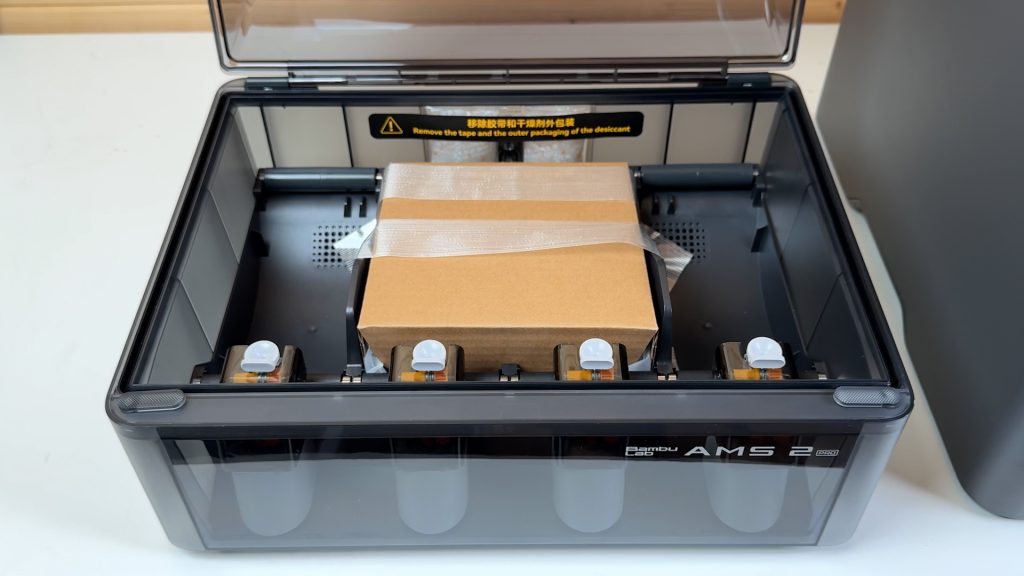
If you’ve got the AMS 2 Pro, that then needs unpacking and mounting on top of the printer, followed by connecting its cables and PTFE tubes.
Finally, you attach the external spool holder and exhaust fan.
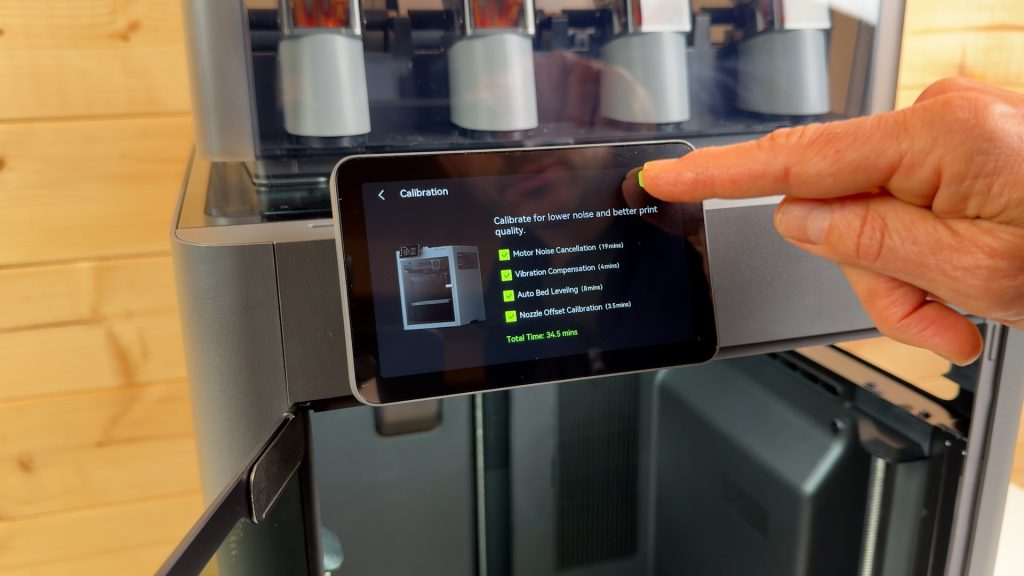
You can then power the printer on and work through the initial setup and calibration process which takes around 30 minutes.
None of it is particularly difficult, and Bambu provides excellent instructions, but it’s definitely not a two-minute unbox-and-print experience. You’ll need to allow some time and take it slowly, particularly if this is your first 3D printer.
Once everything was ready, it was time for my first print. Unfortunately, that didn’t go quite as smoothly as I’d hoped …
First Print & HMS Warnings
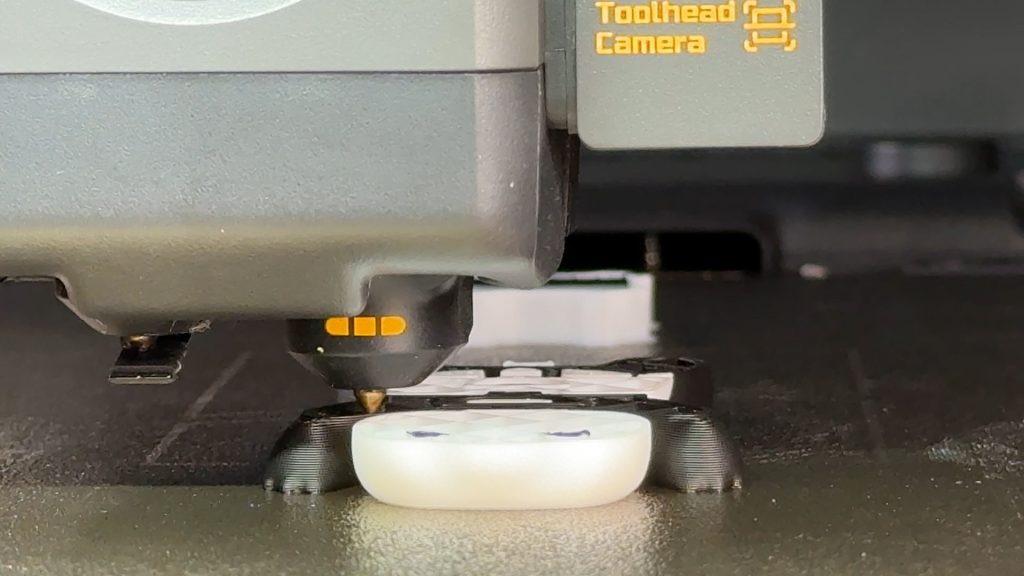
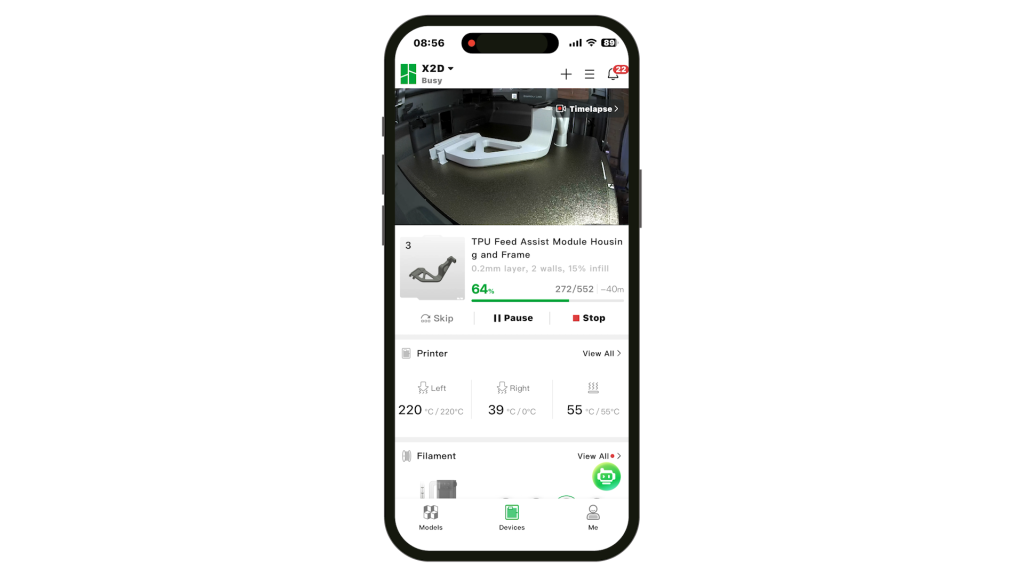
I tried printing the 3DBenchy in Bambu white PLA from the printer’s internal storage. I had updated to the latest firmware, but the print failed to start with two messages from the HMS, or Health Management System.
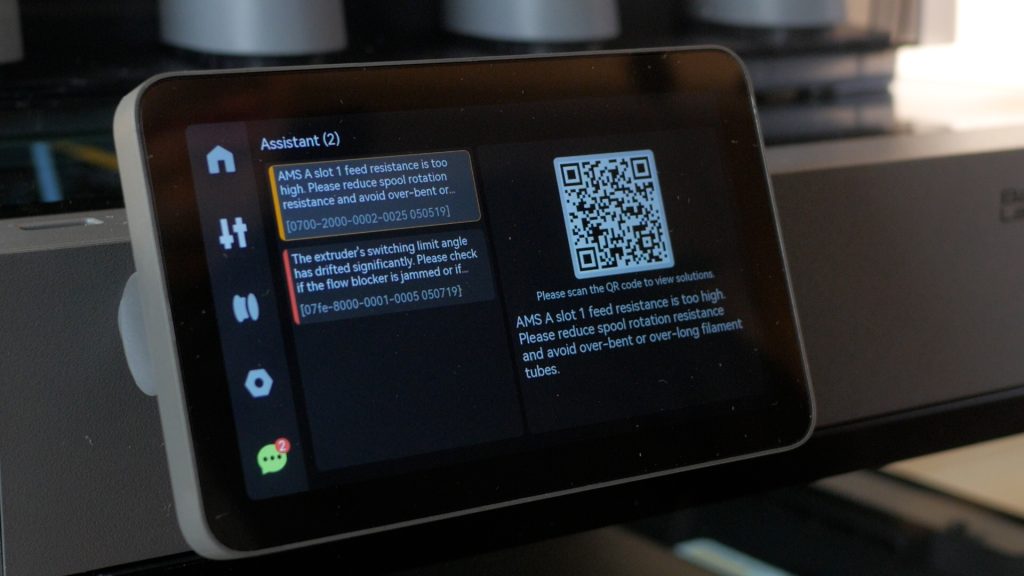
I’m pretty experienced with 3D printers, but these messages and the associated support articles used a lot of terminology that assumed you already had a fairly advanced understanding of the printer and its components.
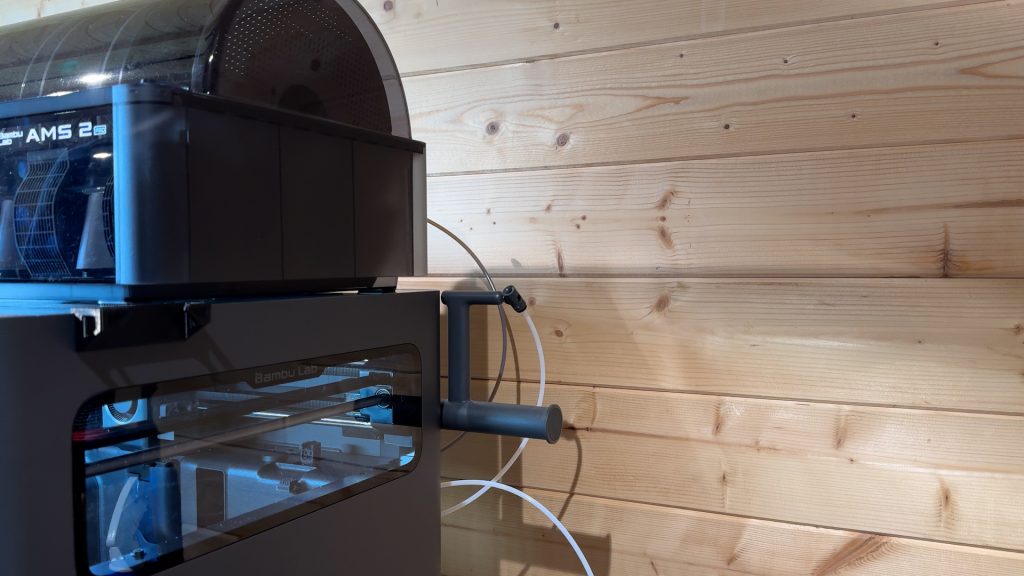
With a little investigation, I discovered there were two separate issues. The filament had snapped inside the AMS, which I sorted out fairly quickly. The warning about resistance took a little longer to work out. It turned out the AMS PTFE tubes were resting slightly against the back wall. Moving the printer just a few centimetres away from the wall completely solved the problem, and I haven’t seen either warning since.
It did make me realise that this is an advanced machine and not necessarily my first recommendation for somebody completely new to 3D printing. I’ll come back to that point later.
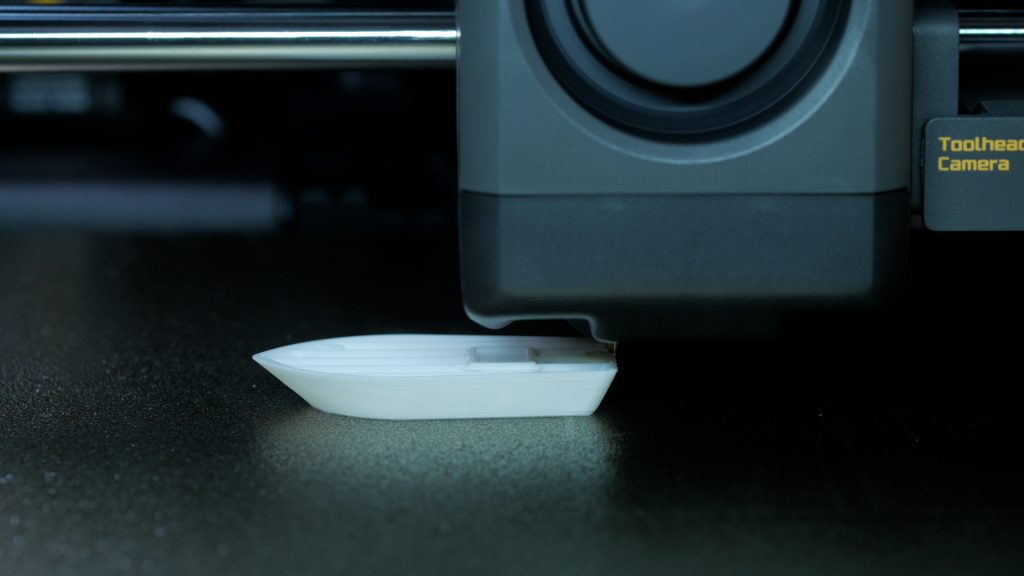
Still, the print itself came out pretty well for a 24-minute 3DBenchy.
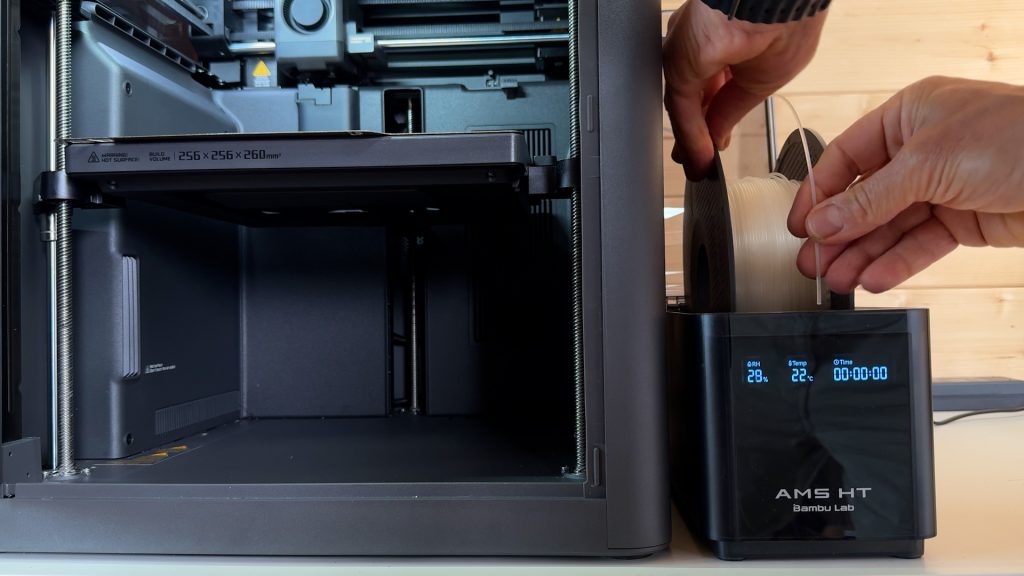
The AMS 2 Pro
The AMS 2 Pro is available for nearly all of Bambu’s printers, but it’s the first time I’ve experienced it, so I’ll cover it here. This is probably my favourite feature of the entire printer.
You might think the AMS is mainly for multi-colour prints since you can store four colours and certainly you can do multi-colour prints with it. But that’s not something I’m so interested in. There’s a far better way to do at least two-colour prints that’s both faster and less wasteful, which I’ll cover shortly.
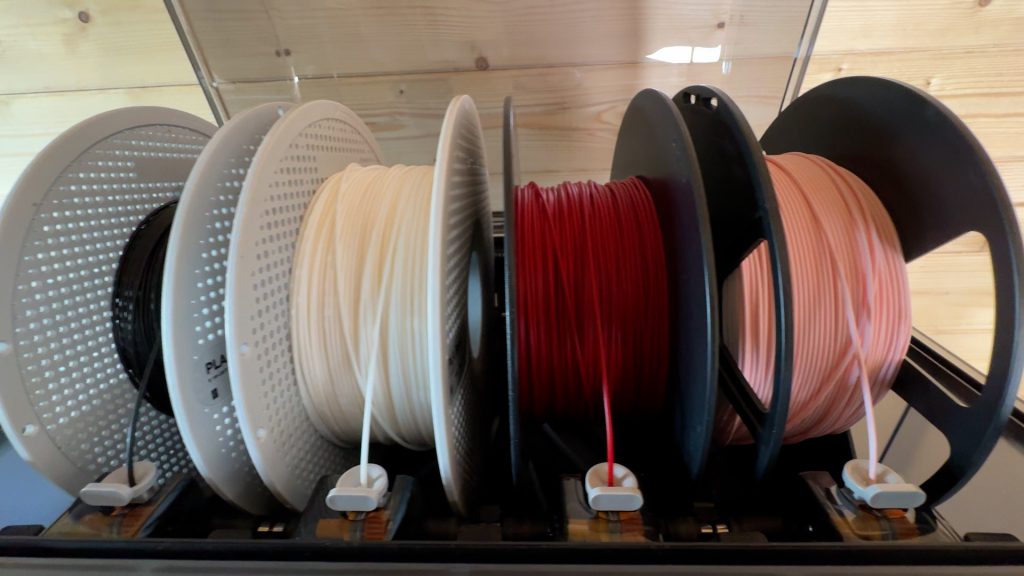
The main advantage for me is being able to have four different types of filament ready to go all the time. These get automatically loaded and unloaded before and after a print. If you use Bambu filaments, they also contain an RFID tag which the AMS can read, automatically identifying the filament and synchronising that information with the slicer.
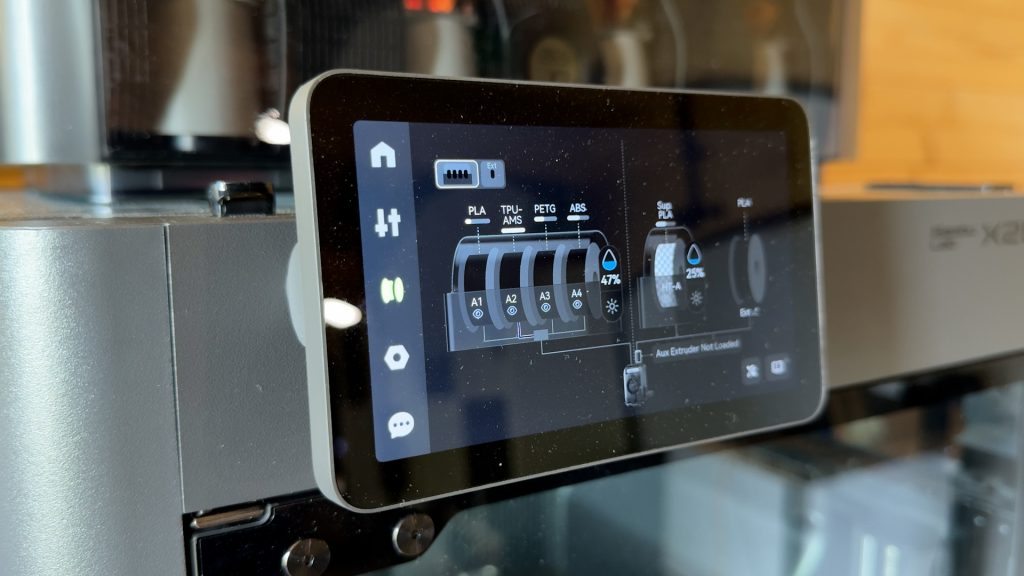
If you want to swap to another filament, you can simply pull one spool out and load another. It takes around 10 seconds. I’ll typically have Bambu’s PLA, PETG, ABS and TPU for AMS loaded, which covers around 90% of what I print. Usually I’ll only need to change the colour.
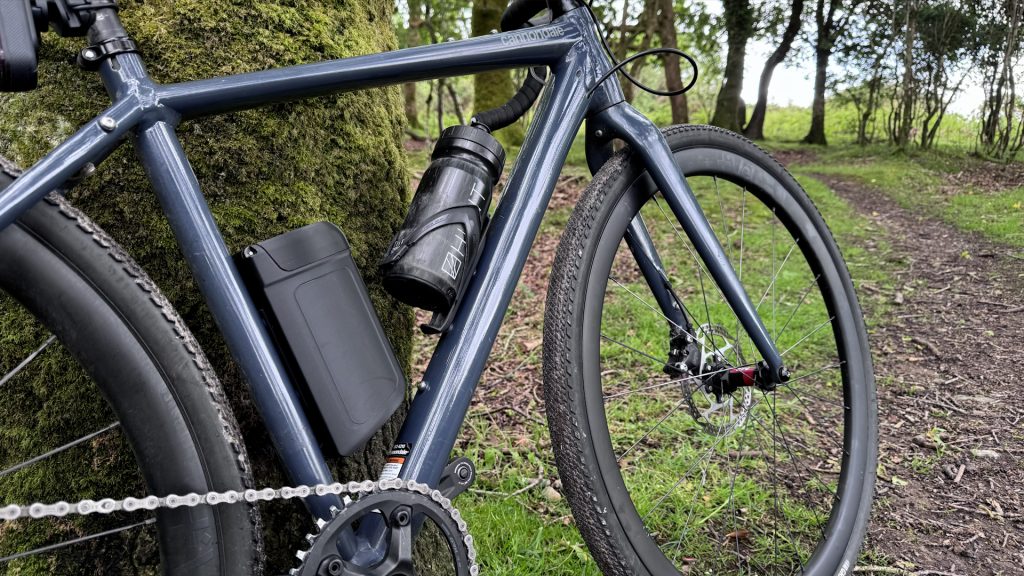
Secondly, and possibly even more important for me, it can dry your filament and keep it dry. I live in a particularly humid part of the world and keeping filament dry is a constant battle. Dry filament makes a huge difference to print quality.
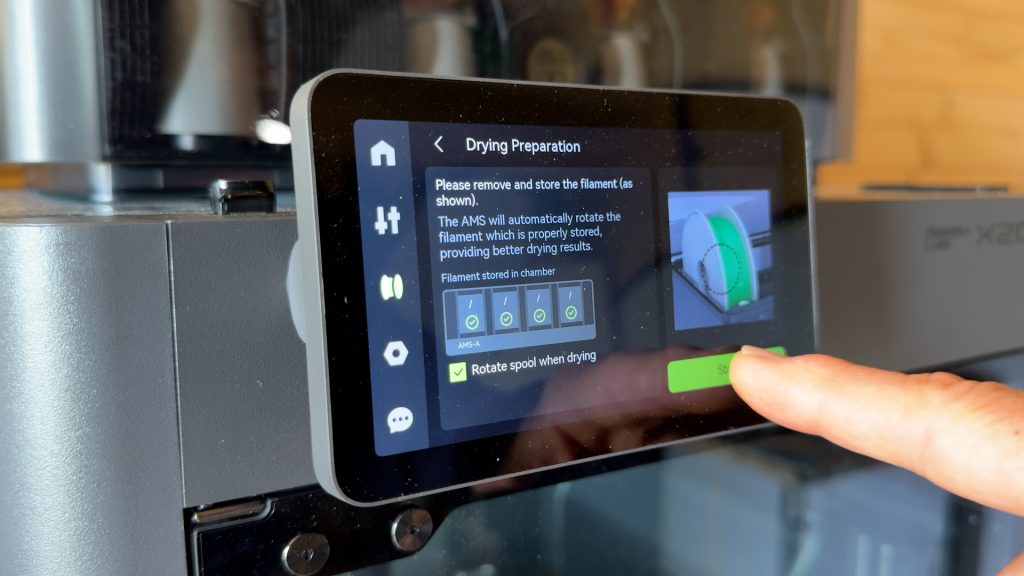
And it can rotate the spools whilst drying when you’re not printing. This makes drying far more efficient and, although I own several filament dryers, the only non-Bambu dryer I have that can do this is the Eibos Polyphemus.
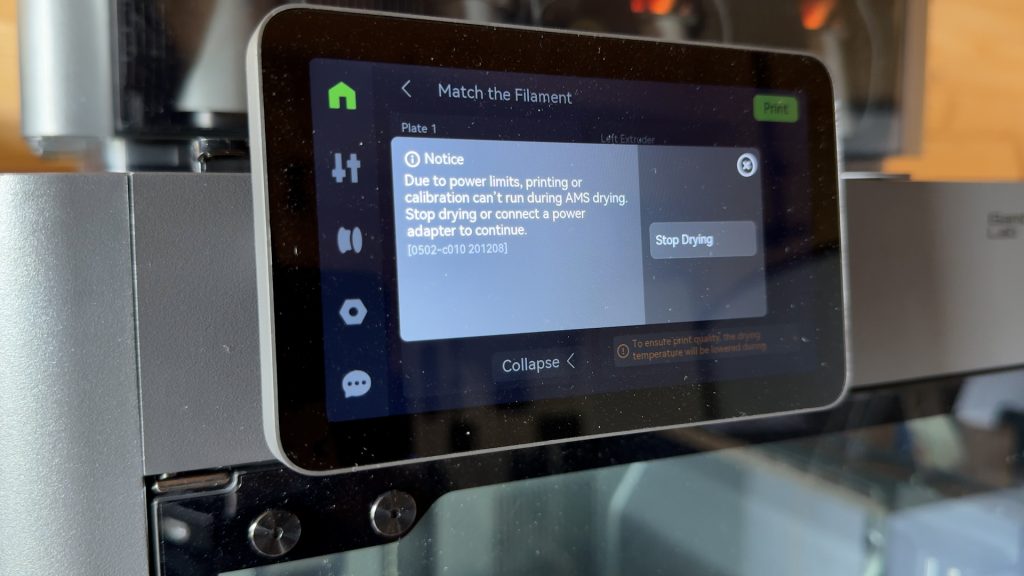
Unfortunately, out of the box you can’t dry filament whilst printing. That’s important for very hygroscopic filaments, but it’s also useful when you’re not completely sure how dry a filament is.
To dry whilst printing you need the optional AMS 2 Pro Switching Adapter. While I was waiting for mine to arrive, I actually powered the AMS from the DC output of my DJI Power 1000 Mini using a makeshift adapter. If you’re interested, all you need is a 24 V, 4 A DC supply.
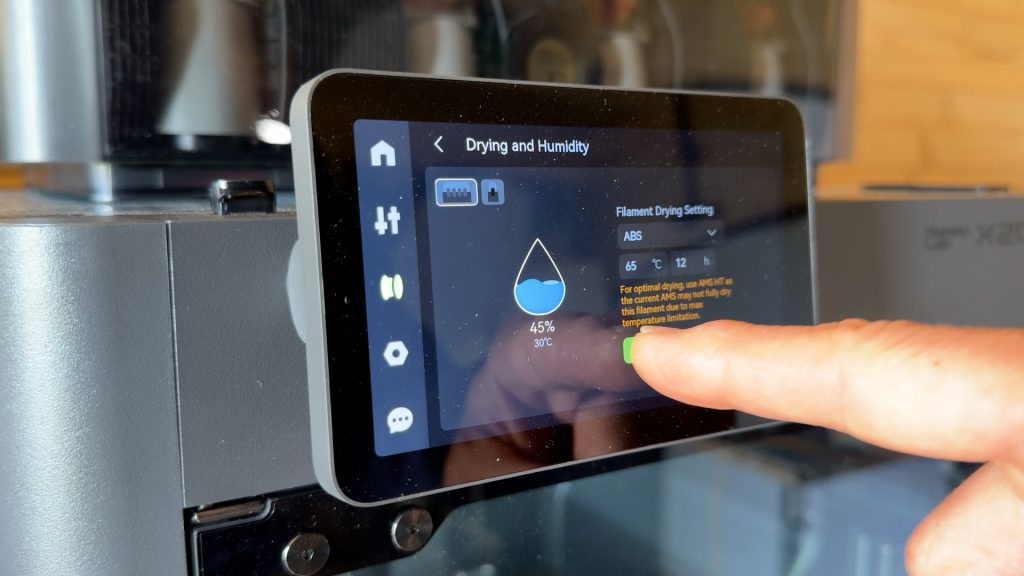
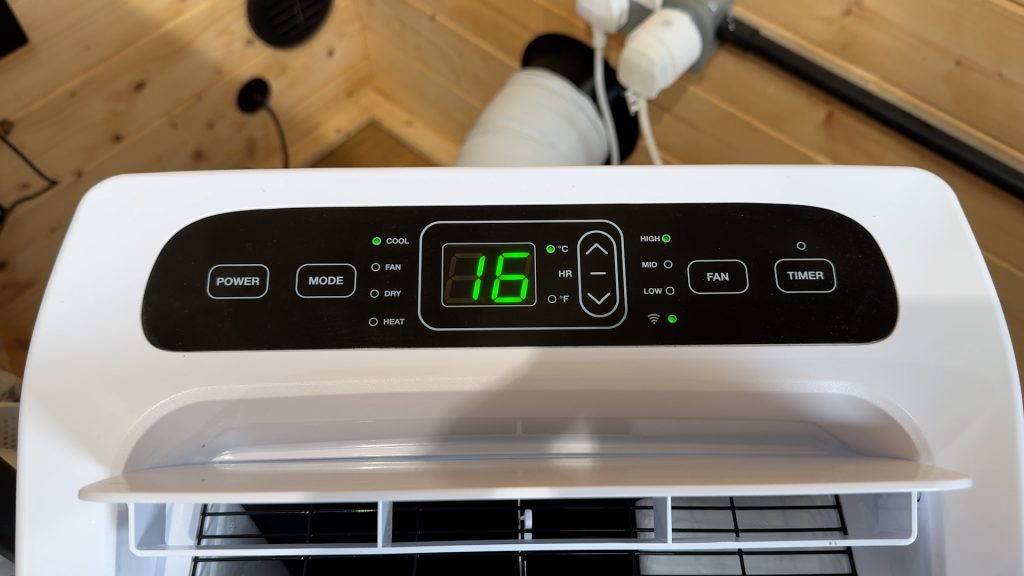
The dryer only goes up to 65°C, so it would take quite a long time to dry some engineering filaments but it’s fine for everything else.
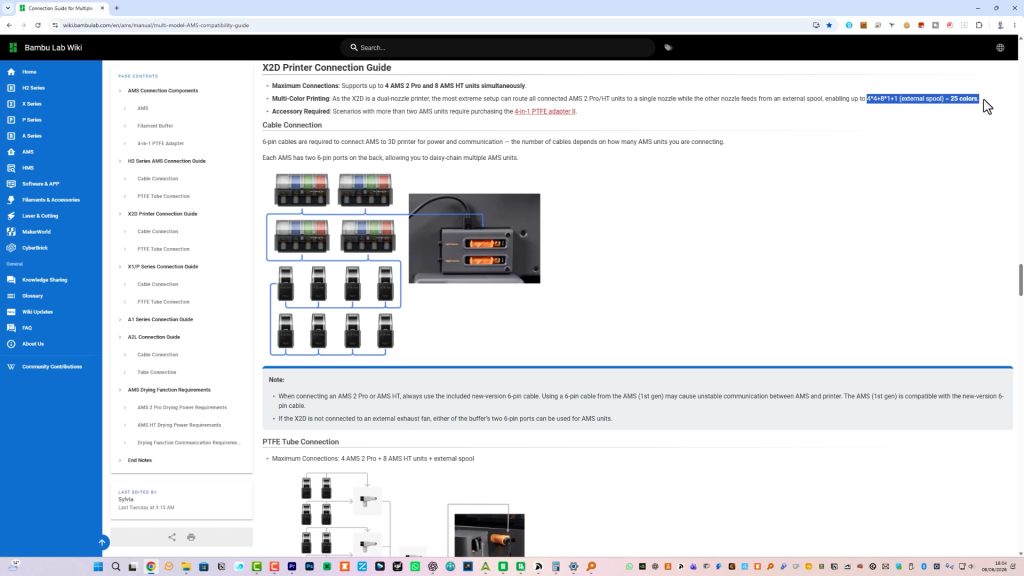
The X2D actually supports connecting up to four AMS 2 Pros, giving you 16 spools. You can then add a further eight AMS HT units and still use the external spool holder, meaning you can have up to 25 filaments connected at once. It sounds slightly ridiculous, but after using the AMS for a while I can already see the appeal, at least of having an additional AMS 2 Pro.
In fact, I’ve already bought an AMS HT myself, which I’ll cover in more detail and show how well it works with the X2D in my follow-up article and video (coming soon).
Apart from those initial issues, it’s worked flawlessly, and it’s hard going back to my other printers without an AMS. I’m even eyeing one up for my A1 Mini.
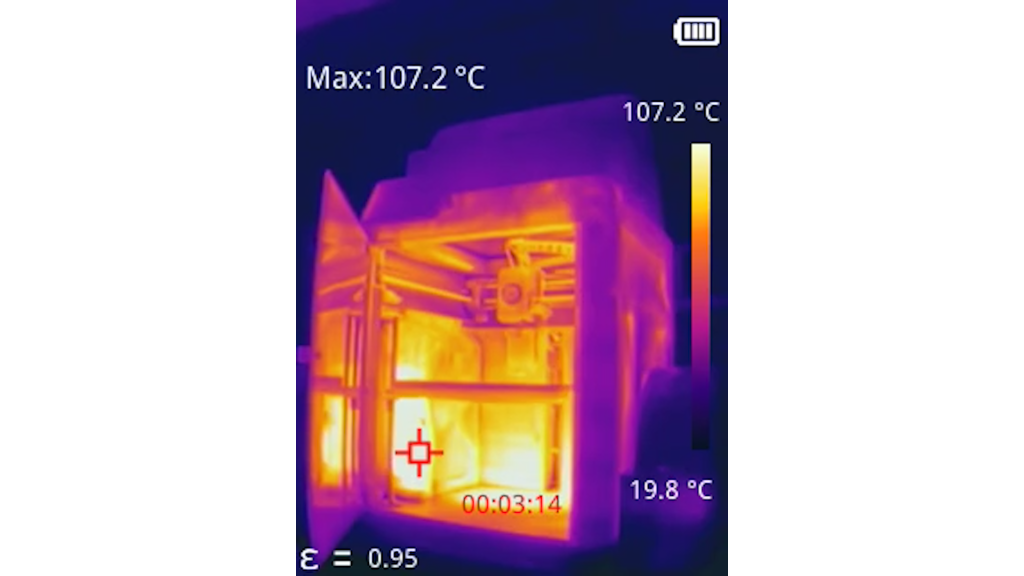
Active Heated Chamber & Engineering Materials

The first of the two biggest upgrades on the X2D over the previous X and P series printers is the heated chamber, which can reach a maximum temperature of 65°C. That allows you to print engineering materials far more reliably, including larger prints that cover most of the build plate.
I was particularly keen to try ABS again. I’ve always had mixed results with ABS, both in terms of warping and weak layer adhesion. It’s as cheap as PLA and PETG, but offers much higher heat resistance and good impact resistance.
Using Bambu’s ABS with the Standard Profile and without changing any settings, the results were almost perfect.
This desiccant dryer spool contains lots of tiny holes, so I switched to the 0.20 mm Optimal profile. There was zero warping, excellent layer adhesion, and a finish that looks and feels remarkably close to injection-moulded ABS.
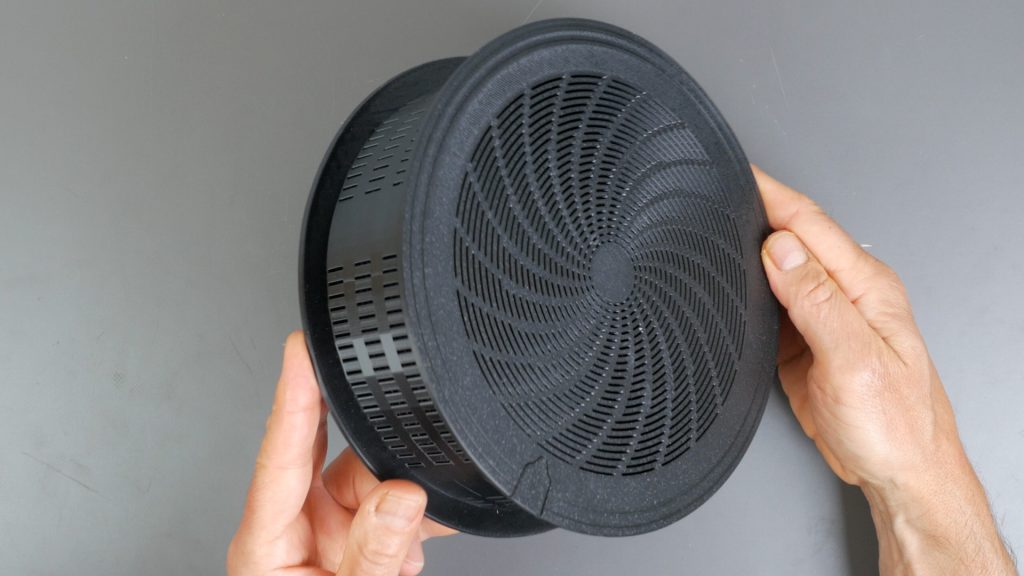
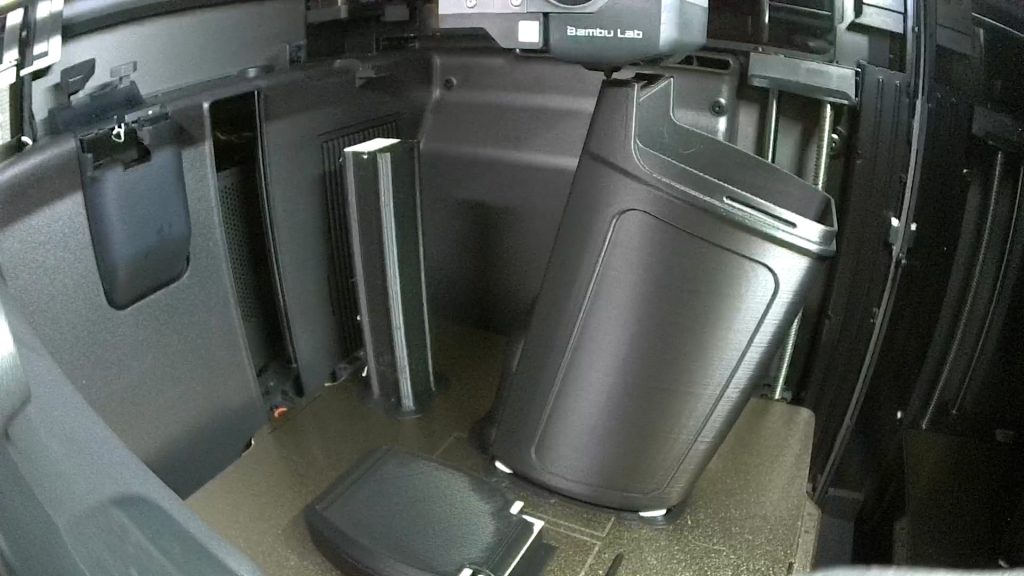
The X2D also introduces a new filtration system, including HEPA and activated carbon filtration.
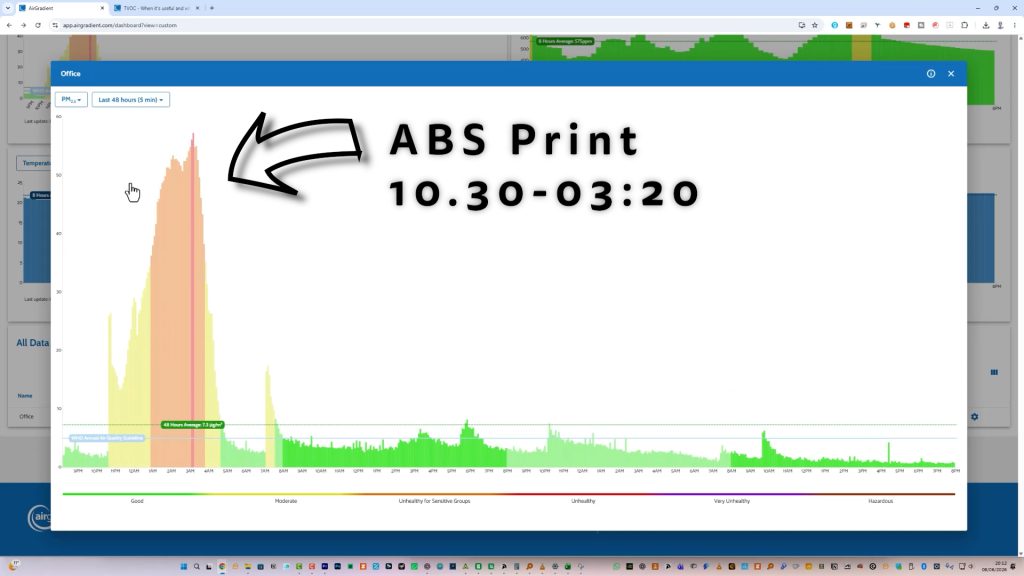
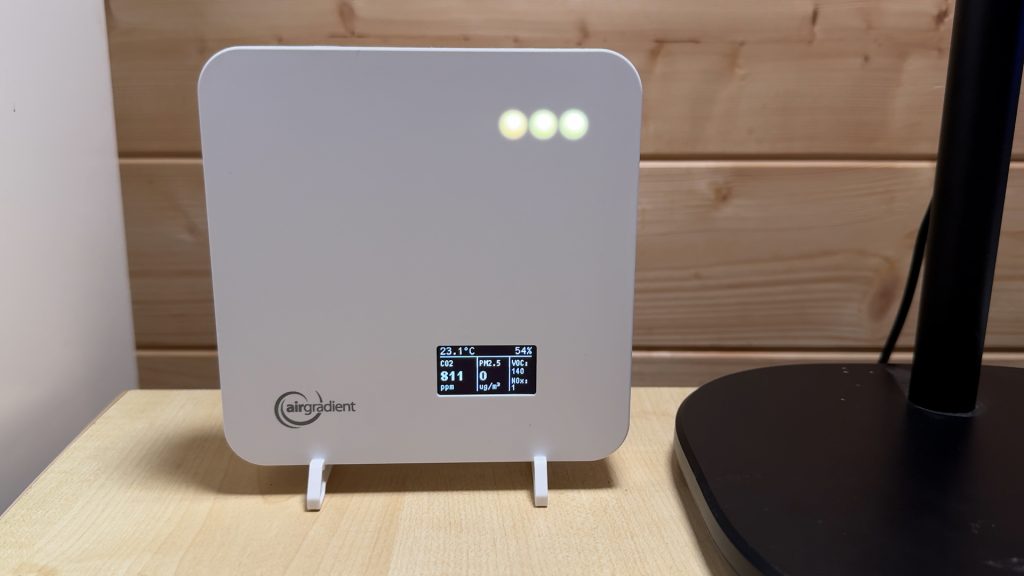
Printing ABS does release noxious fumes, and while the filtration system certainly helps reduce odours and airborne particles, I can still smell the ABS during printing and my air quality monitor shows noticeable increases in airborne particle counts.
What does help is running my portable air conditioning unit, which exhausts air outside. It’s a relatively inefficient single-hose design, which creates negative pressure in the room and draws fresh air in through gaps around doors and windows. That’s normally a disadvantage, but in this case it helps dilute and remove the fumes.
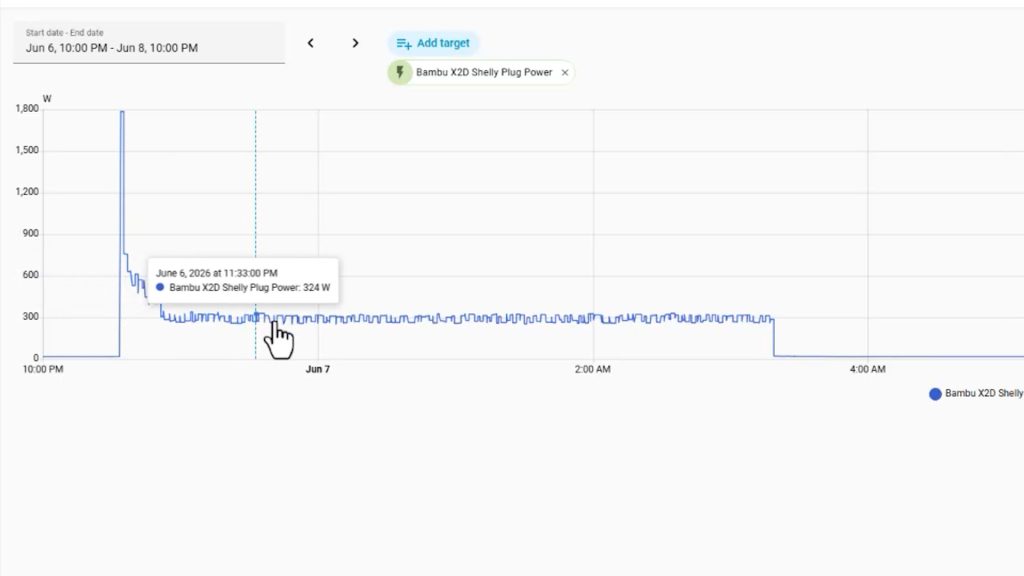
One other point to note is that the running costs of printing with the heated chamber can be quite high. On an overnight ABS print I measured an average power consumption of 330 W, which works out at roughly 1 kWh every three hours of printing. This particular print would cost me just under £1 at current peak electricity prices. Printing PLA is typically around half the power consumption and cost.
For most other materials though, I was quite happy working in the same room as the printer, which brings me onto noise levels. Noise levels are generally reasonable. I was able to work in the same room while the X2D was printing, which isn’t something I can say about my K1 Max. You can certainly hear it, especially during faster movements and filament changes, but it’s never too distracting.
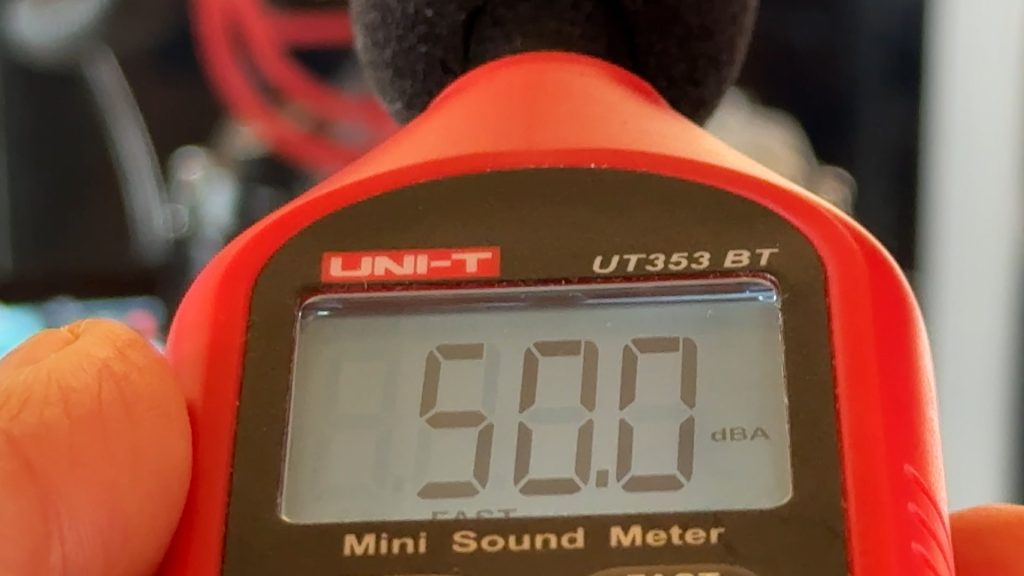
Typically I measured around 50 dB 1 metre away with the door closed. It’s noticeably louder with the door open, reaching around 55 dB, but most of the time you’ll have the door shut anyway.
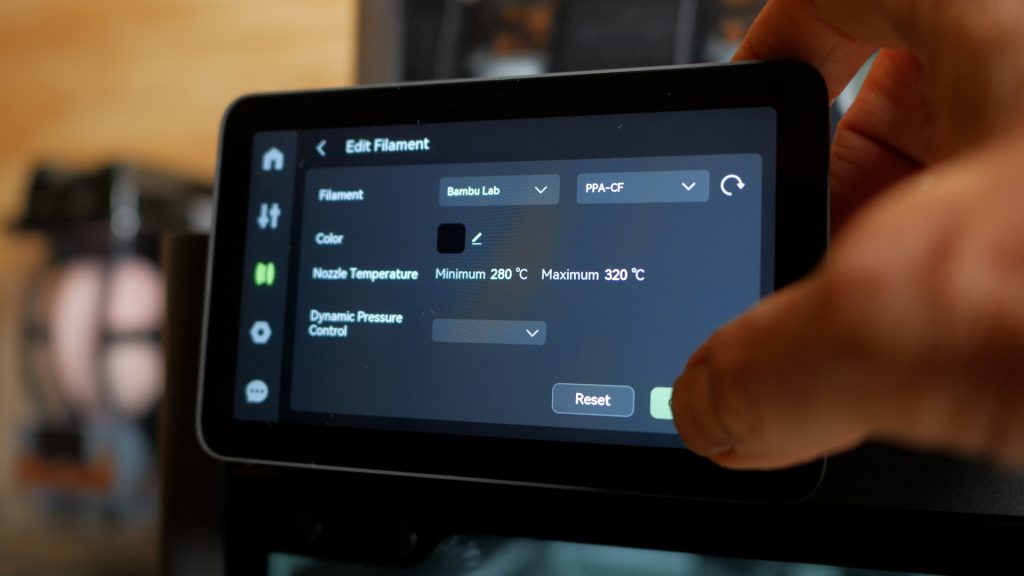
The X2D has a maximum nozzle temperature of 300°C. That’s not as high as the H2D’s 350°C, but it’s still enough to print every filament currently sold by Bambu, including PPA-CF.
Dual Nozzles: Quality & Speed
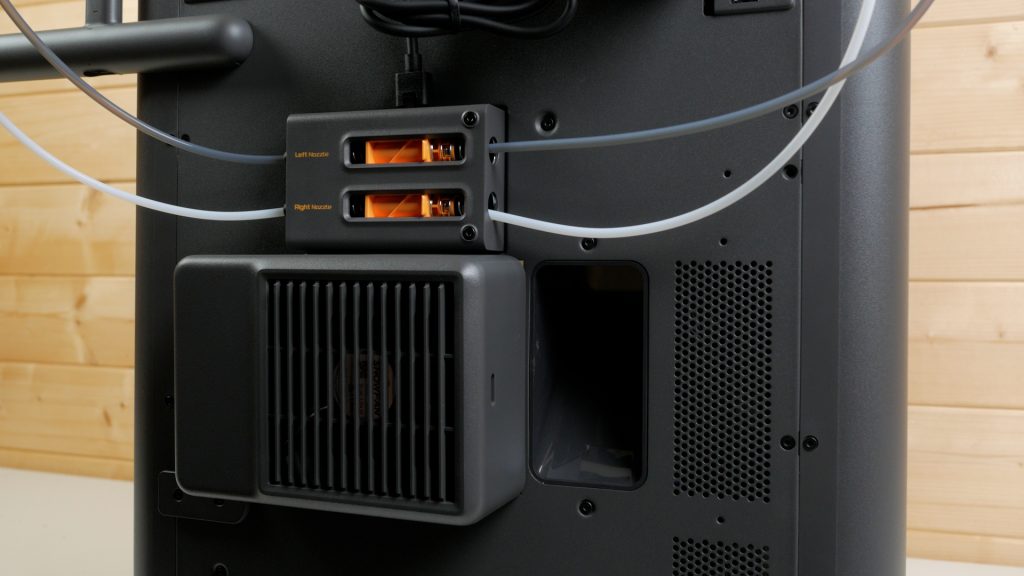
Probably the headline feature of the X2D is in its name: D for Dual Nozzles. The left nozzle is a standard direct-drive setup. The right, second nozzle uses a Bowden system, where the hotend is fed from the extruder via a length of PTFE tubing.
This isn’t particularly common on modern printers, but it does have the advantage of keeping the toolhead lighter, which helps maintain print speeds despite the dual-nozzle design. Bambu very clearly states that this is an auxiliary nozzle intended for printing a small amount of a secondary colour or support materials.
Using the second nozzle, or both together, does reduce the usable build area by 21 mm on the left-hand side of the build plate.
I’m completely fine with all of this and, in my testing, it works just fine. The main compromise is speed.
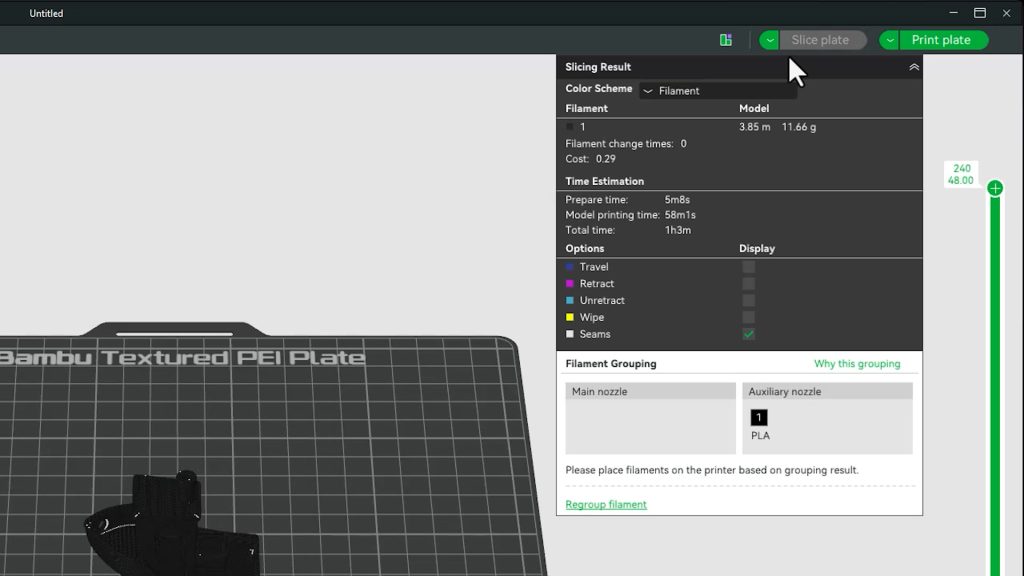
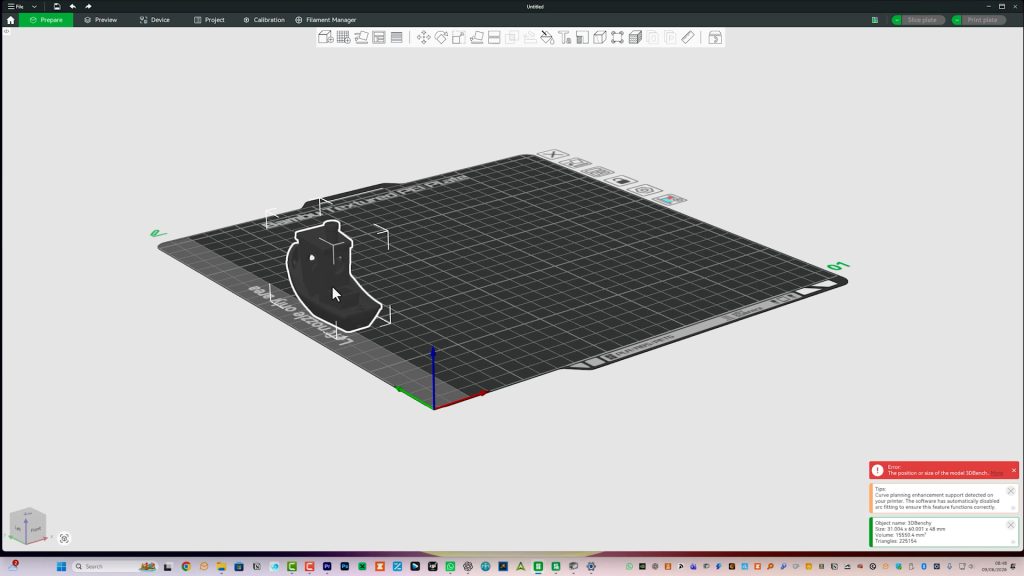
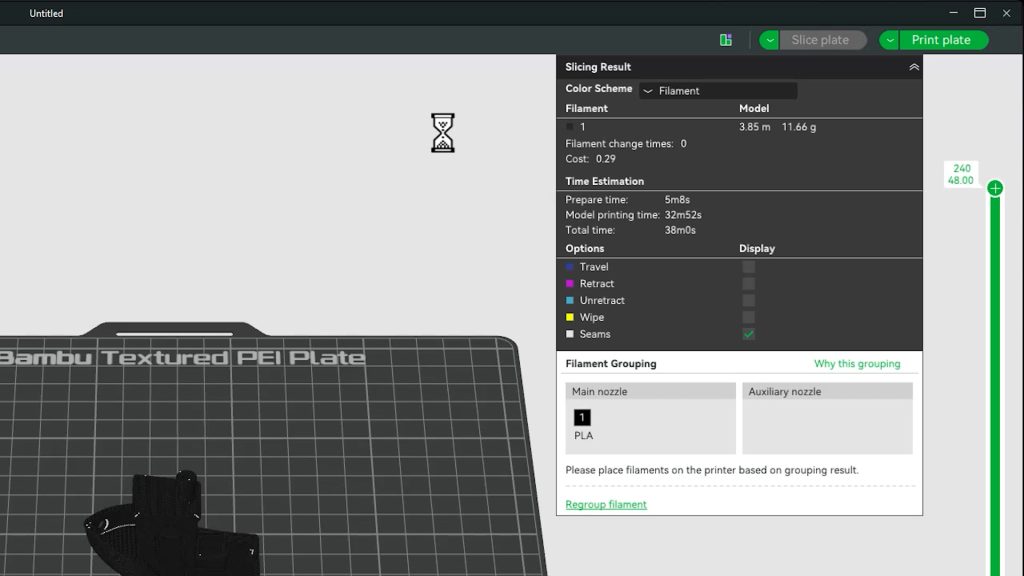
The 3DBenchy takes 38 minutes with the direct-drive left nozzle and 63 minutes with the auxiliary nozzle.
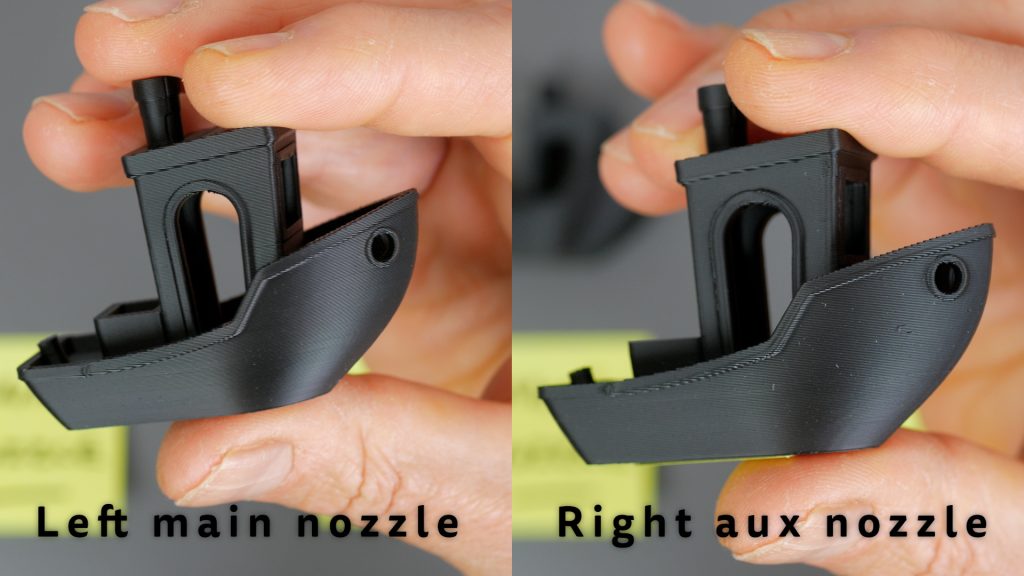
The quality is very slightly worse too, although you need to look quite closely to notice.
This auxiliary nozzle has probably attracted more criticism than any other feature of the X2D. Some people seem disappointed that Bambu didn’t use two identical direct-drive nozzles like on the H2D.
Personally, I don’t think it’s a big deal. Bambu is quite clear about what this nozzle is designed to do, and in my testing the compromises simply haven’t mattered very much. Yes, it’s not as fast and the quality is slightly lower, but for the small amount of support material or secondary colour you’re typically printing through this nozzle, neither has been a significant issue for me. Considering the lower cost and lighter toolhead compared to a full dual direct-drive system, I think it’s a sensible compromise.
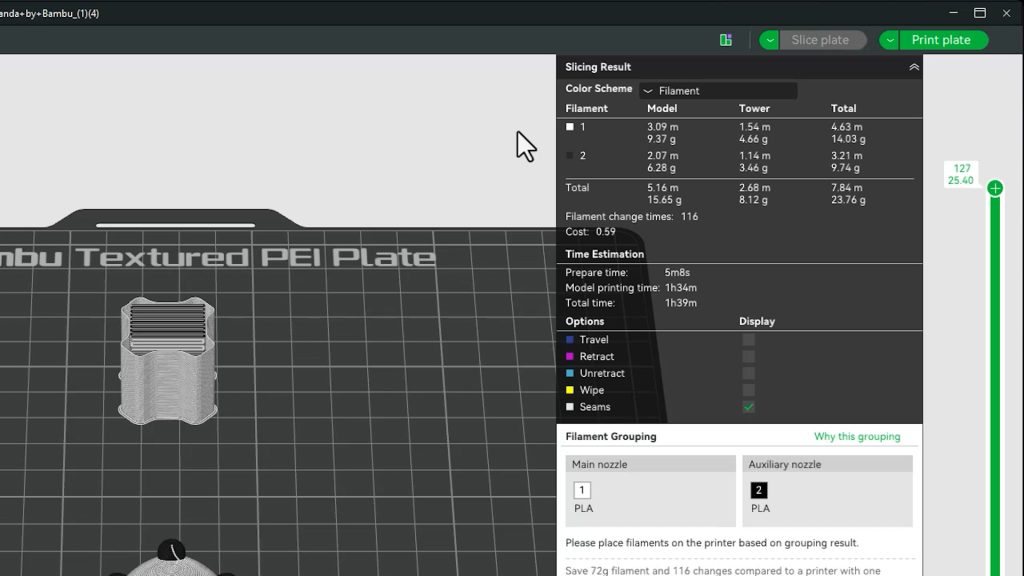
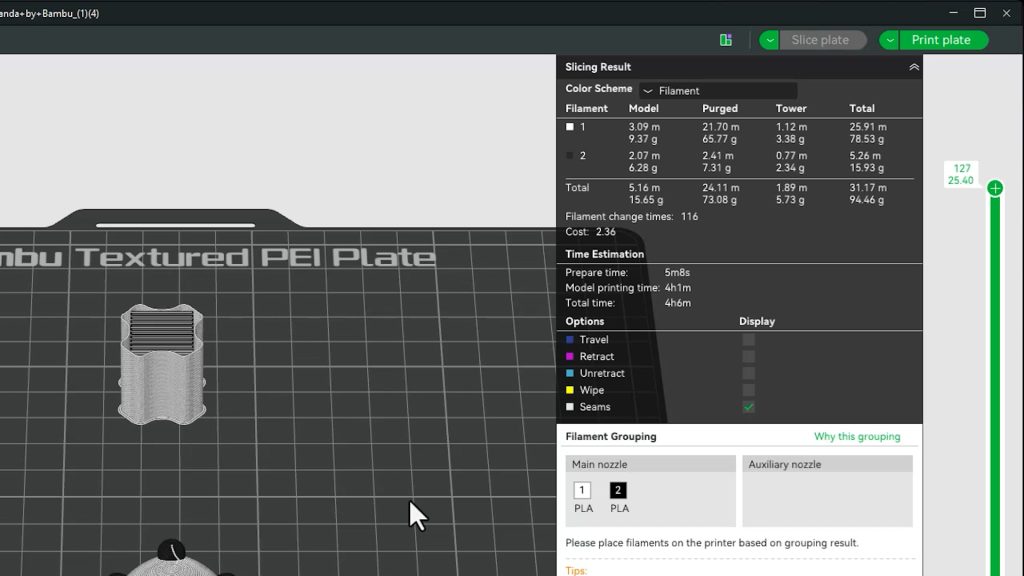
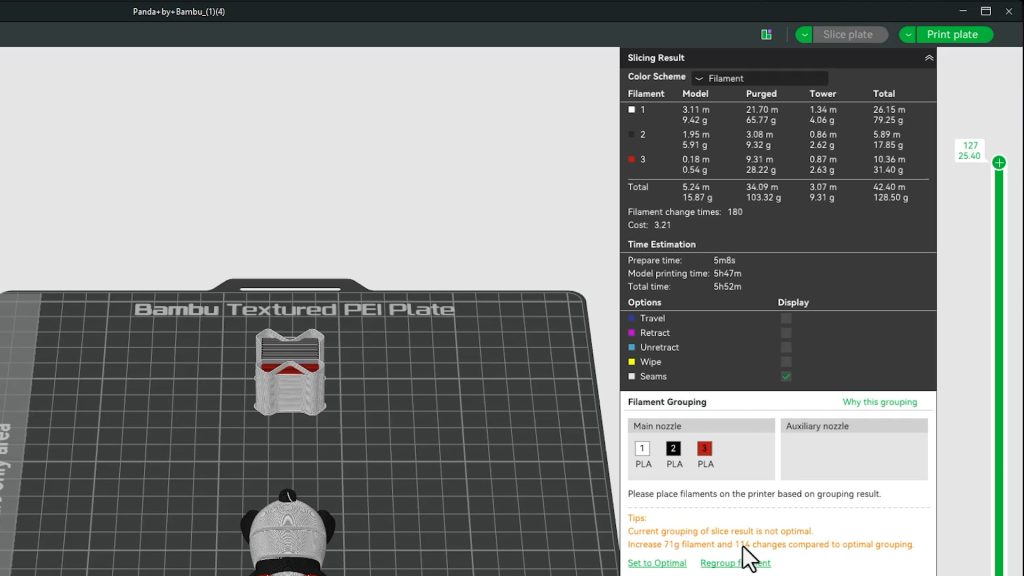
For example, this Bambu Panda takes 1 hour 39 minutes and uses 23 g of filament when printed using the auxiliary nozzle.
Force the X2D to use the AMS alone and the same print takes 4 hours 6 minutes and uses 94 g of filament.
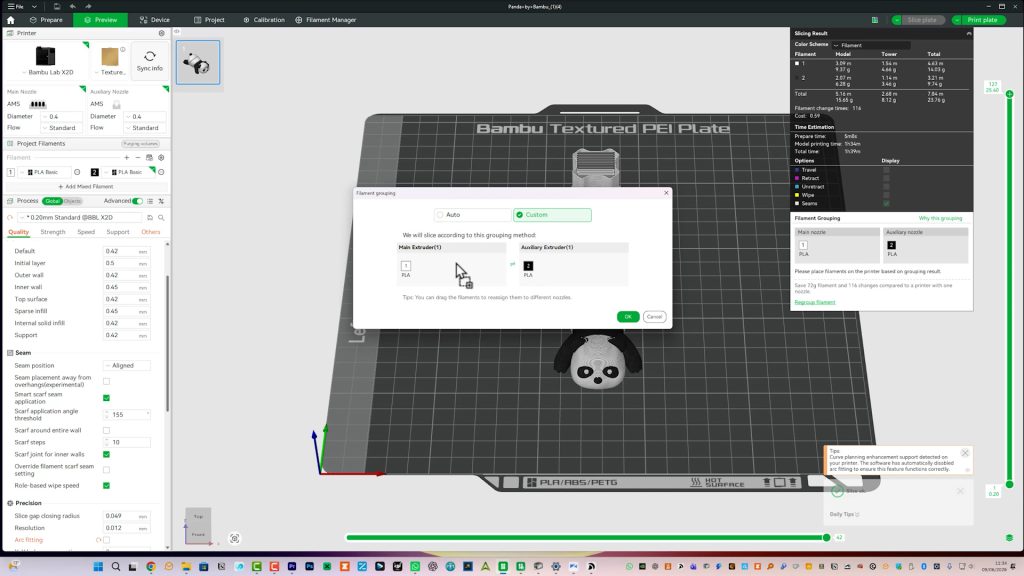
In Bambu Studio it will normally suggest the optimal filament assignment for each nozzle automatically.

But you can also drag filaments between nozzles manually, or simply choose Quality Mode if you want it to use only the left nozzle and AMS.
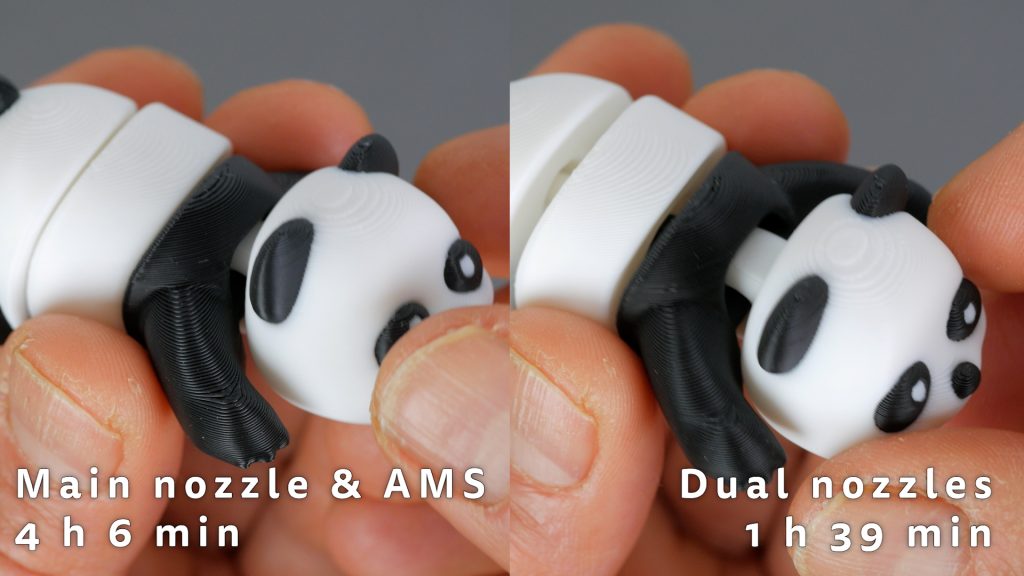
You can see how the two prints compare side by side.
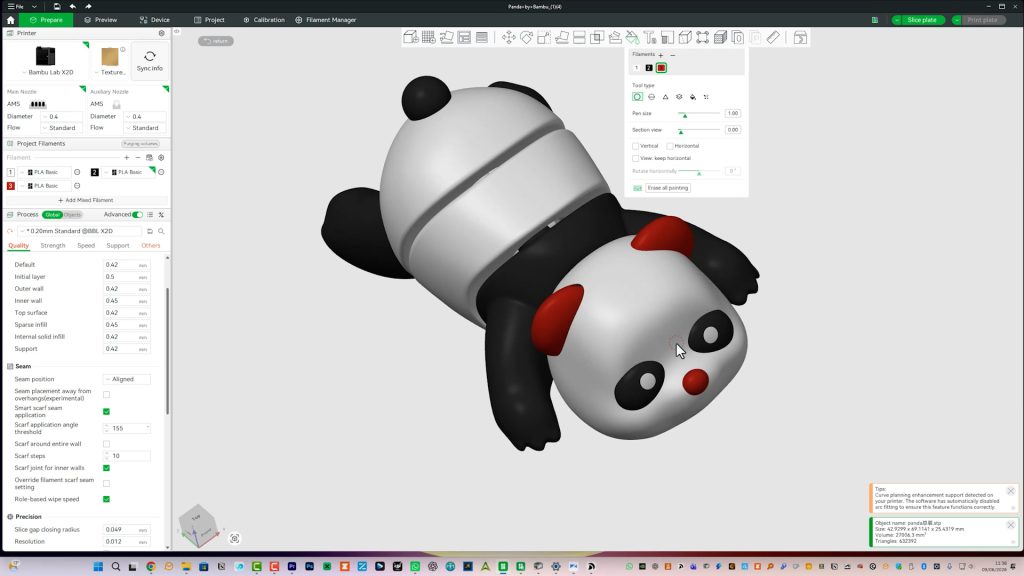
Even adding a third colour, by painting the Panda’s ears and nose red, you can save over two hours and around 70 g of filament using the auxiliary nozzle.
For the typical functional prints I do, I usually only need a second colour and often it’s just some text on a few layers, which is fast enough without a second nozzle.
This toolbox for the X2D’s accessories only saves 2 minutes and 1 g of filament using the second nozzle.
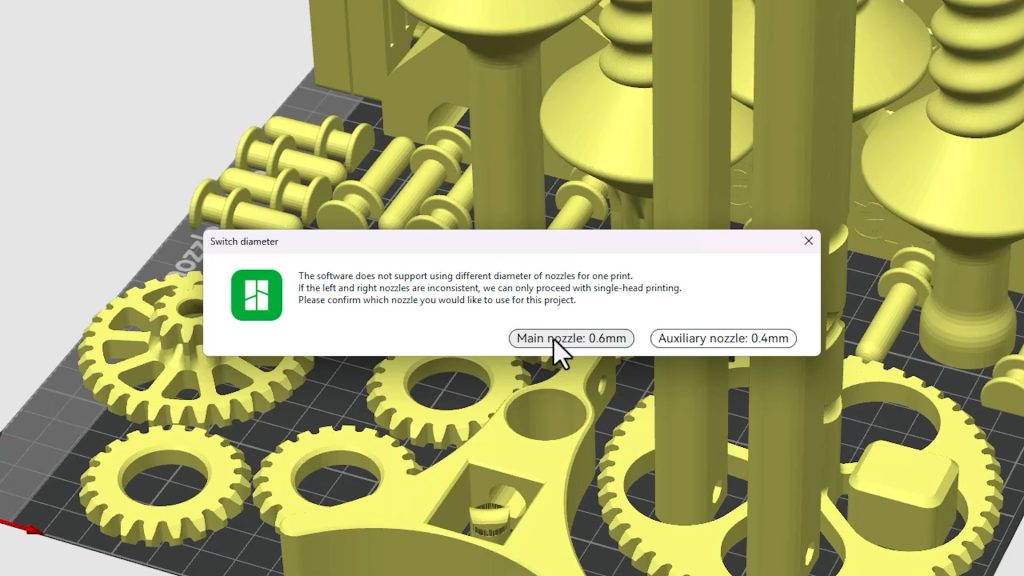
One slight annoyance is that you currently can’t mix nozzle sizes. If you switch to a 0.6 mm nozzle, you’ll need them in both hotends.
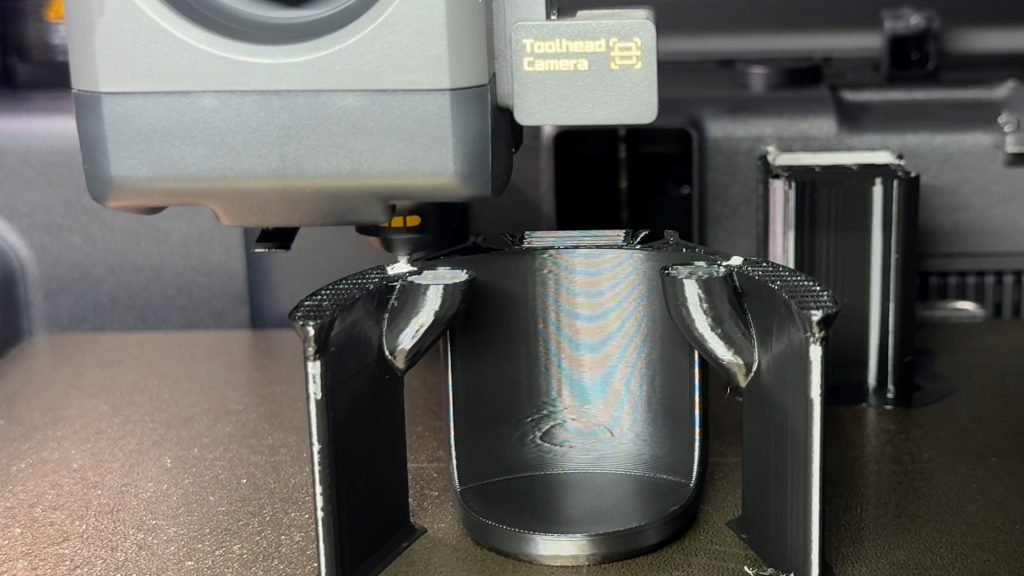
My main interest is using support materials in the second nozzle. Again, you could do this with just an AMS, but as well as being slow it’s even more wasteful since large purge volumes are required whenever it switches materials to prevent cross-contamination between the model and the support filament.
As an example, this bike storage container in Bambu PETG HF prints in 8 hours 9 minutes with the second nozzle printing Support for PLA/PETG, compared to 10 hours 33 minutes using just the AMS.
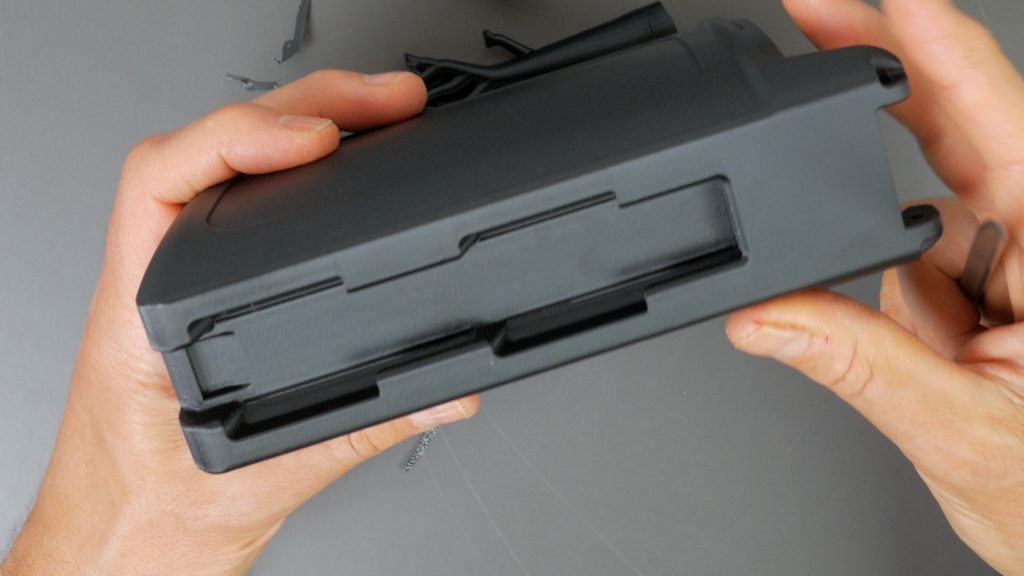
It also uses around 50 g less filament including around twice as much of the support material, which is by far the more expensive filament.
The supports come off incredibly easily and leave barely any scarring. You don’t need to use this special support filament either. PLA can be used as a support material for PETG and vice versa.
I’ll be covering support materials in much more detail in a follow-up article and video, including using Support for ABS. I’ve been experimenting using supports from different materials quite a lot, but it’s a little too detailed for this initial review.
Conclusions
Overall, I’ve been very impressed with the X2D. It’s the first 3D printer that’s genuinely excited me for quite some time. The features it offers at this price point are very impressive in my opinion, particularly the dual-nozzles and heated chamber.
Importantly, you don’t necessarily need to buy the printer bundled with the AMS 2 Pro to get many of those benefits.
Although I tested it with the AMS 2 Pro, I don’t think it’s essential for everyone. The dual-nozzle system is genuinely useful in its own right. Whether you’re printing with support materials or simply adding a second colour, it’s both faster and less wasteful than relying on an AMS alone. For many users, that may be all they need, and you could save a couple of hundred pounds.
That said, if your budget stretches to it, I’d still recommend the AMS. Having multiple colours and materials loaded and ready to go all the time, and being able to swap between them in seconds, together with the drying functionality, makes a huge difference to day-to-day use.
One thing I haven’t talked about much is print quality, although I’ve shown plenty of prints throughout this article and accompanying video so you can see for yourself.

Good print quality is almost a given these days with modern printers, and the X2D is no exception. It produces consistently excellent results.
I wouldn’t say it’s dramatically better than some of the other printers I’ve reviewed and owned. In fact, the Bambu A1 Mini produces prints that are at least as good, albeit on a smaller scale. And it’s unbelievable value.
Even my Creality K1 Max isn’t far behind in most situations and has the advantage of a larger build volume.
For me, the real advantage of the X2D isn’t the print quality itself. It’s the reliability, the ecosystem, the heated chamber, the dual-nozzle system and the overall user experience.
The Bambu Handy app is by far the best mobile app for 3D printing I’ve used. You can monitor your prints, configure print settings, and even send prints directly from their Makerworld platform when you’re away from home.
The standard 256 mm x 256 mm build volume has also been more than adequate for almost everything I’ve wanted to print.
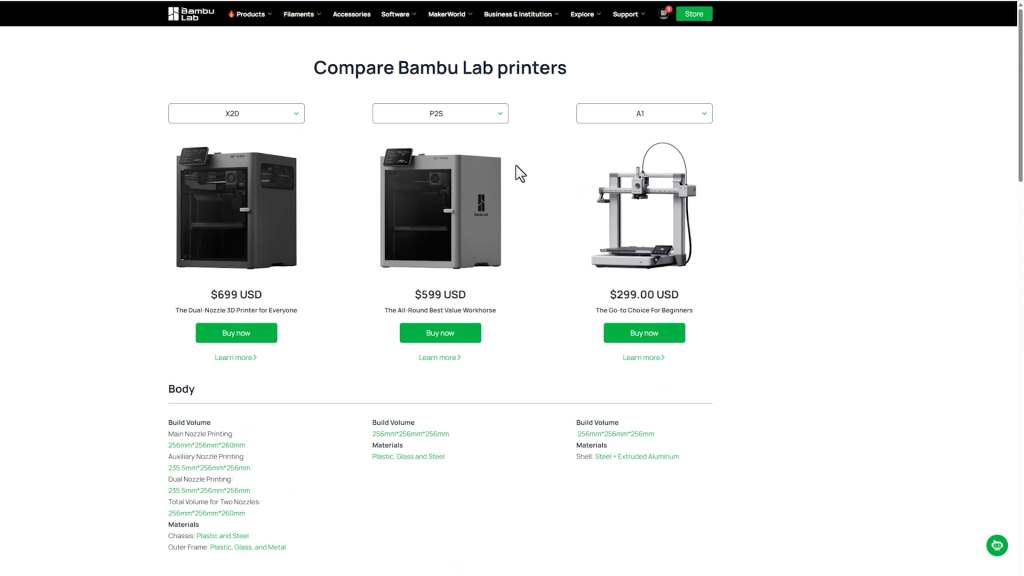
Bambu also has the A1, P1S and P2S with the same build volume. The P2S is the closest to the X2D and is currently only around £70 cheaper, while lacking both the dual-nozzle system and heated chamber. On paper that makes the X2D look like the obvious choice, but the simpler design of the P2S may still appeal if you don’t need those additional capabilities and would prefer a less complex machine. If you want something significantly cheaper, though, you’d need to look at the bargain A1 or the P1S.
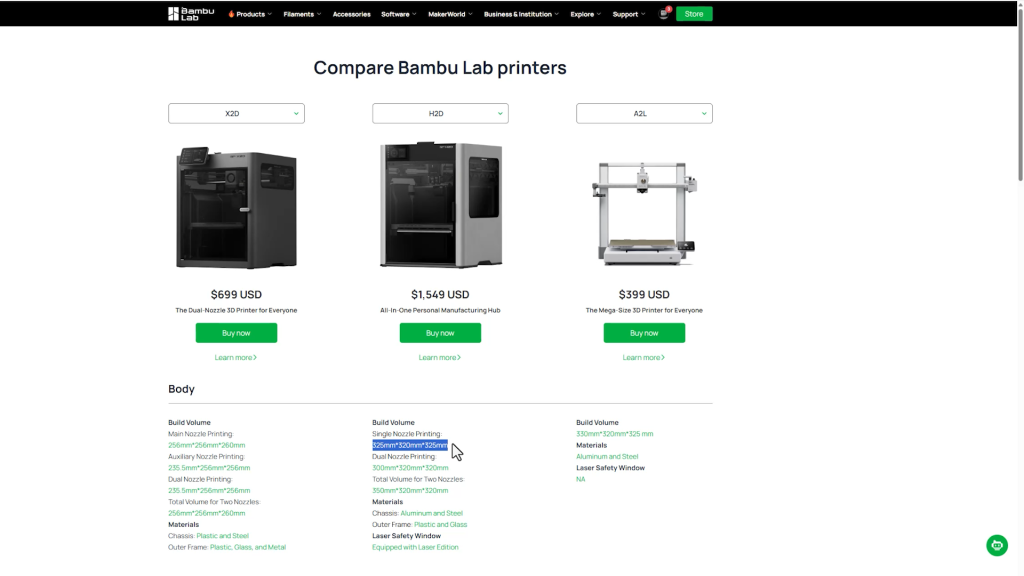
If you want bigger in Bambu’s line up and still want 2 nozzles you’ll have to jump up to the H2D which is over double the price. If you’re happy with one nozzle there’s the new A2L with the same build volume as the H2D.
I do still have some concerns about complexity and maintenance. The HMS warnings I encountered early on were straightforward enough to resolve once I understood what they meant, but the messages and support articles assume a certain level of knowledge.
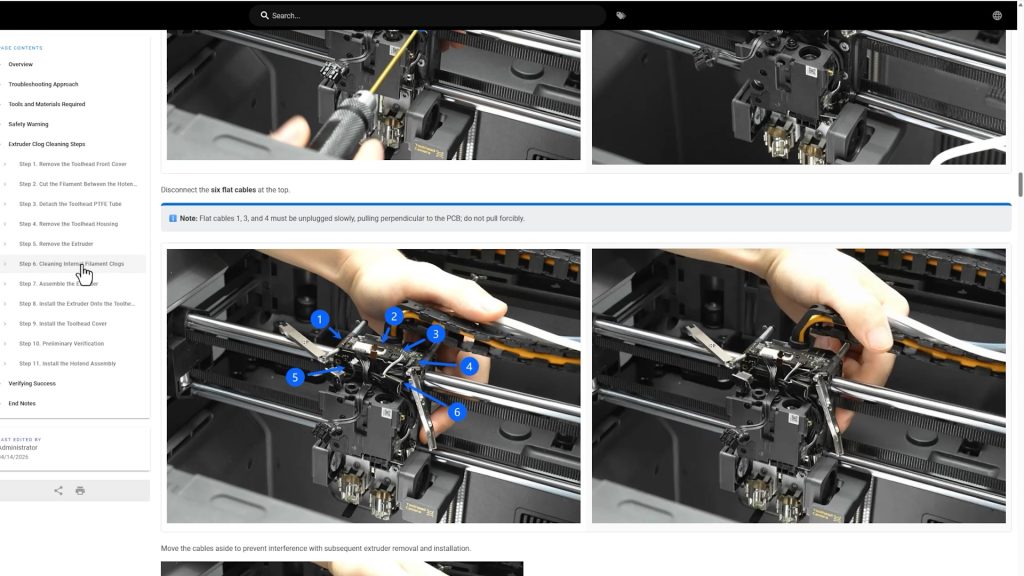
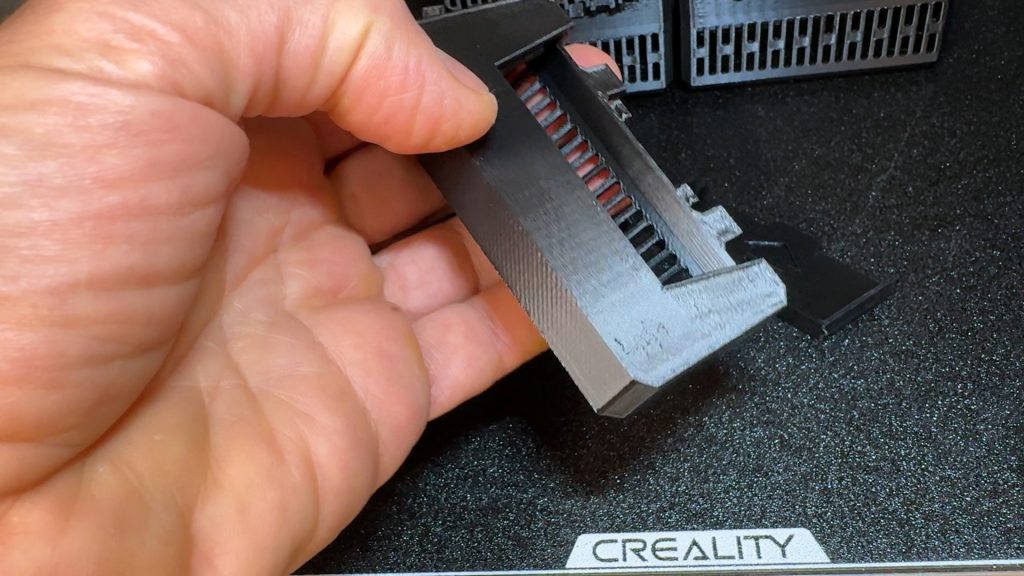
I also took a quick look at the extruder assembly while planning some further TPU testing. It looked surprisingly complex and a little intimidating, certainly more complex than any extruder assembly I’ve encountered on a printer I’ve tested before. I’m sure at some point I’ll end up having to take it apart, but it’s not a job I’m especially looking forward to.
From what I’ve seen, the simpler P2S looks far easier to maintain. The extra features of the X2D do add complexity, and that’s one reason it wouldn’t necessarily be my first recommendation for someone new to 3D printing. Despite how polished the overall experience is, this still feels like a machine aimed more at enthusiasts and experienced users than absolute beginners.
But if you print functional parts, want to work with engineering materials, or like the idea of dedicated support materials, the X2D is an easy choice. Despite a few reservations about complexity, it’s still the printer I’d buy again today.
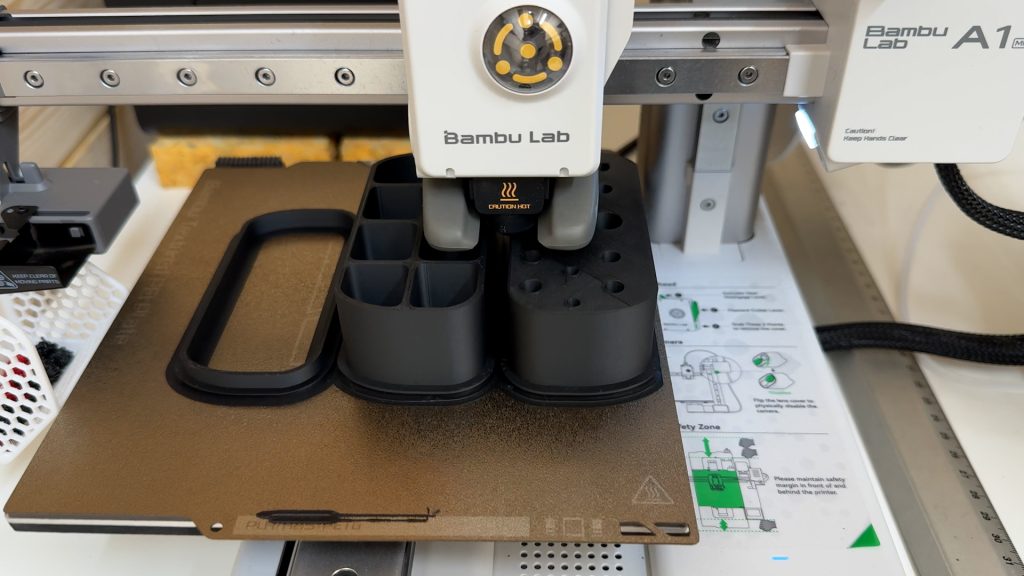
I’ve already done far more testing than I could fit into this review, and there’s still plenty more to cover. That includes printing more exotic materials such as Polycarbonate, PET-CF and nylon, along with softer TPU using the optional TPU module (photo below).
I’ll also be taking a closer look at support-material strategies, using the AMS HT with the second nozzle, and the optional filament track switch for routing filaments across both nozzles. I’ll have a link to the follow-up article and video soon.
Don’t forget to take a look at my YouTube video at the top of the page, and again please subscribe to my YouTube channel where I’m releasing videos every week on the latest technology and how to get the most out of it. If you tap the bell icon when you subscribe you’ll get a notification as soon as I release a video, and there’ll be a link to my site here for the written article. YouTube is also the best place to leave a comment. I read all of them and respond to as many as I can!
Purchase directly from Bambu Lab (non affiliate link):
Bambu X2D: http://bambulab.com
Leave a Reply