[Latest update (v1.0.60, 2023-04-20) adds webcam support and more]
The X3 is the latest 360° action camera from Insta360. These cameras capture everything around you in every direction and can provide quite unique third person views. The intention is you’ll use Insta360’s free software to reframe this 360° spherical video into a standard flat video that is simpler to view and share. Their editing apps are available on iOS, Android, PC and Mac and makes that whole process pretty straightforward.
I’ll help you decide if this is the right camera for you. I’ll look at some of its new features and offer some tips on how they can be used. I’ll discuss why you might want a 360° camera and look at other options available to you right now – both from Insta360 and GoPro. So let’s take a closer look.

Inside the box you get the camera itself, a soft pouch, a USB-A to USB-C charging cable, a lens cleaning cloth, a sticker and a brief quick start guide. There’s no selfie stick included – you will need one to use the camera in most cases. The soft pouch is useful but I wish Insta360 could figure out a way to incorporate an old-school retractable lens guard – a sort of eyelid that could cover either or both lenses to offer at least some protection. Every time you put the camera down you need to either slide the pouch back on or rest the lens carefully on something soft. It can stand upright on its base but it’s not stable.

The X3 is not a major upgrade on Insta360’s previous version, the One X2. The biggest difference by far is the much larger 58 mm rectangular LCD screen – compared to the tiny 26mm circular LCD screen on the X2. Even in bright conditions it’s usable and it’s nicely responsive.

There are also two new buttons. There’s the capture and power buttons as before. But beside the capture button is a dedicated lens button for switching between 360 and single lens mode which I’ll come back to, and a quick button for choosing custom presets.

So for example I shoot most of the time in standard 360° mode with mostly auto settings. I have this configured as a preset and before I start shooting I always make sure I’ve chosen this preset, in case I’ve changed shooting mode or messed around with manual settings – which might not be so obvious.
The lens button is configurable in Settings, but strangely the only other option is to duplicate the capture button. I’d prefer to have this button quickly select your favourite preset for example.

The X3 also has a slightly bigger 1800 mAh battery versus the X2’s 1630 mAh battery but the runtime is about the same – 81 minutes in 5.7K 30 fps video mode. These batteries aren’t interchangeable and if you purchased the fast charge hub for the X2 to charge multiple batteries quickly, you’ll need another fast charge hub for the X3’s larger batteries.
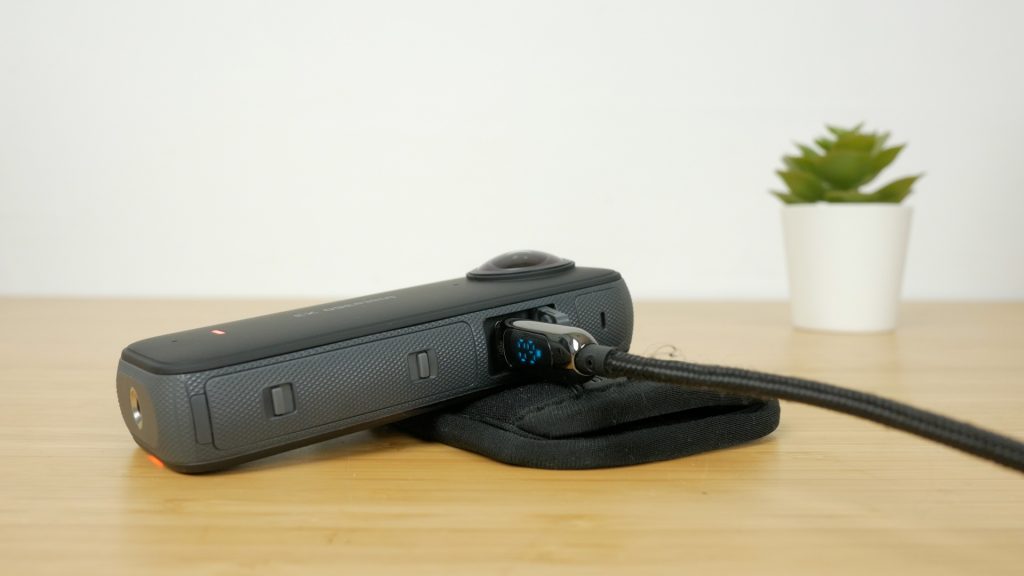
The USB-C charging port cover has also had a small upgrade – it’s now hinged. On the X2 it always got in the way.

Internally each lens has a new larger 1/2″ 48MP Quad Bayer sensor, compared to the X2’s 1/2.3” 12MP sensors. But you are still limited to capturing video at a maximum resolution and frame rate of 5.7K, 30 fps. The exact same resolution as not only the previous model, but the One X released 4 years ago!

And although 5.7K sounds like a decent resolution, once you extract a flat video from the 360° capture, typically you’ll have at best a 1080p video. This is not too bad, but if you start zooming in on your footage when editing, it can quickly look blurry.

But with the latest firmware just released, you do get a new 4K 60 fps and a slow motion 3K 100 fps mode. And they’ve also added a pre-record function that can capture 15 or 30 seconds before you hit the record button. A handy feature, if you can spare the battery.

Each fisheye lens captures just over half a spherical image which is stitched and blended together seamlessly in real time.
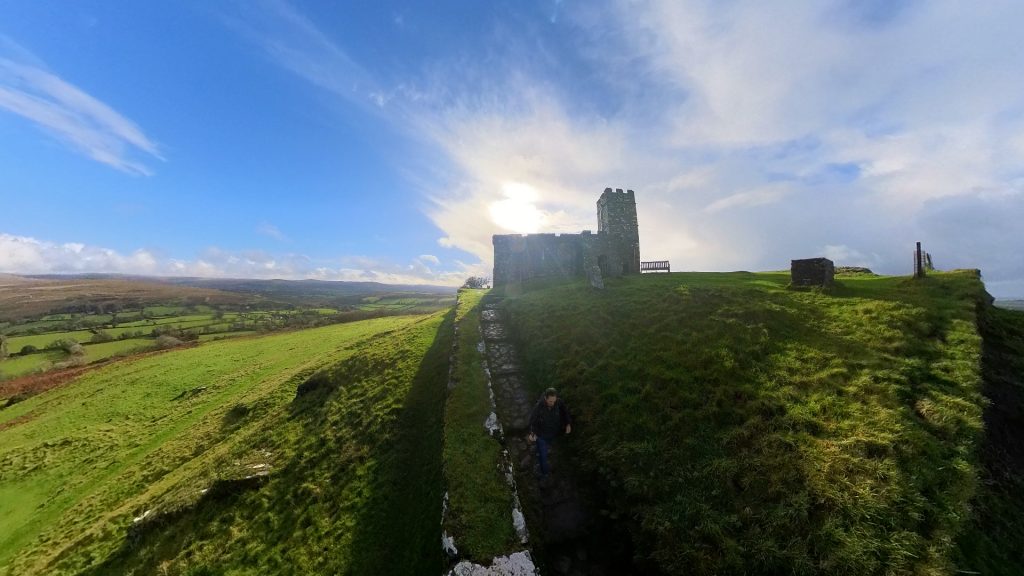
Anything in this stitch line disappears – for example the selfie stick, which is how you got those impressive third person shots that can look like they’ve been taken with a drone.
The computational challenge of this stitching process must be the limiting factor for higher resolutions, but I really hope we see a significant bump in resolution soon, with perhaps a beefier processor in whatever comes next.
There have been improvements to the single lens and photo modes though, which I’ll discuss shortly.

With the larger screen, sensors and battery inevitably the X3 is thicker and heavier than the X2. It measures 114 x 46 x 33.1mm (W x H x D) and is 3mm thicker than the X2 and almost 30g heavier at 178g. The extra weight is noticeable – especially on the end of a long selfie stick where it’s exaggerated. And the extra thickness makes stitching more of a challenge, although in practice I didn’t see much difference.

You’ll need to activate the X3 with the Insta360 smartphone app before you get started. If new firmware is available you’ll be prompted to update. I’d make sure you connect to the app first and activate the camera before updating the firmware to avoid any issues.

Although there are numerous modes and settings on these cameras – even more with this latest version, most of the time I use one of the two 360° video modes or the HDR photo mode.

For general use in good lighting the best option is Active HDR which improves the dynamic range, bringing out more detail in the highlights and shadows. In lower contrast scenes and when it’s not so bright, I stick to the standard video mode. I usually shoot in 5.7K at 25 fps or you can choose 30 fps depending on your region.

If you want to add any slow motion effects you can shoot at 3K 100 fps with the latest firmware albeit with a significant quality hit. Or 4K at up to 60 fps which you can at least slow down to a little better than half speed on a 25 fps timeline.
The large screen makes the X3 so much easier to use. If you hold your finger on the screen you can drag around the preview image in 3D space. Tap the little x to exit. The icon at the bottom right of the screen will flip the preview between the front and back lens. This is not to be confused with the physical lens button below which enables shooting with a single lens which I’ll discuss shortly. To change shooting mode you swipe the middle of the screen left or right or tap on the mode icon at the bottom left.

Swiping from the right edge of the screen lets you configure video or photo settings including the colour profile, white balance and exposure compensation. After plenty of experimentation I’d stick with Vivid mode and Auto white balance. The Isolated Exposure mode allows each lens to set its own exposure so the stitching may be more apparent. I find the X3 does an excellent job of setting the exposure most of the time in automatic mode, but if the lighting is very uneven and you know you’ll either be using the front or rear lens footage and can avoid the seams in your edit this might be an option. If you tap Manual you can also configure ISO and shutter speed.
Swiping from the left edge of the screen lets you review your footage, and you can drag around any 360 footage with your finger as it plays. The large screen makes this more than usable without having to get out your phone. I still use the accompanying app to review and obviously edit footage and it’s very useful for setting up 360° photos. But you’ll need it far less with the X3.
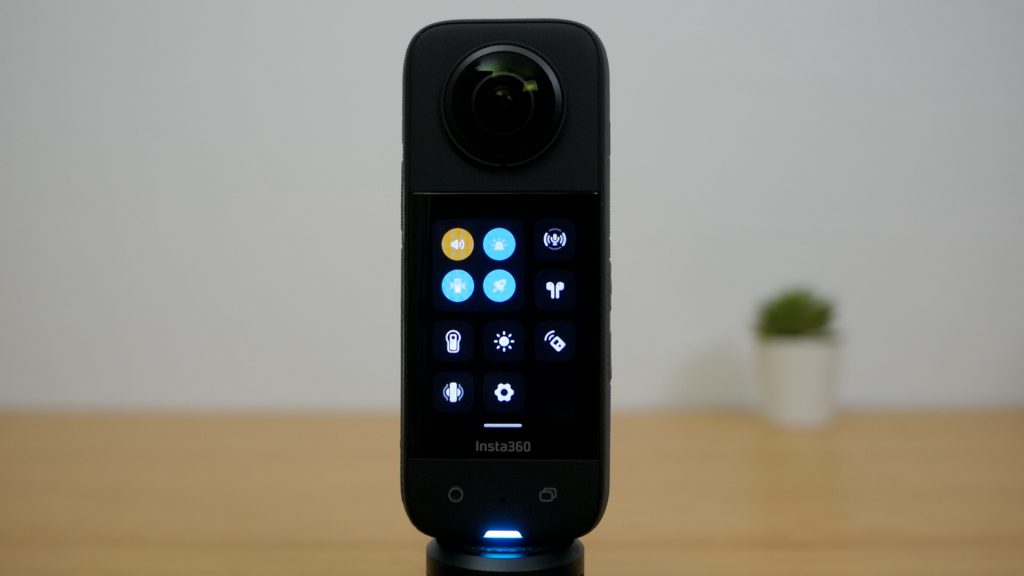
Drag down from the top edge of the screen to get to settings. I’d recommend turning on haptic feedback with the vibration icon. Quick capture is something I use a lot for mountain biking for instance to save battery. With it on, pressing the capture button with the camera off will turn on the camera and start recording. Pressing it again will stop recording and turn the camera off. It’s also worth choosing how the four microphones are set up. Most of the time you’ll want Wind Noise Reduction for action footage, and Stereo mode for general footage. Direction focus is useful if you’re uploading 360° footage and will adapt the sound to the direction of your playback. You can also use this option in Single Lens Mode. You can hear how the microphones sound in stereo mode in the accompanying video.

In settings check the bitrate is set to high and I’d recommend setting sharpness to medium. I find high and highest too aggressive.
I normally have voice control turned off since I don’t find it too reliable and as always make sure you format the SD card here in the camera before first use.
I mentioned briefly the quick button for recalling custom presets. I currently have just three presets for the modes I use most often. Standard 5.7K 25 fps video, Active HDR video again at 5.7K 25 fps for when it’s bright, and HDR Photo.

What’s great is you can access these presets and start recording without using the touch screen. If you have gloves on or muddy hands this is super useful. Press the quick button and then press the capture button to choose this preset and then again to start recording. Or you can repeatedly press the quick button to cycle through your presets and then again use the capture button to select the one you want.
I do find the buttons a little hard to press and only the capture button is slightly embossed to make it easier to locate. So it can sometimes take a little fumbling to feel for the right buttons.

360° video has to be processed in Insta360’s smartphone or desktop app. I’ve covered this in more detail in my review of the One RS – there’ll be a link on screen and down below if you’re interested. But basically you drag around the 360° video and tap on the + icon to add keyframes to change your camera view. So for example I could start with a video looking back at me riding down a trail, and then rotate the view to see the trail I’m riding or to see the view off to the side. When you’re done you tap export for a standard flat 1080p MP4 video.

But if you don’t want to have to use the app and just want to use the X3 like a GoPro, you can use the physical lens button to choose the front or rear lens, set your resolution and frame rate up to 4K, 30 fps and record directly to an MP4 file that doesn’t need any post processing in the app and can be used right away. Of course you will be losing the main benefit of a 360° camera, but it might make your workflow simpler.
At 3.6K and below you can shoot at up to 60fps but there’s still no true slow motion mode which is disappointing. This feature isn’t new to the X3, but the X2 had a maximum resolution of 1440p or 2.7K.

To test this single lens mode I had the camera mounted in a chest harness.

The footage looks good and the image stabilisation is excellent as I’ve come to expect from Insta360’s cameras.

There is a completely new mode on the X3 called Me mode. It’s only available under single lens mode, but it actually uses the bottom half of both lenses to capture selfie videos. The idea being you don’t need to do any keyframing, but unfortunately this still records a video for each lens in Insta360’s proprietary format that needs to be stitched together in their app. You need to ensure the camera is on a selfie stick and held generally horizontally so the bottom half of each lens points at your face or whatever you want in frame. Unfortunately you can only record at up to 1080p, 60 fps in this mode.

The resulting footage looks ok, but personally I’d never choose to use this mode. I guess it might be useful if the camera stitched the footage into a flat MP4 file that was ready to use. But since you need to use the app anyway it takes literally seconds to reframe yourself in the 360° video and tap the + icon to set a keyframe.
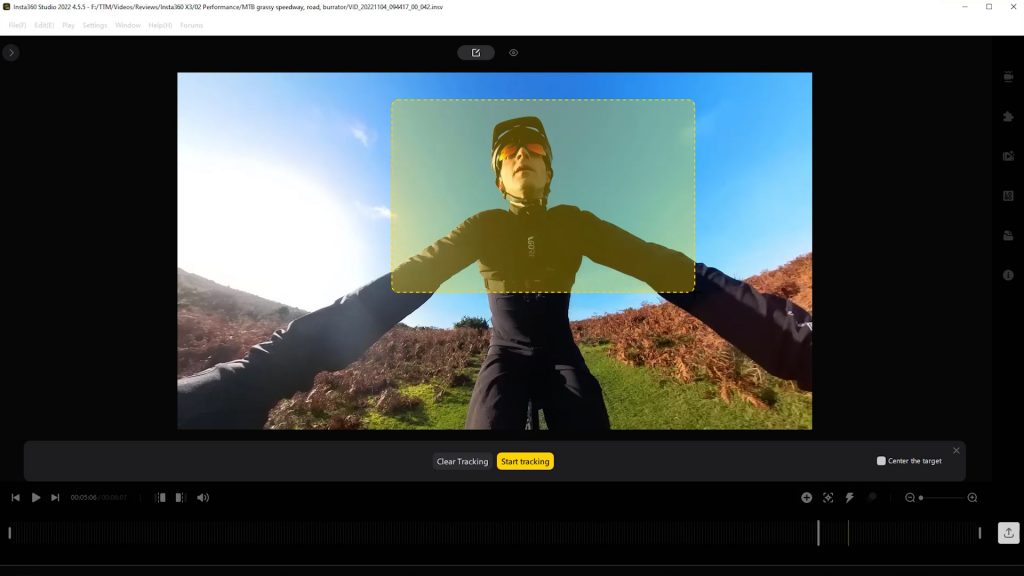
And there’s even intelligent tracking in the app to keep anything you like centred in the frame – not just yourself. You just draw a rectangle around what you want tracked and tap the track icon.
To me the whole point of a 360 degree camera like this is you don’t really need to think when you press the capture button. And being able to switch camera angles after the fact can make for far more interesting footage. Still I’m sure some will find it useful.

Finally, you can now capture photos at up to 72MP. Comparing the 72MP photo mode to the 18MP photo mode I couldn’t really see much difference in quality. Insta360 is using a Quad Bayer sensor which divides each pixel into 4 but you don’t actually get 4 times the detail of an 18MP sensor, and the files are much larger.

HDR photo mode is still 18MP but if there’s not too much movement in the scene I much prefer using this mode. It takes multiple photos with different exposures in quick succession and blends them together. And just like the X2 the X3 offers a huge amount of control – you can select up to 9 bracketed shots for a very high contrast scene. I generally get my best results with 3 shots, 2 stops apart.

There are loads more shooting modes and I won’t cover them all. But the Loop Recording could be useful, turning your X3 into a 360° dash cam. It’ll capture continuously and just record the last configurable 1 minute to 30 minute fixed segment.

Even with the slightly larger sensor, this is not a low light camera. Even filming on a cloudy morning just after sunrise, the footage looks very grainy. I didn’t notice much of an improvement over my X2 unfortunately. You’d need to step up to the RS 1-Inch 360° for better low light performance.
Coming back to my original question – who’s this camera for? I have all sorts of cameras including action cams, 360 cameras and a mirrorless camera with lots of lenses. And of course a very capable smartphone camera. But the One X2 and now the X3 does something none of my other cameras can do and in a very compact package that I can slip into my pocket. And therefore if I’m going to carry an additional camera as well as my smartphone, most of the time it’s this one. And cycling I occasionally take this instead of my smartphone, relying on my cellular watch for phone calls. Even with its pouch and a micro tripod it weighs less than my iPhone 13 Pro!

To get the most of it you do need to be prepared to do a little post processing. But Insta360 has put a lot of effort into developing their smartphone and desktop apps over the years. You can edit and export footage quickly without having to even download it to your smartphone or computer. And the smartphone app which is updated regularly has some fun and bizarre effects too. For instance the sky swap in Shot Lab under Stories actually does a pretty good job with some very abstract options (see photo above)!
If you get a camera like this, I’d get the biggest microSD card you can and leave at least your recent footage on this card so you can review, edit and share your footage as you like. I have a 512GB card in my camera but anything over 128GB would probably be sufficient. You do still need to make sure you back up regularly to your computer in case the card becomes corrupt for any reason.
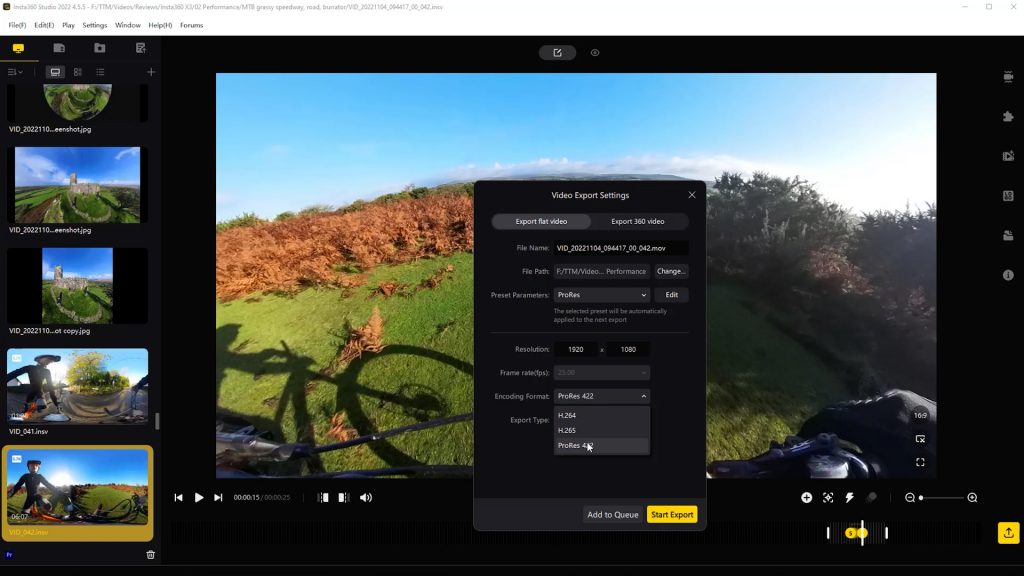
And having the footage on your PC or Mac lets you use the Insta360 Studio app which is more capable for more serious use with a few options you can’t do in the smartphone app, like exporting footage in high quality ProRes format which is more suitable for further editing. It’s worth mentioning that there’s no built-in storage which I would have liked to see – even a small amount. Just for those emergency situations where you’ve forgotten your memory card.
If you already have the Insta360 X2 I don’t see a big reason to upgrade to the X3. The screen is a massive improvement and I do really like the quick presets that I can select with buttons alone. But you’d have to look very closely to see any quality differences and it’s a little thicker and heavier. I wouldn’t upgrade just for the single lens modes. For the money, you’d be better off picking up a more robust GoPro – even an older second hand model that has a replaceable lens for single lens action footage.
The Insta360 ONE RS I reviewed recently is another option and is very versatile. Especially for travel where you’re not sure exactly what you’re going to need and want to carry as little as possible.
To confuse matters further Insta360 also recently released their prosumer modular ONE RS 1-Inch 360 with better low light performance and some compatibility with the One RS. But it’s a lot more expensive, heavier and bulkier and with only limited IPX3 weather proofing it’s not so suitable for action footage. The lenses on the X3 are still very exposed so you need to take care, but the body feels rugged and it’s waterproof to 10 metres.

Finally there’s GoPro’s 360 offering – the Max. This a perfectly capable camera, but it’s bulkier than the X3 and very likely to be refreshed soon – the current model was released 3 years ago. It will be very interesting to see what GoPro comes up with.
If you have any interest in photography and have never owned a 360 camera I’d highly recommend the Insta360 X3. It may not be a huge upgrade over the ONE X2 but in my view it’s the best option right now and a lot of fun.
Don’t forget to take a look at my YouTube video at the top of the page, and subscribe to my YouTube channel where I’m releasing videos every week on the latest technology and how to get the most out of it. If you tap the bell icon when you subscribe you’ll get a notification as soon as I release a video, and there’ll be a link to my site here for the written article. YouTube is also the best place to leave a comment. I read all of them and respond to as many as I can!
Insta360 X3: https://www.insta360.com/sal/x3?insrc=INRT7JX (you get a free selfie stick with this link!)
Or you can purchase on Amazon: https://amzn.to/3Glvn3O
Leave a Reply