The budget Ender 3 from Creality costs as little as £150 or $150, making it one of the cheapest 3D printers available. But it can produce prints that look like they’ve come off a printer at least four times its price.
I’ll start with a brief introduction to 3D printing, explaining how it works, how much consumables cost and what it can be used for.
I’ll then provide an overview of assembling the printer and getting your first print.
After printing almost non-stop with the printer since I got it, I’ll go over its strengths and weaknesses and briefly discuss a few free and cheap optional upgrade options. I’ll also discuss a few other models you might consider, depending on your budget.
3D printing for complete beginners

It seems quite mysterious until you see it in operation, but 3D printing is a fairly simple process. You load a roll of plastic filament into the printer. This is melted into a thin string of molten plastic by pushing it or extruding it through a hot nozzle very precisely onto a flat bed that can move backwards and forwards. The nozzle can move left and right and up and down and the plastic is built up in layers that melt together into your 3D model.
This is referred to as FDM or Fused Deposition Modeling 3D printing and is currently the most budget friendly, versatile option. There is also SLA or Stereolithography 3D printing which uses a liquid resin which is particularly good for small detailed models, but I won’t cover that in this video.

3D printing is a slow process with even quite small 3D models taking at least an hour to print and large models taking days. So even though the build size of the printer is often the headline feature, it’s worth considering how often you’d print anywhere approaching the maximum build size. The build size of the Ender 3 is 220mm x 220mm x 250mm. Printing a model even approaching this size could take over 4 days to print!
Apart from the electricity to run the printer which I’ll discuss later, the rolls of filament are the main cost and considering how much you need for an average print, are reasonably priced at around £22 or $22 for a 1kg roll. As an example, printing a case for my AirPods Pros costs around 25 pence or 25 cents in filament.

These cheaper models can only print one colour at a time, but you can change the filament in between layers manually if you were after a simple multicoloured model.

It can be difficult choosing a 3D printer, since apart from its build size which is easy to compare, many of the other listed features don’t make a lot of sense to begin with.

Theoretically the quality of the print is determined by the height of each layer which is effectively the resolution of the printer. But as you increase this resolution the print time increases proportionally, so it’s a trade off.

By default in PrusaSlicer, the Ender 3 can print in detail mode at a 0.12mm layer height, normal mode at 0.2mm, or draft mode at 0.24mm. But a print in detail mode will take approximately twice as long as a in draft mode, since it has to put down twice as many layers.
To confuse matters slightly, you can fit different size nozzles on your 3D printer if you want to print either with finer details with a smaller nozzle, or faster with a larger nozzle. By default you get a 0.4mm nozzle with most printers including the Ender 3.

There’s also print speed which is measured in mm/s, but it’s unlikely you’ll be printing anywhere near their maximum speeds. The Ender 3 can print up to 180mm/s but you’ll generally be printing closer to 50mm/s.
More expensive printers can print a little quicker, but the difference isn’t huge with the more affordable 3D printers at least.

The Ender 3 also comes with a heated print bed, which allows it to print a wider range of materials. It helps the molten plastic stick to the bed, stops larger prints from warping and also makes it easier to remove finished parts.
The main feature the Ender 3 is lacking, is an auto-levelling bed which ensures the bed is exactly the same distance from the nozzle over its whole service. This is important for ensuring your first layer adheres evenly to the bed.

You need to manually level the bed on the Ender 3, but it’s a pretty easy task and doesn’t need to be done every print. I’ll come back to this later.
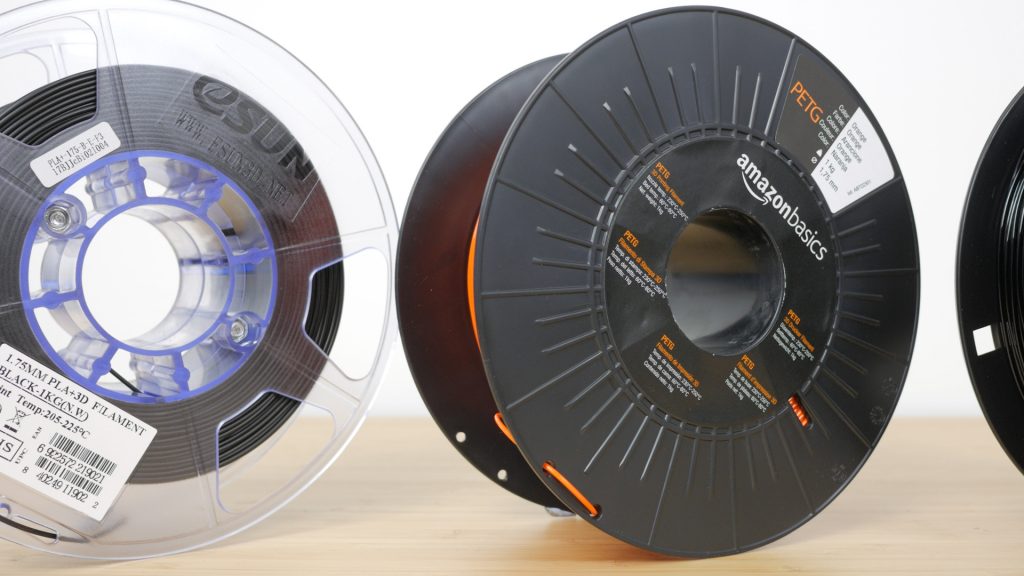
Probably the most confusing part of 3D printing is the array of plastics you can print with, which all have different properties. The most popular plastic by far is PLA, a biodegradable plastic which is easy to print, fairly cheap, looks good and is strong. It is a little brittle and not particularly heat resistant – its glass transition point where it can start to warp is only 60C. If you need something with a slightly higher glass transition point of around 80C, there’s PETG which is also more ductile. There are many other materials, but I’d start with these two, which can both be handled by the Ender 3. Without modifications the Ender 3 can’t handle higher temperature tougher plastics like Nylon.

It’s pretty limitless what you can print on a 3D printer. To get started, you can visit a site like Thingerverse which has thousands of free models you can download and print. Whether it’s a part for your campervan, a knob for your oven, a smartphone holder, a face mask or a mini Yoda – the chances are someone’s already designed it.

You simply download the model which has an STL extension and load into a piece of software called a slicer. This converts it into something the printer understands. This sounds tricky but in most cases, it’s a simple case of choosing the type of filament you’re printing to and deciding at what level of detail you want to print at.
The resulting Gcode file is a text file that basically tells the printer what temperature the nozzle and bed need to heat up to, how much plastic to extrude and all the X, Y and Z coordinates it needs to move to as it squeezes out the melted plastic.
If you really want to make the most of your 3D printer it might be worth spending a little time learning some 3D modelling software so you can design and print off anything you want.
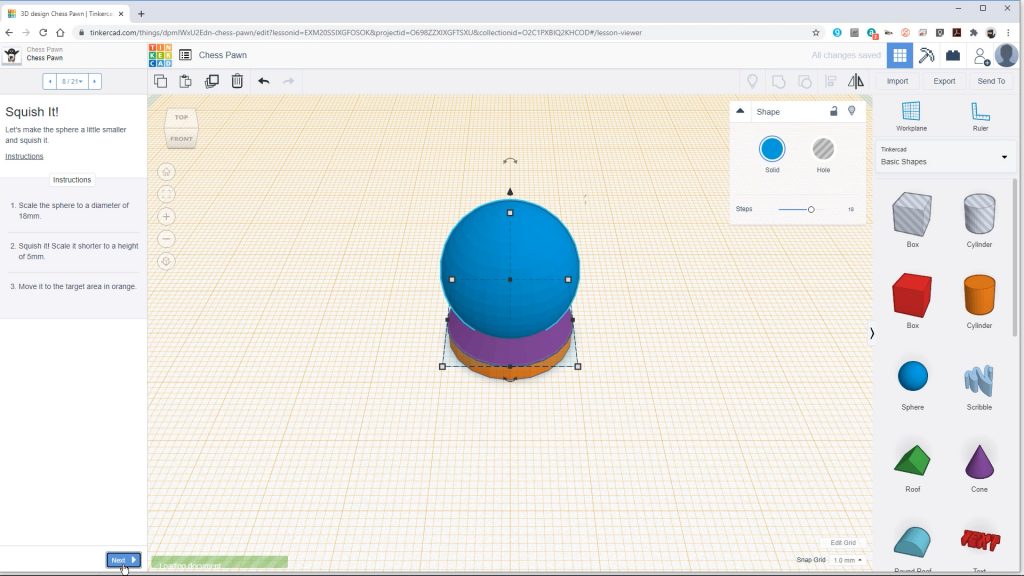
The free web based Tinkercad is a great place to start and is very easy to use. It’s fairly basic but you can still create simple 3D designs and send them straight to your printer which is hugely satisfying.

If you have a little more time to invest, Fusion 360 is still free for personal use and is more powerful. And if you have an iPad and an Apple Pencil, Shapr3D is a great program and free if you’re a student or teacher, but pricey otherwise.
Creality Ender 3 overview

The Ender 3 comes very well packaged with dense foam holding all the parts in place.
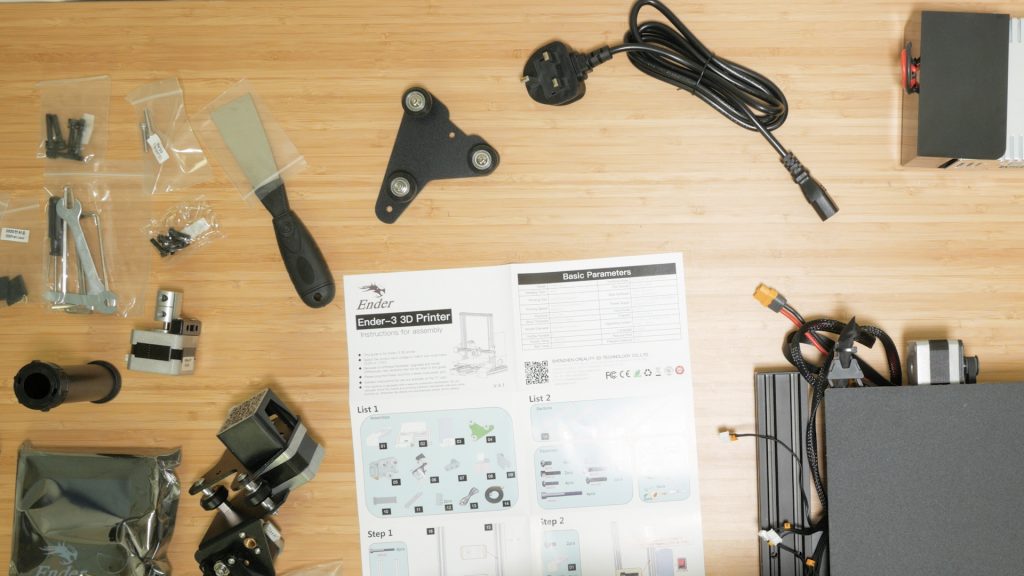
Creality very optimistically describe the printer as partially assembled requiring only 10 minutes to put together. But as you remove all the parts from the box it does look quite daunting.

You do get everything you need, including a bunch of tools and accessories. You don’t really need anything else to get the machine assembled and printing your first model, although I’d recommend having an engineer’s square or something similar to hand.

There’s a large double sided pictorial assembly guide which also lists all the parts. It’s worth checking you have everything, which will at least familiarise you with what’s what.
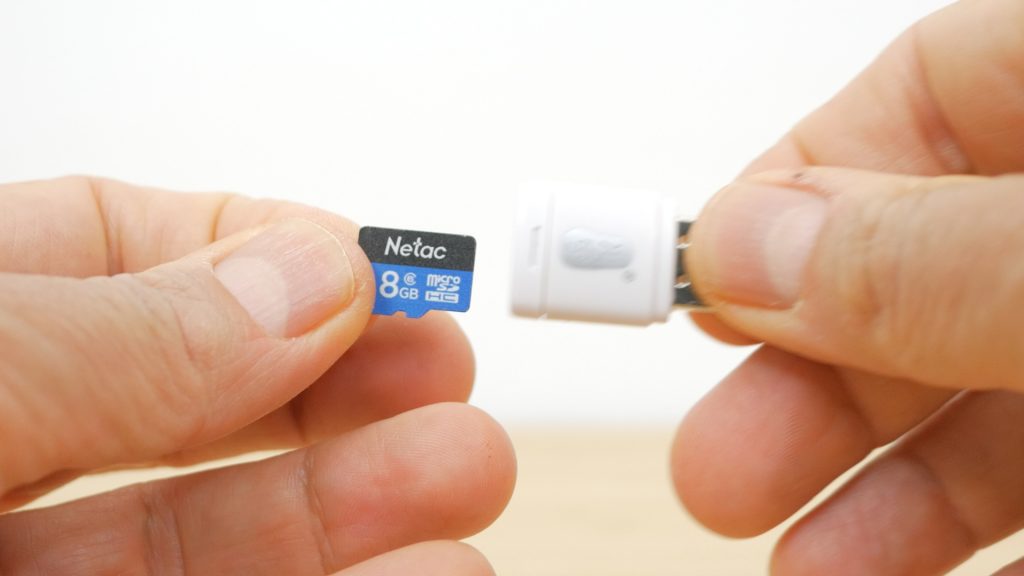
It’s worth taking a look at the contents of the included 8GB microSD card which comes with a USB card reader, before you get started. As well as a clearer PDF version of this assembly guide, there’s also a manual which labels the printer parts and describes basic operation, something missing from the printed poster.

But the most useful file is a 3D animation of the printer assembly. You’ll have to pause it at each step but it’s a great addition to the printed guide.
I’m not going to go through the detailed assembly of the printer but I will point out a few things to watch out for so hopefully together with the printed guide and animation you should have the printer assembled in one to two hours, depending on your experience. It’s worth taking your time so you avoid any problems later.

Before you attach the power supply, make sure you check the switch is in the correct position for your country. This was already set as 230V here in the UK. But in the US at least make sure it’s set to 115V.

Before you tighten the uprights, it’s worth taking a moment to check they are square, ideally with an engineer’s square or similar.

If you find the rollers tight or loose on the horizontal or vertical rails, try adjusting the eccentric nut until they are just right.

When you install the belt, make sure it’s the correct way around with the ridges facing the gear teeth and be sure to tension it sufficiently, using the already fitted belt underneath the bed for reference.
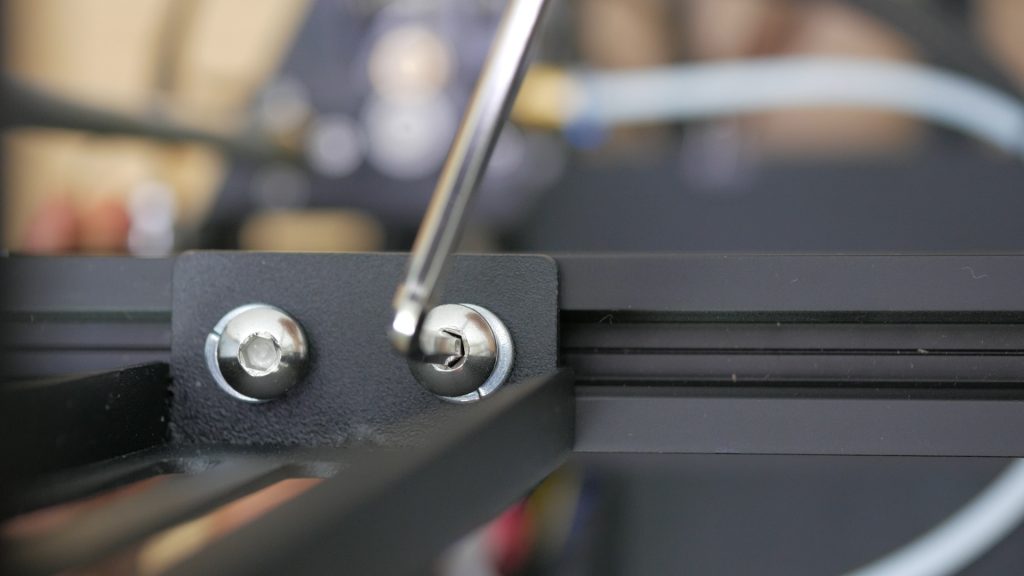
Attaching the spool holder requires a couple of spring washers which are included, but I didn’t see this mentioned anywhere. Otherwise the bolts will bottom out and not hold the spool holder securely.

The last step is connecting all the cables including the power supply, but they are all clearly labelled – just make sure you don’t miss any!

Before you turn it on make sure everything slides smoothly, and there are no cables that will be in the way when everything starts moving back and forth..

Also when attaching the build mat with the small bulldog clips, make sure they are at the front and back with their arms flipped backwards. If you have them on the sides they’ll get in the way.

Turn the printer on, click on the control wheel, scroll down to Prepare, then scroll down and click on Auto Home.

With any luck this will move the print head to the home position at the front left of the build plate.
Next we need to level the bed. Usually you want to do this with the filament loaded and the nozzle heated up, since you’ll often have some plastic stuck on the end of the nozzle which will mess up the levelling. This will be rubbed off when the nozzle is hot.
But since we’ve not loaded any filament yet, turn the printer off.
Now manually pulling the build plate back and forth and moving the head left and right we can move the head around to set the nozzle the same distance from the bed in the four corners and centre. Don’t move the head and table too quickly – there’s a small chance the resulting voltage generated by the motors might damage the electronics.

The large rotating knobs underneath each corner adjust the level. The first time you do this it might take a few attempts, but try and get it as close as possible. It will only take minor tweaks next time you need to level the bed.
There are arrows on the knobs to show which way you need to rotate them to move the bed up or down, but they are hard to see. As you look down at the bed from above, rotating each knob clockwise raises the bed and anti-clockwise lowers the bed. Once you’ve got that, it’s easy.

Move the nozzle over each corner, just above the levelling knob and slide a piece of printer paper underneath the nozzle. Rotate the knob so that it scratches the paper in each position. If it’s not rubbing, turn the knob clockwise to raise the corner, if the paper’s too tight or doesn’t slide underneath the nozzle, turn the knob anti-clockwise to lower the bed.
Ideally you should be able to pull the paper from underneath the nozzle, but if you push the paper it will curl up.

Finally move the head to the centre of the bed and check the nozzle still just touches the paper. If the nozzle is too far away turn each corner knob the same small amount clockwise. If the paper is too tight, turn each corner’s knob anti-clockwise.
You’ll need to go around at least one more time, probably more for this initial procedure. Get it as close as you can but I’d recommend doing it once more when the filament is loaded and the bed is heated up.

Now you’re ready to print your first model. I’d highly recommend using PLA until you get the hang of the printer. You can use the small sample provided or preferably a 1kg roll you’ve purchased separately. There’s loads to choose from but I’ve had very good results from eSun and AmazonBasics. I’ll provide links down below to the exact filament I’m using.

Turn the printer back on and scroll down to Prepare again. Now scroll down a page to Preheat PLA, and then again choose Preheat PLA which will heat up both the nozzle and the bed to 185°C and 45°C respectively.
You’ll see the set temperature and actual temperature displayed as it heats up. When the nozzle is up to temperature, you can load the filament.

Place the spool on the spool holder so the filament comes over the top and down to the extruder. This has a metal gear that slowly rotates pushing or extruding the filament through the white PTFE tube and down into the hot end which melts the plastic before it’s forced out the nozzle. This extruder is sometimes called the cold end. On some printers the extruder is right next to the hot end – what’s called a direct drive system.
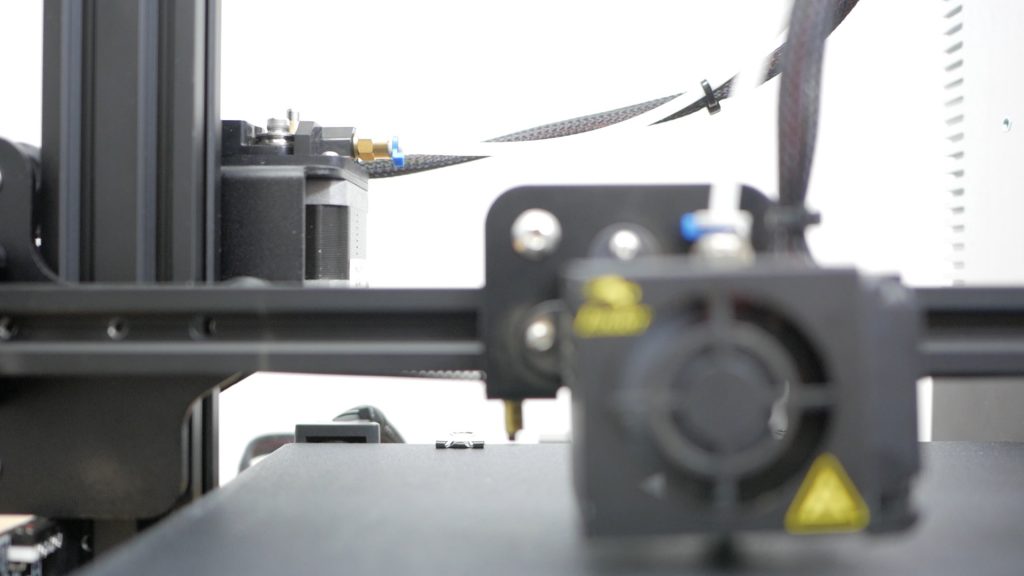
In the Ender’s so-called Bowden setup they are separated with the PTFE tube. The advantage is the moving head is lighter which should provide less vibration and therefore better quality, at least on a cheaper perhaps less stable machine. The disadvantage is pushing the filament through this additional length of tubing means they can’t generally cope with the wider range of plastics a direct drive system can.

It’s useful to trim the end of the filament at an angle with the supplied side cutters.

Then push it into the extruder whilst squeezing the extruder lever. It needs to pass through the geared wheel and through the other side into the PTFE tubing.
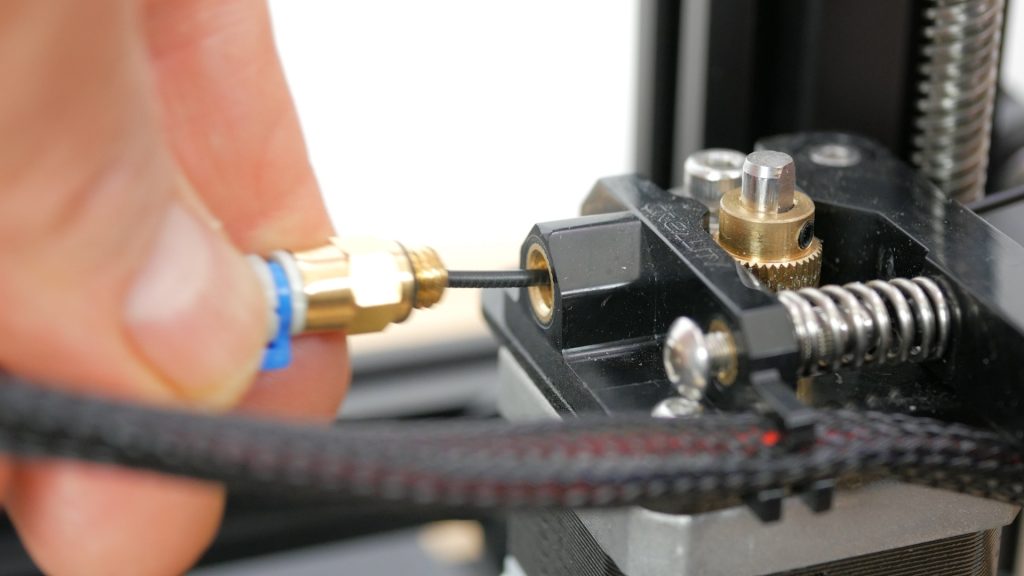
It might take a few attempts. I find it easier to bend the end slightly, away from the geared wheel. It’s also useful sometimes to unscrew the coupling from the extruder until you have around 20mm out the other side. Then push the coupling and PTFE tube over the filament and screw it back on – it only needs to be hand tightened.

Still squeezing the extruder lever, keep pushing the filament through the PTFE tubing until it arrives at the hotend and starts melting out of the nozzle.

You can now send your first print. Creality provide a few already sliced files on the microSD card which are ready to print. The dog model will take around 2.5 hours.
Alternatively, find something more useful on Thingiverse. I found a cable clip which will print quickly.

Download the STL file which we are going to load into our slicing software.
Insert the supplied microSD card into its USB dongle and into a USB port on your computer.
To keep things simple we’re going to use the software that comes with the printer which is often overlooked. It’s easy to use and gives decent results out of the box since it’s already set up for Creality’s own machines. Creality Slicer is a simplified version of Cura which is probably the most popular slicing software but can be a little overwhelming. They don’t include a version for Macs though so if you’re on a Mac I’d suggest installing PrusaSlicer which is what I use, or Cura. Both programs support the Ender 3.

After installing Creality Slicer select Creality Ender 3 from the available machines. Load the downloaded STL file which will be placed in the middle of the bed. You can rotate around the bed in 3D space with the right mouse button, and zoom in and out with the scroll wheel.
Choose Common PLA as the material and then choose the resolution or layer thickness.
If you’re printing this cable clip, the default Normal 0.15mm will print in around 43 minutes. Or Fast 0.2mm will print in 30 mins.

A simple model like this prints fine in fast mode if you’re in a rush and just want to get your first print finished!

Save the Gcode file to your microSD card. Carefully insert the card into the printer, and click the dial, and choose Print from TF.

You may have to initialise the card first – this doesn’t delete anything. Choose the file you created.

If you’ve never seen a 3D printer in action, the whole process is completely mesmerizing.
A nice feature the Ender 3 has, is if the power is lost in the middle of a print, it can resume from exactly where it left off when power returns.
Print quality and performance

My first test was using the supplied Creality Slicer software to print the same cable clip at 0.1mm High Quality, 0.15mm Normal Quality and 0.2mm Fast Quality. I also tried 0.24mm and 0.3mm layer height. For the 0.3mm print, I did reduce the print speed slightly to 60mm/s but it still printed in just under 23 minutes, almost exactly half the time it took at normal quality.
I used eSun PLA+ which I’ve had excellent results with. PLA+ is just PLA with some additional manufacturer specific additives which supposedly improves its properties.

The results looked very good for all the prints. You can just about tell the difference if you look closely, but they all came out clean with just some minor artifacts from the slicing software. The print at 0.1mm was still going after nearly two hours when I stopped the print early, but you can barely see the layers.

If you’re going to use the Creality Slicer I would recommend changing one setting if you’re printing smaller objects like this. When a print starts, by default most slicing software will print what’s called a Skirt around the object, effectively to prime the nozzle and ensure you’re getting a good flow of plastic when the print starts.

Go into Expert | Switch to Full settings, say yes to the prompt and under Support | Platform adhesion type, click on the 3 dots and change the Line count to at least 2.
For most of my other test prints, I used the free PrusaSlicer, since it’s a more capable piece of software and also supports the Ender 3.

I used the Generic PLA for the eSun PLA+ filament but changed the temperature in Filament Settings to print at 205°C with the first layer at 215°C. I also changed the bed temperature to 60°C.

I got even better results using PrusaSlicer with no slicing artifacts, but by default the prints do take longer since the print speeds are a little more conservative. PrusaSlicer also uses the so-called magic numbers for the layer heights, which are a multiple of 0.04mm, based on how the stepper motors that drive the machine and in particular the Z height axis, work.

I printed the little Marvin test figure which is only slightly bigger than my thumb fingernail. Because of its size, I printed it at higher quality with a 0.12mm layer height. As you can see the quality is exceptional for what is quite a difficult test print.

I then printed probably the most popular test print – the 3D Benchy. I printed it at the recommended settings with a 0.2mm layer height. The results were excellent with barely any noticeable flaws. And this is another challenging print.

I also printed countless other items and they all came out well, with clean results and almost no stringing, which are wisps of filament that continue to ooze out as the print head moves.
I moved on to testing the printer with other materials. I tried AmazonBasics PETG in bright orange. PETG is a little less brittle than PLA and can also handle higher temperatures. It does have to be printed at slightly higher temperatures, but well within the maximum 255°C of this printer.
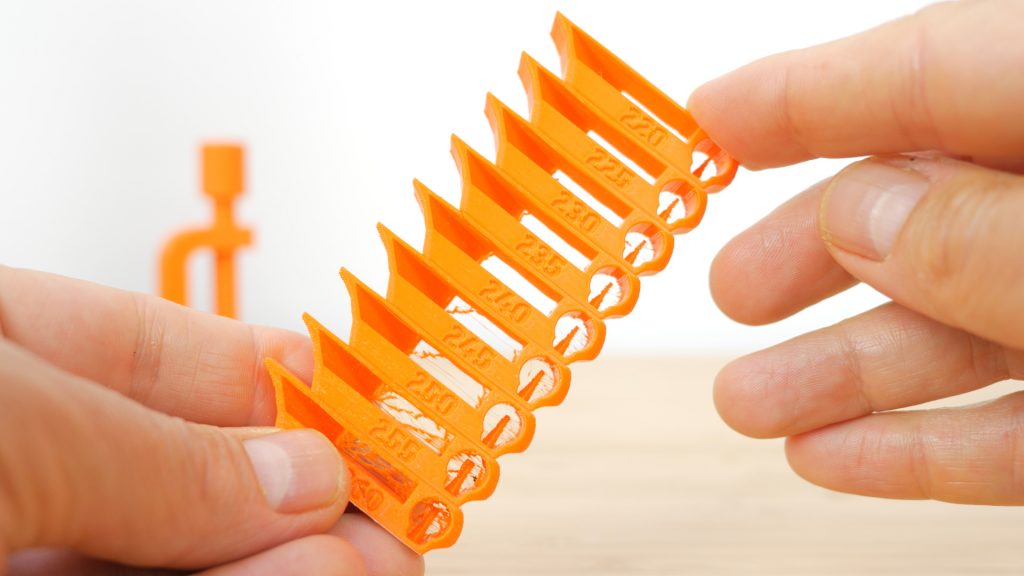
If you’re using any new filament, I’d highly recommend printing a temperature tower, which is a test print with each section printed at progressively lower temperatures. I’ll provide a link in the description. You can then look at the results and choose the perfect temperature for your filament and printer combination.
You want to pick the temperature where the quality looks best with the least amount of stringing.

I found I could go right down to 230°C with the Amazon PETG for the cleanest results, but I print the first layer at 240°C to make sure it adheres well to the bed.

I did have a few issues with PETG releasing from the bed prematurely. This is often a sign the bed isn’t quite level but mine was. After some experimentation, I found scrubbing the removable build plate with washing up liquid and a scouring brush fixed the issue.

It’s recommended to use some IPA alcohol to clean the bed of oily fingerprints which I do regularly, but it seems printing PLA before PETG might have contaminated the bed somewhat, making the PETG struggle to get a strong bond.

After this minor issue, I got good results with PETG. The results don’t look as clean as with the PLA. Even tweaking settings, there is some stringing and small minor imperfections on more complex prints and I did find large prints warped slightly, lifting from the bed at the corners.

But for the more practical prints you’d want to use PETG for, the results were good.
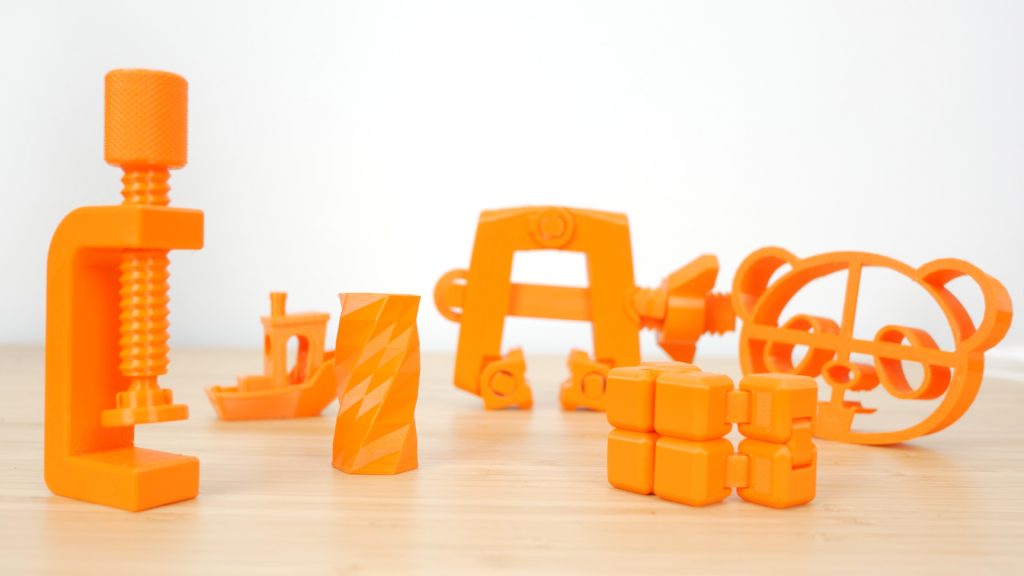
And this AmazonBasics filament was actually cheaper than the eSUN PLA+.

PLA and PETG are both rigid plastics and I was very keen to see if the printer could handle flexible filaments called FLEX or TPU. I’d read the extruder on this printer would struggle to reliably feed the more stretchy filament through its geared wheel without modifications. I tried some Eryone TPU which is harder than the most flexible stuff like NinjaFlex, but still perfect for cases for phones, GoPros and I even tried printing a sleeve for my AirPods Pros.

I printed it just like PLA and I was really impressed with the results. It fed through the extruder just fine and although there was a lot more stringing than with PLA and PETG, I could still get some really practical and useful 3D prints with it. I used the PLA profile with a temperature of 210C and a bed temperature of 50C. Depending on your results your could try reducing the speed by reducing the Max volumetric speed to 1.5mm3/s under Filament settings | Advanced | Print speed override. You’ll need to make sure Advanced mode is enabled to see this setting.

You should also increase the Extrusion multiplier setting to around 115% for this filament, which adjusts the flow of the plastic.

You can confirm this exact number by printing a calibration cube – you can find more details here. This is worth doing for any material you print for the best quality and it also ensures parts you print have the correct dimensions which is important if you’re printing practical pieces that need to fit with each other or something else.

I did also try some of Creality’s own PLA, but whilst the results were still more than usable, no matter how I tweaked the slicer settings, I never got results close to the eSUN PLA+ filament or even the AmazonBasics PETG.

I found the build plate that comes with the printer did a very good job sticking to the various plastics I tried to print. And also released them quite well too.

Most prints I could just grab straight off the printer, and for stubborn prints you can remove the build plate and flex it slightly to release them. It seems quite primitive with the bulldog clips, but it works fine. Do make sure you give it a good clean as I mentioned earlier if you have any issues, and make sure the bed is level too.

Although bed levelling is a manual affair you get very quick at it. It’s useful to download a Gcode file that you can put straight on your microSD card. Select to print it and it will heat up the nozzle and bed, and automatically move the print head around the four corners and centre position twice. I check the bed every few prints but it’s barely changed between prints – and if it has it’s by a tiny amount. Even moving it between the office and the shed a few times didn’t throw the calibration off. I wouldn’t skip this printer because it doesn’t have automatic bed levelling.

It is important your bed is flat though and mine is almost perfectly flat. If not, use some masking tape underneath the build plate to shim it flat.

I’ve not mentioned the noise this printer makes and that’s one of the few criticisms I have of the printer. You can hear how it sounds in the accompanying video. It’s really noisy, even when it’s not printing. The nozzle fan is the main culprit and it never turns off and there’s no way to manually turn it off. The only solution would be to upgrade the fan which I’ll come back to shortly.
Once you start a print, it’s even noisier with the stepper motors whining away at different frequencies constantly. I found it almost impossible to work with the printer in the same room, without at least some music playing through some noise cancelling earbuds. But there is an upgrade path if this will be an issue, which I’ll discuss briefly in the next section.

The screen and interface is not the most user friendly but it’s quite usable and perfectly acceptable at this price point and there is a nice tactile dial to move around the menu options. It does sometimes slow down when you have a microSD card inserted. If you get this issue, I’d get a slightly higher quality microSD card than the one provided and try organising your files into folders so you don’t have huge lists of files to browse through.

I checked the power usage of the printer using an energy monitoring plug. Printing the Benchy in PLA which took just under two hours used 0.11kWh, roughly equivalent to having a 50W lightbulb on for around the same time.

One concern with using any 3D printer is safety, particularly a cheaper one like this. You shouldn’t really leave them unattended although most people do. Earlier versions of this printer didn’t have thermal runaway protection which is probably the minimum safety feature you’d want. I checked this printer and fortunately it does have this protection, but make sure you don’t buy old stock. I got mine direct from Bandgood which whilst not as convenient as Amazon, is more likely to have the latest version and was a good deal cheaper too. I’ll provide a link down below.
Upgrade options

Out the box I’ve found this printer produces some excellent prints. But what makes it so popular is the number of upgrades available for it. Most of these upgrades won’t necessarily improve the print quality, especially if you’re only going to print PLA and PETG, but they either make the machine quieter, or they make it easier to use.

The best upgrades are the free ones that you can print yourself. I’ve links to the printed upgrades in the accompanying YouTube video’s description. But I’d recommend printing a filament guide and fan cover first off. The filament enters the extruder quite steeply without the guide which could cause issues and it’s a quick print.

And little pieces of filament quickly start getting sucked into the fan if you’re not careful. The fan cover is also fairly quick to print.

It’s optional, but I’d recommend checking and adjusting the calibration of your extruder for the best results, before doing any sort of upgrade.

You can easily check the calibration of your extruder by telling the printer to extrude say 10cm of filament and checking you do indeed get 10cm extruded.

Again, I have links in the YouTube’s video description describing this process in more detail.

I’ve not purchased any Ender 3 specific upgrades since I have a Prusa Mini coming soon which I want to compare to this stock Ender 3 first. But if the noise is an issue you can purchase a quieter nozzle fan.

And replacing the main board will also significantly quieten the stepper motors.
You can also add automatic bed levelling via a BLTouch probe – if manually levelling the bed isn’t for you, or your bed is warped. Or even just replace the bed springs if you find your bed doesn’t stay level.
If your extruder struggles feeding a very flexible filament like NinjaFlex, you can add an EZR Struder.
If you want to handle plastics that need to print at higher temperatures you can even install a new hot end. I’ll include links to YouTube videos on these upgrades if you’re interested.

I did buy an inexpensive Raspberry Pi credit card sized computer that runs a free Linux distribution called Octoprint. This connects with a permanent USB connection to the printer and lets you send files directly from your computer over WiFi to the printer.
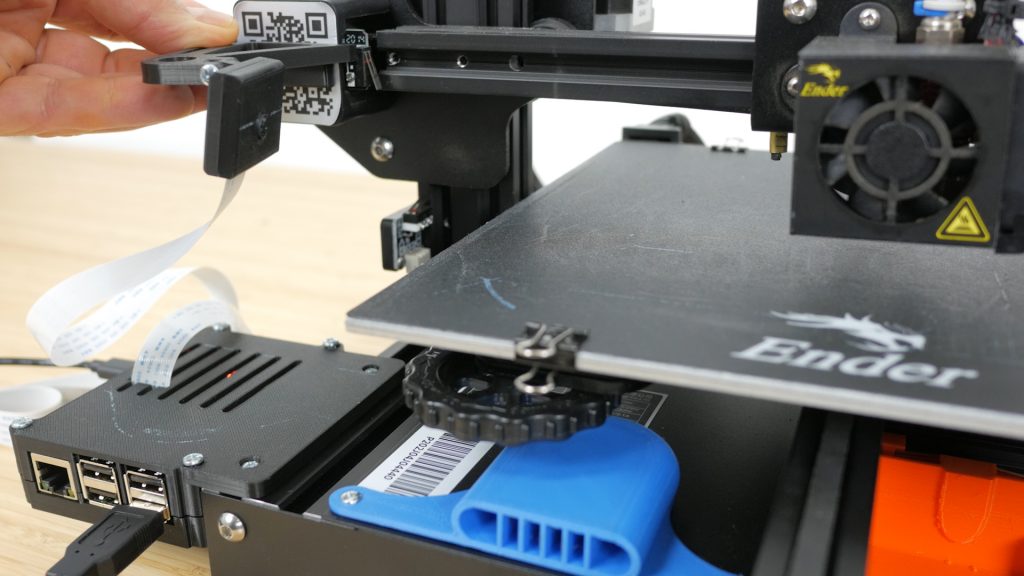
I also attached the optional camera module so I can monitor prints remotely. It can also do a lot more that maybe I’ll cover another time.

It makes the printer so much easier to use, and is handy since I have the printer in the workshop at the back of the garden most of the time. It’s all connected to a smart plug so I can also turn it on and off remotely too.

I’d highly recommend this, whatever printer you have – and you can have fun printing off the enclosure and mounting brackets.
Conclusions

At the price I paid for the Ender 3 it’s very hard to fault this printer. I’ve been extremely impressed with the quality of prints it can produce. Although this model has been out for a while there appears to have been some slight modifications to it since it’s launch, that have overcome some of the initial issues people had.
It is noisy though, but as long as you’re not sharing an office with it, or running it overnight even in an adjoining room, that’s not a massive issue.
It could be the perfect introduction to 3D printing if you’re happy to assemble it. If you could pay a small amount extra to have it arrive fully assembled, I’d recommend it to anyone. Assembly isn’t difficult, but it still might put off some people. And you do need to take care assembling it for the best results. You’re unlikely to get much support from the manufacturer, but there is a huge community of Ender 3 owners if you do get stuck including a very active and helpful Facebook group, or feel free to ask down in the comments. I will see how the printer fares over the coming months and years – so look out for an update.
I don’t think the lack of automatic bed levelling is a big deal, but in a few weeks I should be receiving the more upmarket Original Prusa Mini which will require less assembly and has auto-bed levelling. It should be quieter too with more advanced electronics, but it costs twice the price of the Ender 3. I will be comparing it to the Ender to see if it justifies the extra cost, so look out for that review.
If you like the idea of the Ender 3, it’s also worth looking at the more refined Ender 3 V2 which has just been released. It’s more expensive but is quieter, has an upgraded colour screen and a glass bed as well as a few more new features.
There’s also the Ender 3 Pro, but I’d probably skip that for the V2 if you can afford it.
Overall, if you’re happy spending a few hours getting the printer assembled and understanding how it works, the Creality Ender 3 could be your perfect first 3D printer!
Don’t forget to take a look at my YouTube video at the top of the page, and subscribe to my YouTube channel where I’m releasing videos every week on the latest technology and how to get the most out of it. If you tap the bell icon when you subscribe you’ll get a notification as soon as I release a video, and there’ll be a link to my site here for the written article. YouTube is also the best place to leave a comment. I read all of them and respond to as many as I can!
Ender 3: https://amzn.to/3gSXWWN
Ender 3 V2: https://amzn.to/33ZyBqq
Leave a Reply