The Vyper is a new 3D printer from Anycubic that promises to be the perfect beginner printer. It requires very basic assembly and has true automatic bed levelling to ensure prints stick to the bed. This is often the biggest cause of frustration for beginners. And it comes with a few other features that make it easier to use, including a removable magnetic build plate – my favourite platform and a 4.3” touch screen.
It has a large print volume and its twin screw system for the height axis should provide more accurate prints. And it promises to be quiet with its supposedly silent motors.
I’ll find out how easy it is to set up and get your first print completed and I’ll put all their claims to the test, printing a range of models with a variety of filaments, to try and help you decide if this printer is right for you.
If you’re new to 3D printing I’d highly recommend reading my review of the Creality Ender 3 that also introduces 3D printing.
Let’s take a closer look.
Setup

The printer comes well packaged and requires only minimal assembly. They include a written assembly guide, but there’s a more detailed user manual on the included SD card and a useful video guide on their website that is probably the best overview of the setup.
It is by far the easiest printer I’ve put together so far – it should take 15 to 30 minutes before you’re ready for your first print depending on your experience.

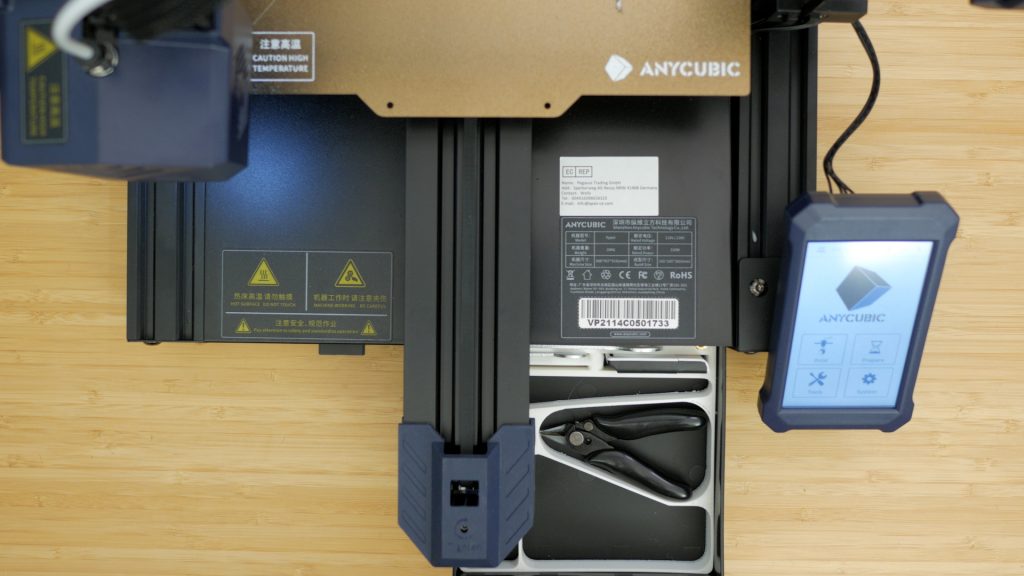
A drawer slides out from the base with all the tools you need to assemble the printer, including the smallest flush cutters I’ve come across. I’d still recommend using your own tools if you have them. You also get some two spare nozzles, sample filament, a plastic scraper, a USB cable and the full size SD card with a USB adapter. My printer didn’t come with the correct mains kettle lead for the UK, but luckily I had a spare one.
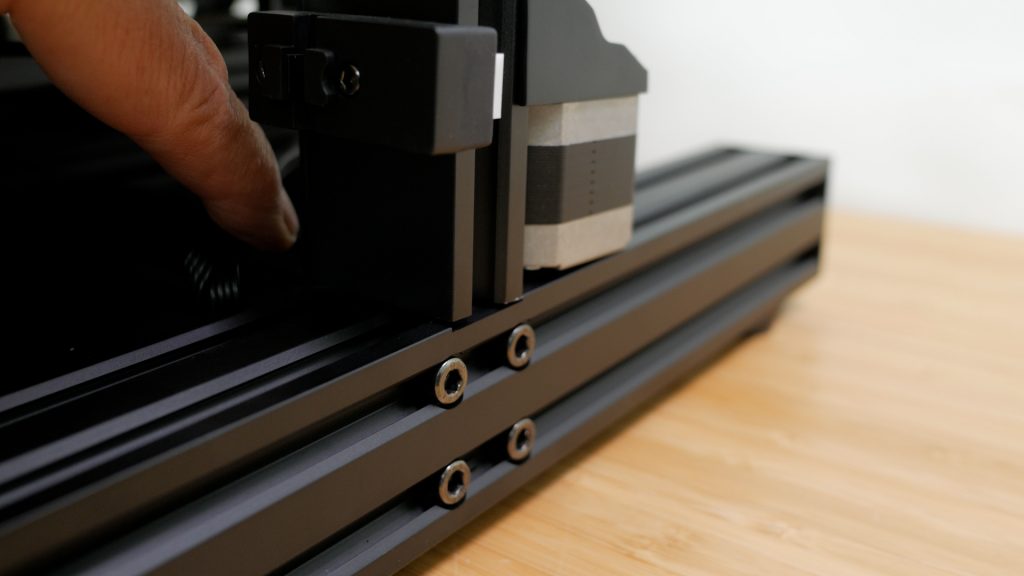
The frame aligns with two grooves in the base and is secured in place with the longer bolts. You must be careful not to pinch any of the cables.

I found I could carefully lean the printer on either side to attach the bolts. Or you could hang it over the edge of a table or rest it on a pile of books.

The 4.3” touch screen then attaches to the front right of the printer with the 3 shorter bolts.

You then just need to attach the cables to the print head, extruder, Z axis left and right motors and limit switches and the screen.

All the cable connectors are labelled and keyed and already routed to where they need to go so it’s pretty straightforward. Finally you need to cut the shipping cable ties: under the printer bed, on the right and left Z axis, and the print head.
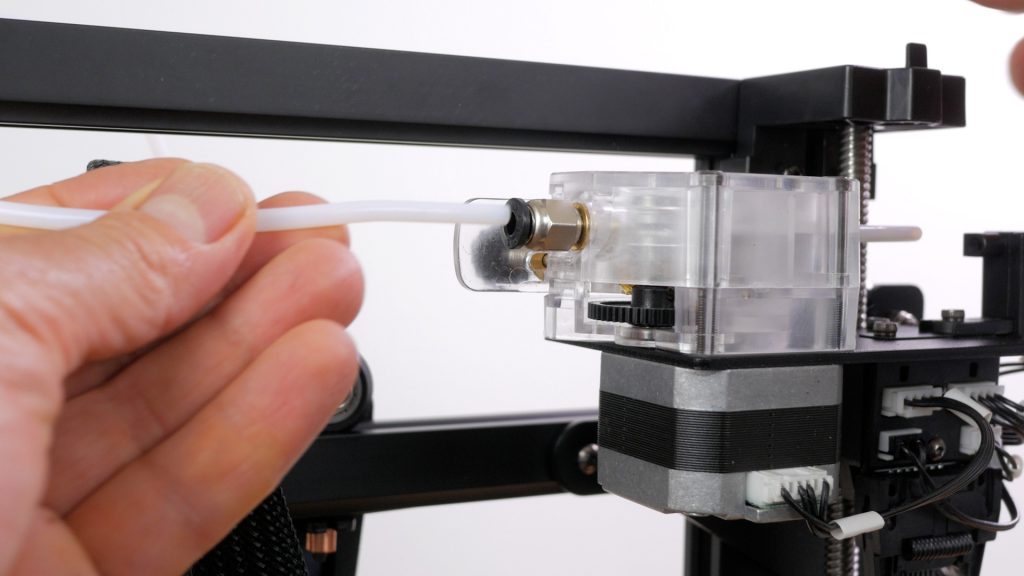
Then push the teflon tubing into the extruder and use the included cable ties to hold the teflon tubing and print head cable together and secure the print head cable to the print head. This is not ideal but I’ll come back to cable management shortly.
Finally attach the filament holder which doesn’t quite snap onto the bottom rail, but is secure enough.

You’re almost ready to print but Anycubic recommends checking there’s no wobble in the heated bed and print head and both the X and Y belts are tight. My belts were correctly tensioned, but if yours aren’t then it’s straightforward to tighten the set screws with an allen key. This is a far simpler system than on many printers I’ve set up. Both the print head and bed have eccentric nuts that you can adjust for any play with the included spanner.

My bed had a small amount of play which I removed with a fraction of a turn of each nut.
Before you power on the printer, check the voltage switch is correct for your region. Mine was already set to 230V for the UK.
With a nice clean nozzle with no filament yet loaded you can level the bed. This is fully automatic and probes the heated bed with the nozzle itself which is attached to a strain gauge.

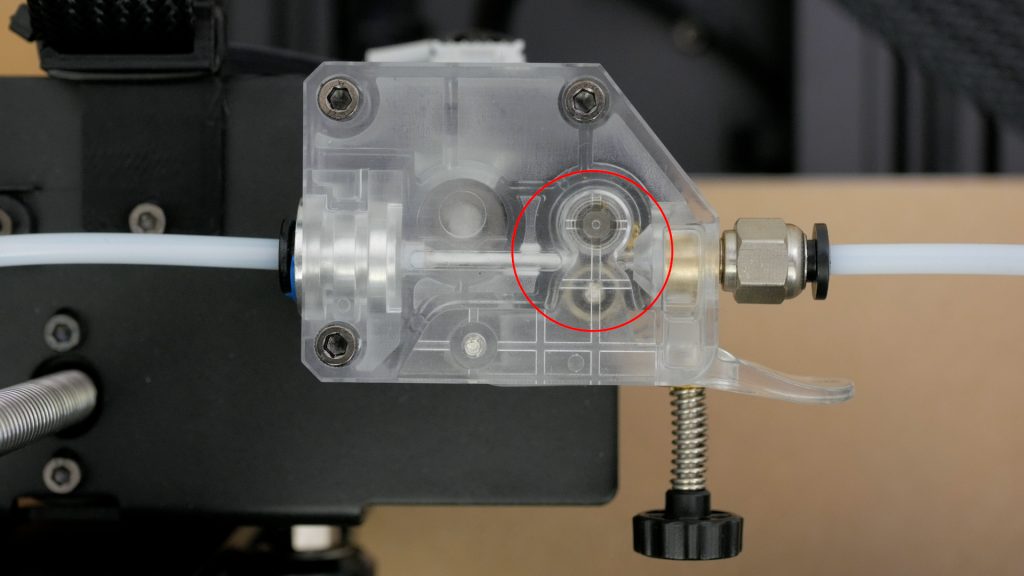
It’s recommended to check this strain gauge is working properly before you choose levelling in the printer menu. You don’t want the print head scratching the build plate.

They suggest pressing the nozzle with a spanner to check the red LED comes on, which you can just see through the print head cover. You may need to dim the lights to see this.
Also check the teflon tube going into the print head is not restricted in any way. This can cause the strain gauge LED to come on without touching the nozzle and the levelling process will fail.
The nozzle does heat up when you start the bed levelling process, so if you have filament loaded I’d recommend cleaning the nozzle with a brass brush once it’s up to temperature – you want the tip of the nozzle itself to touch the bed. Even if the nozzle then dribbles a little bit of filament it should still be accurate since the melted filament is soft. You could always unload the filament before levelling to be sure.

Then tap Prepare | Levelling | Auto-levelling. The printer then slowly probes the bed at 16 locations. It takes around 4 minutes, a lot longer than on my Prusa Mini+ and Prusa MK3S+.

I’d recommend keeping a close eye on this to check it’s working as it should, but I’ve not had any issues so far.
The advantage of using the nozzle itself to level the bed, is that you shouldn’t have to mess too much with the Z-offset, which fine tunes how close the nozzle is to the bed for decent adhesion of the filament to the bed, and a precise first layer. This could make this printer ideal for anyone new to 3D printing. The popular Prusa range of printers also have automatic bed levelling, but you must adjust the Z offset with a calibration print when you change filament, the build plate or the nozzle. And it can be a little tricky to get just right – at least initially.
Unlike Prusa printers, this bed levelling is not automatically completed before every print and Anycubic don’t consider it necessary to level before each print.
I’ll discuss the levelling further, and how it performs shortly.

To load filament, tap on Prepare | Filament | Filament In. You’ll be prompted to allow the printer to heat the nozzle up to temperature.

While it’s heating up, cut the filament off at an angle and feed it in through the filament sensor and through the PTFE tubing until it touches the extruder gears. I like the transparent extruder which makes it easy to see what’s going on, and if there are any issues.
The extruder has two gears which should make feeding flexible filaments more reliable.

Tap on Filament In again and push the filament into the rotating cogs of the extruder which will feed the filament through the teflon tube and out the hot nozzle.
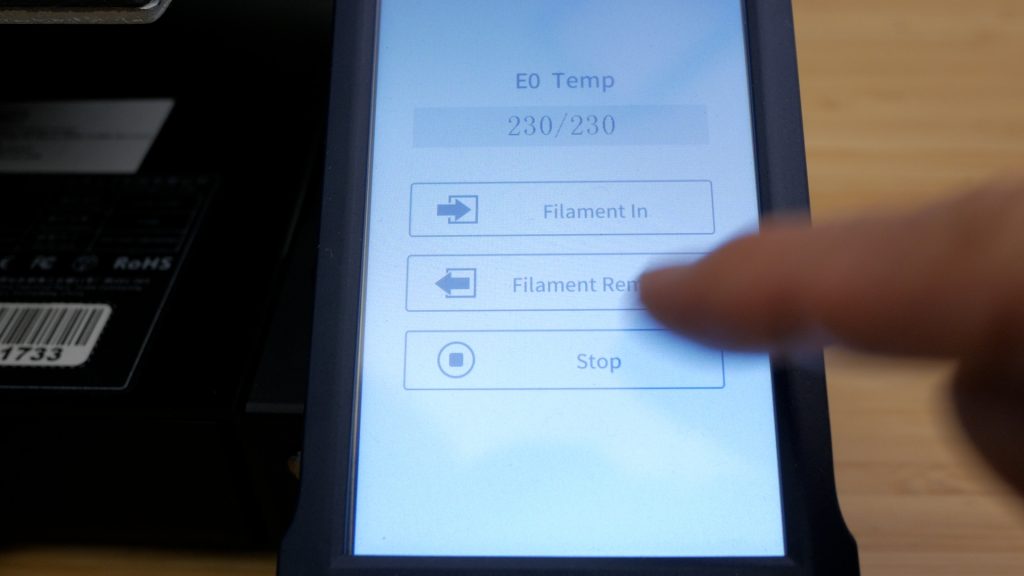
You have to tap on Stop otherwise you’ll waste a lot of filament. I’m not quite sure why the printer can’t just push a fixed amount of filament through and then stop, like on other printers. But it works pretty well once you know you have to tap stop.

The manual recommends you tighten or loosen the knob on the side of the extruder to adjust the tension of the cogs if the filament is too thin or thick. But that’s hard to gauge without any experience. I’d just check the gap between the knob and extruder is 18mm as recommended. I’ve not had to adjust this knob in all my testing so far, printing a range of filaments.
Performance

The Vyper is a Fused Deposition Modeling or FDM printer with a well sized 245mm x 245mm x 260mm build volume and a Volcano-style hotend fitted with a 0.4mm nozzle. The hotend can reach 260°C and the heated bed 110°C, both very respectable and more than enough for PLA, PETG, TPU and ABS, but not more exotic materials like most Nylons and Polycarbonates.

The printer weighs around 10kg and you can see its overall footprint and the amount of space required in use with the travel of the bed and the attached spool holder. You’ll need a fair amount of desk space for it.
For my first print, I used the included sample of white PLA to print the owl model included on the SD card. Unfortunately the gcode file is not in the root folder of the SD card and the printer doesn’t support folders. So you’ll need to copy the owl.gcode file to the root of the SD card on your PC or Mac.

Then you can tap on the Print icon, tap on the file and tap Print. The bed and nozzle will heat up to the correct temperatures and the print should start.

It’s worth keeping an eye on the first layer going down. You shouldn’t need to make any adjustments, but you can adjust the Z offset after tapping the Settings icon, if the nozzle is too close or far from the bed. In this menu you can also adjust the nozzle and bed temperature, print and fan speed and you can toggle the print head LED on and off, all mid print.

The Z Offset and Speed settings will persist even after the current print. The manual states if you tap the Back icon rather than OK, the settings will only be applied during the current print, but that wasn’t the case in my testing.

The owl print came out pretty well considering this is an out of the box print, with almost no user interaction and using the included PLA which isn’t the best quality.
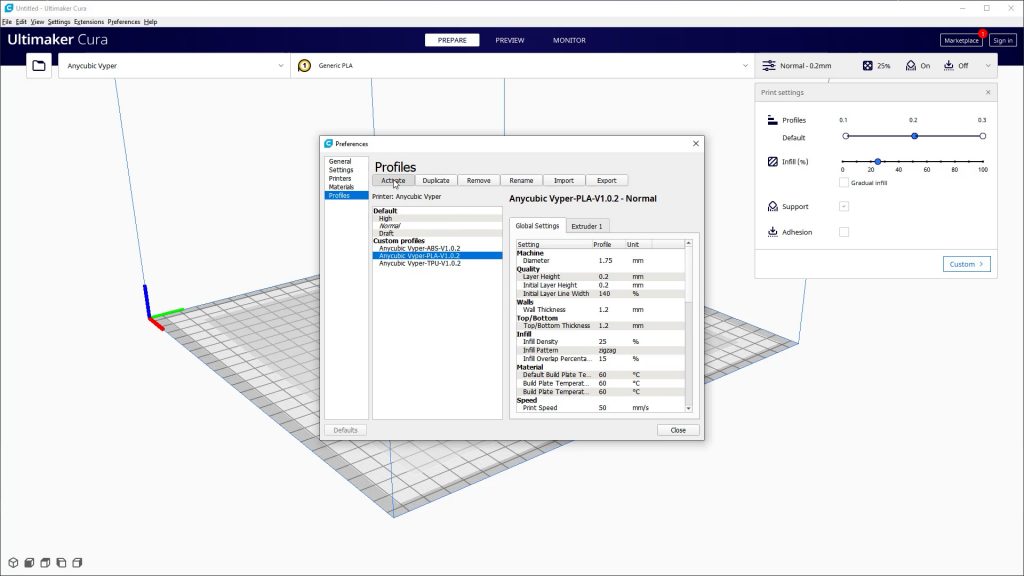
I used the remainder of the sample filament and some white 3DQF PLA to print an organiser for the built-in storage tray to replace the foam. I used Cura to slice the model with the supplied profile from Anycubic. You can download and install the latest version of Cura, and then follow the instructions in the Anycubic manual to add the Vyper, based on the older Anycubic Mega, and import the configuration files. It’s straightforward but hopefully soon this printer will be already included with Cura and other slicers.

The first layer was a little too low so I did adjust the Z offset to 0.05. As the sample spool was running out, this gave me a chance to try out the filament runout sensor. The printer did pause printing and the nozzle lifted up but it didn’t move away from the print, and the only option was to resume the print. There’s no option to unload or load filament, and you can’t access any of the move controls, which is not ideal.

Still I fed in the new filament and resumed the print. The transparent extruder helps here – you can butt the new filament against the filament that’s run out until it gets pulled through the extruder.
The print completed, and apart from the slightly squashed first layer it looked ok.
I’ve included links for any of the prints I show or mention at the bottom of this article.

The printer also has a power resume feature which I tested next. So if there’s a power cut, the printer will prompt you to continue the print when the power comes back on. Printing a small calibration cube, I pulled the plug after a few layers. After restoring power, I was prompted to resume the print, and after warming the bed and nozzle up again, the printer returned to its home position and then resumed the print from where it left off. It might make more sense for the head to return to its home position before heating up, to avoid the blob of dribbled plastic, although that might pull the print off the bed. But the print did finish, with only a minor defect where the power had been lost.
While I was printing this test cube I also tested the filament sensor again, but this time unloaded the filament manually by pulling it out from the hotend after removing the teflon tube from the extruder and then manually pushing fresh filament through until some of it oozes through the hotend. You can remove any excess filament with some needle nose pliers or tweezers and continue the print. My first method of dealing with filament running out worked out a little better but this method would be useful if you wanted to manually change the colour of the filament mid-print.

I did try a colour change print using PrusaSlicer but although the printer paused and started partially unloading the filament, after I had manually loaded a new colour I wasn’t able to resume the print. It looks like this is a bug which will hopefully be fixed in a future firmware release.
I tried various prints in PLA from 3DQF, Prusament, Fillamentum and eSun and I generally got good results. The biggest variation in quality was dependent on the slicer and profile I used which is one of the big selling points of a Prusa printer, with software they develop themselves and their well tuned profiles.

The printer comes with CURA profiles on the SD card for PLA, ABS and TPU but no PETG. The PLA profile worked ok but I got better results using PrusaSlicer. As in Cura, I added the Anycubic Mega and then changed the bed size to that of the Vyper and renamed it. I did add a skirt to this profile – which is also useful for checking the Z height is correct. In fact it’s useful to add 2 or 3 skirts and space them further away from the model – especially with smaller models where the skirt would finish printing too quickly.

This gives you a little time to check the Z offset is ok – if you’re careful you can pick at the skirt to check it’s well stuck to the bed.

You can see the difference between these two profiles with the classic Benchy. The results are very comparable to my Prusa Mini+, and more expensive Prusa MK3S+ for that matter.

There’s a small amount of stringing but otherwise it’s a very clean print with few defects, and even the text on the bottom is quite readable which is a real test of the built in levelling.

I also found prints off the Vyper were quite accurate, especially considering its larger size. A 20mm square calibration cube measured within 0.1mm for the X, Y and Z axis. I also printed Maker’s Muse’s clearance and tolerance test which is a very challenging print.
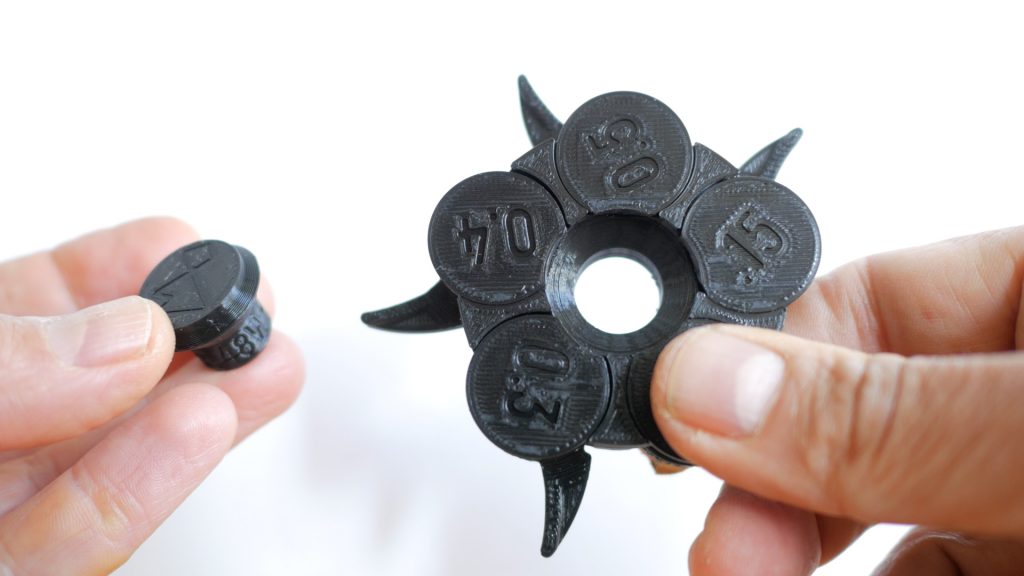
The print looked very good in PLA and I could release the 0.5, 0.4 and 0.3mm arms fairly easily but more impressively I could complete the challenge and open the puzzle, releasing the 0.2 and 0.15mm arms with the help of a screwdriver, and without the arms breaking off as defined by the rules of the challenge!

This cable organiser came out nicely in Fillamentum PLA and you can see just how good the first layer is with the levelled bed.
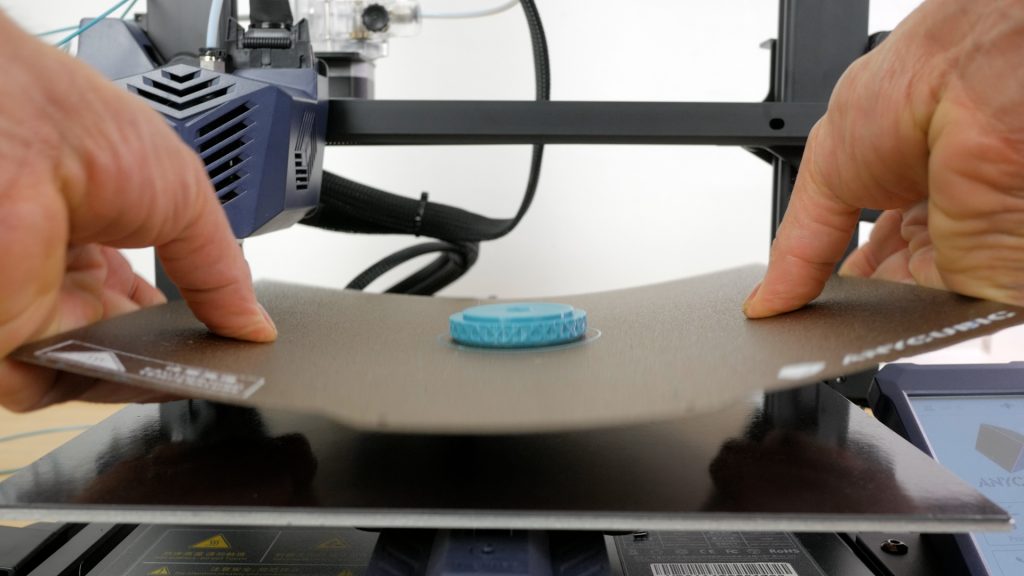
And also how easy it is to get prints off the textured spring steel magnetic PEI sheet. If you let the print cool down for a minute or so you can just peel it off if it’s not already released. For more stubborn prints or if you’re impatient, you can remove the sheet and give it a slight flex to pop the print off. Theoretically you could print on the smooth side, but Anycubic don’t recommend it and I didn’t really have any reason to use it since everything stuck so well to the textured side – even smaller PLA prints where a smooth PEI sheet is often recommended.

But for the purposes of this review I did try a few prints on the smooth side and it worked very well too. And sometimes you might prefer the smooth bottom surface of a model this side of the sheet gives you. Remember to run the bed levelling when you flip the sheet – since the nozzle height will be different. I’d only use this side with PLA, other materials may be harder to remove without using some glue stick to help with their release. I give either side of the build plate a clean with IPA alcohol before most prints. If you get any problems with prints sticking, you can give the build plate a scrub in the sink with washing up liquid.
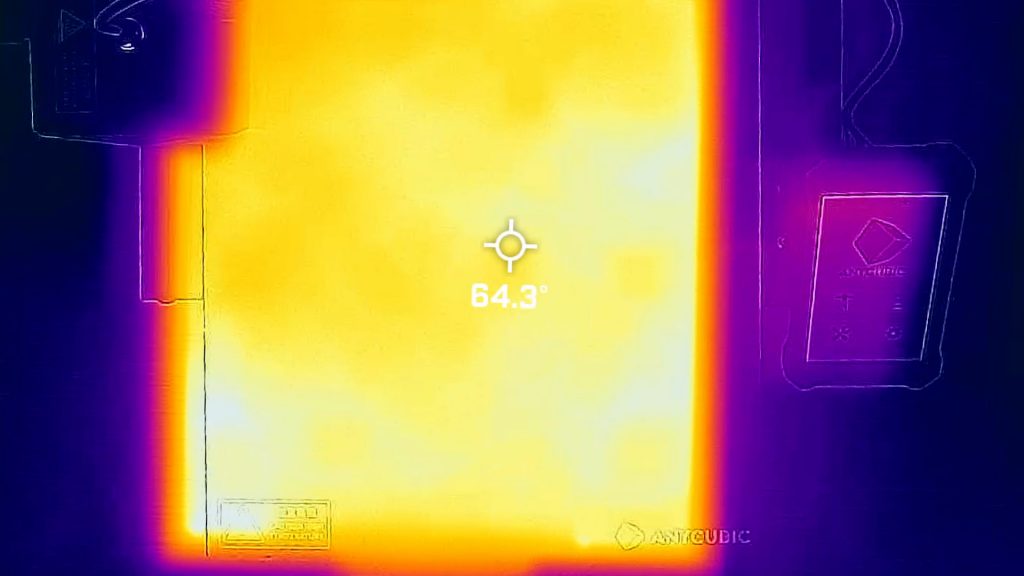
I also checked the temperature variation of the heated bed at this point with a Flir thermal imaging camera. It was very even, within 1 or 2 degrees across the bed – which is what you want for larger prints. Although it didn’t seem to quite reach the set temperatures.

Moving on to PETG, I used the PETG profile in PrusaSlicer and printed the support arm for a Dremel cut off saw in Prusament Galaxy black, which looked good apart from some light stringing, most likely from this filament needing a little time in the dryer.

The area around the hole is my fault – I should have enabled supports.
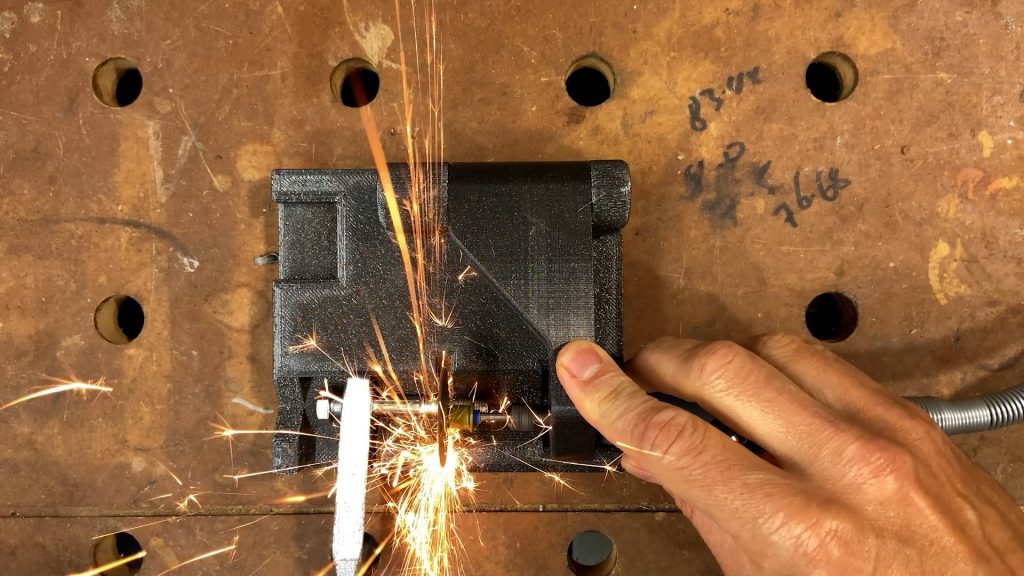
But the cut off saw still works quite nicely, as long as what you’re cutting doesn’t get too hot!
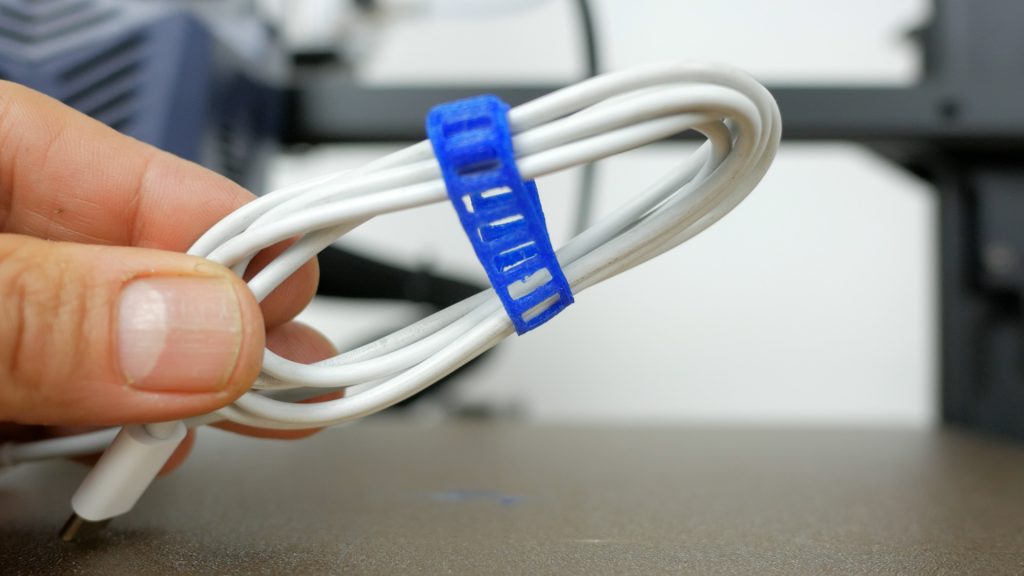
I then tried flexible filament which is notoriously difficult to print with bowden extruders like on this printer, particularly the super flexible Ninjaflex which I tried first. The supplied Cura TPU profile was set to print way too quickly and just produced a mess. Since I’m happier tweaking settings in PrusaSlicer, I used that and created a profile based off a flexible filament on the Prusa Mini. The cable strap did print successfully, albeit with a fair bit of stringing.

I got slightly cleaner results with some Eryone TPU which isn’t quite as flexible. But both prints were perfectly usable which is normally my goal with flex prints.
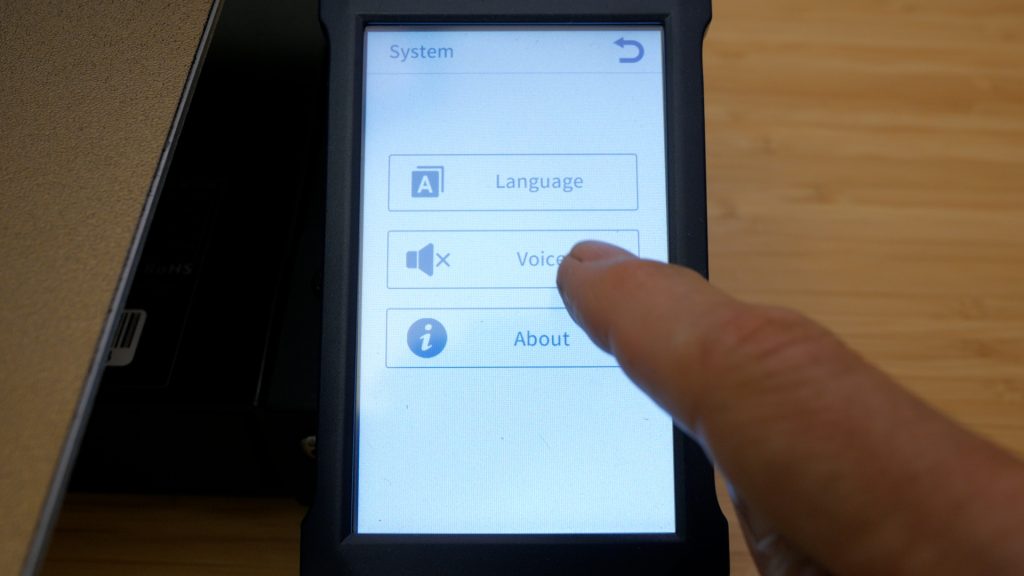
The 4.3” blue on a white background touch screen is pretty responsive and I’m glad that you can turn off the beeps under System | Voice. It’s a fairly basic interface which does make it easy to use but given the size of the screen, it would have been nice to see thumbnails of prints, like on the smaller Prusa Mini’s screen. And I also like to see layer height while printing which is missing. And there’s no print time remaining either.

I was able to connect up Octoprint via the USB port and a Raspberry Pi, which enabled full remote control and monitoring of the printer and is handy for calibration via the terminal interface. I did adjust the e-steps via this interface, but I can’t say I noticed much difference in print quality – it was already pretty good.

I also used the Bed Visualizer plugin to see how flat the bed is on my printer. You can see there’s around 1 mm of variation – which is quite evident even checking with a straight edge.

It’s more than I’d like to see, but the printer’s bed levelling seems to cope with this amount of variation quite happily.

The Vyper has a 32-bit mainboard with silent stepper drivers and the printer bed and print head movements are quiet. But unfortunately the noise from the hotend, cooling and mainboard fans are very noisy. Luckily although that makes it noisy and quite distracting if it’s beside you, you don’t tend to hear it in the next room like you can with some printers – even the Prusa MK3S+ with various noise dampening measures. And the fans only come on when you’re using the printer, unlike the Ender 3 which is noisy even when idle. You can hear how the printer sounds in the accompanying video.
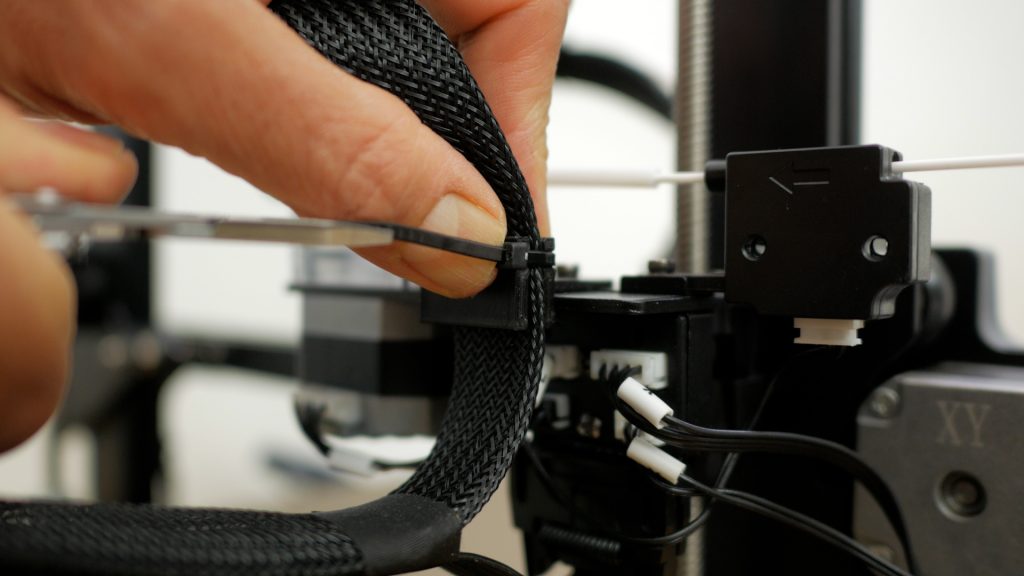
I didn’t find cable management very satisfactory out of the box. Even after following instructions from Anycubic, the print head cable drapes over the build plate and more worryingly the heatbed cable can snag on the y-axis motor which could cause real damage. I found a simple print on Thingiverse that attaches to the bolt that holds the filament sensor in place and does a fantastic job of solving this issue. But Anycubic really needs to address this problem.

Another issue I had was with the extruder which began rattling after maybe 20 hours of use. The extruder gear had become loose. I removed the tensioning knob and used a 1.5mm hex bit to tighten the grub screw which fixed the issue. You could also use the supplied 1.5mm Allen key.
Conclusions
In my testing I’ve been quite impressed with the Anycubic Vyper. The easy assembly, automatic bed levelling and removable magnetic sheet should make it a good option for beginners. If you’re printing PLA, the custom profile for Cura works ok, but there was no included profile for PETG and their Flex profile printed way too quickly. Hopefully they’ll add a PETG profile and tweak the Flex profile for better results.
Even though I haven’t had any major issues in my testing, I do have concerns around reliability. There are quite a few reports on the forums about faulty strain gauges amongst other things. This may be a very small number and Anycubic do appear to be sending out replacements without any quibble. But I would pay extra attention to the bed levelling the first few times you run it. I did contact support and got a reply within a day which is ok considering the time differences, but 24 hour chat support would be much better, especially with a printer marketed at beginners.
Cable management is also an issue out of the box. I’d highly recommend making your first print the simple clip I showed earlier or something similar.
And whilst the printer has very quiet stepper motors, I’m not sure Anycubic can really market “silent printing” as a feature. The multiple fans are very noisy. But at least the printer is silent while it’s idle.

The price will probably come down, but right now it’s around £330 or $360. I’d consider the Vyper’s main competitors the Creality CR-6 SE which is around the same price, and the Prusa Mini+ which is a little more expensive. I’ve not tested the CR-6 SE, but it also has automatic bed levelling and a touchscreen, but comes with a slightly smaller build volume and a glass bed. The Prusa Mini+ has a much smaller print volume, and comes with a removable magnetic build plate and automatic bed levelling like the Vyper. But you do have to adjust the Z-height manually. The main advantage of the Prusa is their 24/7 helpful chat support and PrusaSlicer software with finely tuned profiles for a wide variety of filaments. Please let me know in the comments if you’d like to see a review of the Prusa Mini+.
If you don’t mind levelling the bed manually, the Ender 3 I reviewed a while back is less than half the price and the only upgrade I’ve made to it is a removable magnetic build plate. There isn’t a huge difference in print quality compared to the Vyper, but it is much noisier. There is also the more refined Ender 3 V2 which is only a little bit more expensive than the Ender 3, but quieter and comes with a colour screen like the Vyper, although without touch and it still doesn’t have automatic bed levelling.
I’m still not sure I’ve found the perfect 3D printer for beginners, but there is a lot to like about the Vyper.
Don’t forget to take a look at my YouTube video at the top of the page, and subscribe to my YouTube channel where I’m releasing videos every week on the latest technology and how to get the most out of it. If you tap the bell icon when you subscribe you’ll get a notification as soon as I release a video, and there’ll be a link to my site here for the written article. YouTube is also the best place to leave a comment. I read all of them and respond to as many as I can!
Anycubic Vyper 3D printer: https://amzn.to/3CT4kYP
Creality CR-6 SE: https://amzn.to/3zPtYvp
Creality Ender 3 V2: https://amzn.to/3iixKrf
Creality Ender 3: https://amzn.to/2ZGQISa
Models referenced in video:
Hotend cable clip: https://www.thingiverse.com/thing:4939641
Dremel cut off saw (for Flex Shaft: https://www.thingiverse.com/thing:3458147/files
Charger cable organiser: https://www.prusaprinters.org/prints/51301-charger-cable-organizer-the-cable-winder
Vyper tray organiser: https://www.thingiverse.com/thing:4909034
Leave a Reply