Overview

The Olight Seeker 4 Mini is a fairly compact torch with a 1200 lumen standard white light for general use and rather unusually a UV light with specific uses that I’ll come back to.
I’ve done a roundup of pocket torches and and I’ve also done a roundup of keychain torches which introduces any technical terms I use – so please do check these articles (and videos) if you like.

It comes with a proprietary 18350 battery already installed, a magnetic charging cable and a lanyard. It also has a removable two way pocket clip so you can carry it either up or down in your pocket.
It’s easier to carry bezel up – it really needs two hands to use it bezel down with only a slight lip on that side of the clip.

Although it’s billed as an EDC (Every Day Carry) light, it’s really too chunky for the pocket of your jeans. It has a pretty large 30 mm head, and the body varies but is around 25 mm in diameter. It’s 87 mm in length so in Olight’s range it sits in between the popular Baton 3 and the newer Baton 3 Pro but actually weighs a little more than the longer but slimmer Baton 3 Pro. It looks very small compared to Seeker 3 Pro.

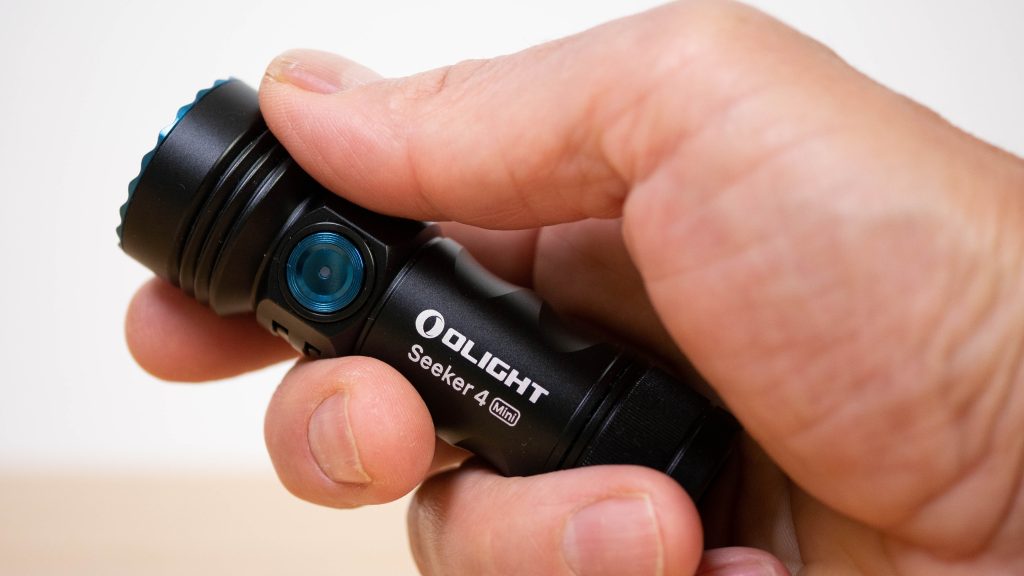
Like all Olight torches I’ve tested it’s well built, made almost entirely of aluminium – even the power button is metal. It’s IPX8 waterproof and 1.5 metre drop resistant. It’s available in different colours – I have it in black.

The head has a blue crenellated bezel like the Seeker 3 Pro. I don’t think this is for self defence – it’s too shallow, but it is useful to remind you the torch is on if you leave it head down on a flat surface. Unlike a lot of recent Olight releases the Seeker 4 Mini doesn’t have any proximity sensor to automatically dip the beam or turn it off if left on accidentally so the bezel design is a good idea.

The installed protected 18350 1100 mAh battery should only really be charged inside the torch using the supplied magnetic charger.

The torch is supplied with the 1A cable, but it can be charged with Olight’s 2A magnetic charging cable that comes with their bigger torches and the Omino 4-way charger.

It will charge at up to 1A with a full charge taking around 1.5 hours. You need to make sure you unscrew the tail cap and remove the insulating film before first use. You can only use these proprietary batteries in the torch – a standard 18350 won’t work.

If you’re careful you can charge the Olight battery in a standard charger, but the positive terminal is recessed so you need to add a little magnet to get this to work. I could charge it a little faster with the SkyRC MC3000 charger, but I’m fine using the supplied cable. As long as you have it with you, it’s one of the easiest charging mechanisms I’ve come across. You only need to have the magnetic tail cap of the torch near and it snaps into place. But I would love to see Olight introduce a USB-C charging port to their batteries so if you don’t have the cable with you or it fails, you’re not stuck.
The charging cable’s LED changes from red to green when it’s fully charged, but this isn’t always reliable. Sometimes it’s green when I’ve used the torch a bit and I know it needs topping up. And less often it’s red when the battery is fully charged and no current is being drawn. Usually removing and then reattaching the charger does bring it to green, and briefly entering turbo mode when it’s green changes it to red, but it’s not ideal.

The magnetic tail cap is useful for charging, but also makes it a useful work light. It will support its weight in any orientation which can be very handy for hands free operation.
If you’ve owned an Olight, the user interface will be mostly familiar to you. And it’s one of my favourite user interfaces.
The torch turns on and off with a single press of the side switch. Holding down the side switch cycles between a 15 lumen, 33 hour 30 minute low mode, a 120 lumen 5 hour 20 minute medium mode and a 600 lumen high mode. The high mode should last 50 minutes and then drop to 120 lumen medium brightness for a further 20 minutes.
If you double press the side button with the torch on you’ll enter the 1200 lumen turbo mode for three minutes. It’ll then drop to the 600 lumen high mode for 41 minutes and then the 120 lumen low mode for a further 25 minutes. I don’t quite understand why Olight insists on listing these brightness drops in percentages. It makes more sense to me in lumens. I’ll come back to my measurements of runtimes shortly.

If you double press the side switch with the torch off you access the 760 mW 365 nm UV light. This has only one brightness level. This usually accesses turbo mode on similar Olight torches. You can access a 2 lumen 12 day moonlight mode with a long press of the side button with the torch off and a strobe mode with a triple press with the torch on or off.

The side switch illuminates to indicate the battery level. Green for more than 60% battery remaining, orange for between 10 and 60%, red for between 5 and 10% and blinking red for less than 5%. I’d prefer green was more than 80% with perhaps one additional colour for a clearer indication of remaining battery, but it’s not a big deal. In moonlight mode the battery indicator remains off which makes sense to not add any additional light when you don’t want it.
You can also lock and unlock the torch with a long press of the side switch with the torch off. Wait until moonlight mode turns off. If you try to turn the torch on in lock mode, the LED will glow red. The torch will come out of lock mode in moonlight mode.
Finally like a few other Olight torches I’ve tested there’s a timer mode. Choose the brightness level and double press holding the second press. The torch will blink once or twice alternatively each time you do this. One blink for a 3 minute timer, 2 blinks for a 9 minute timer. It’ll switch itself off automatically after 3 or 9 minutes. This is useful if you have the torch hanging in a tent or even as a bedside light.
Performance

There are three LEDs behind the lens – two white LEDs and one UV LED. The torch is available in two variants. The one I’m testing is the cool white version with a colour temperature of between 5700 and 6700K – I’ll measure it precisely shortly. There’s also a warmer neutral white version with a colour temperature between 4000 and 5000K. What you choose will come down to personal preference, but I’d usually prefer the warmer option.
Olight don’t specify what LEDs they are using, but by all accounts the white LEDs are OSRAM P9.

I tested the runtime in turbo mode with a fully charged battery in my calibrated DIY lumen chamber. Olight torches are some of the best regulated torches I’ve tested and this one is no exception. In other words they can maintain their standard brightness levels (not usually turbo) without dropping.

I measured 1181 lumens at turn on, 1175 at 30 seconds (ANSI) and 1160 after two minutes. That’s pretty close to its rated 1200 lumen maximum output. By three minutes it’d dropped to almost exactly 599 lumens where it remained barely dropping at all for around 25 minutes. It then dropped to 119 lumens for the remaining 8 minutes or so before turning off. The regulation is very impressive as is the accuracy of Olight’s spec’d lumens. But it didn’t achieve the runtimes Olight list in their user manual. There’s no cooling in my tests and it’s unusually hot at the moment (by UK standards). In real life, typically with a cooling breeze, runtimes will be better. It’s likely the torch is dropping its brightness at a certain temperature.

I measured the temperature of the torch in turbo mode with a thermal imaging camera. The head didn’t get above 46°C in my tests with the body a few degrees cooler. It felt warm in my hand, but by no means uncomfortable and the head never got too hot to touch.

I did the same runtime test this time starting in high mode. The torch held pretty close to the spec’d 600 lumens for over 30 minutes before dropping to the 120 lumen medium mode for around 8 minutes before shutting off. This is again less runtime than spec’d but 30 minutes at 600 lumens for a relatively small torch like this is still pretty good.

The torch has a very floody beam – it’s rated at 120m range (3600cd) in turbo mode which is less than even the much smaller Baton 3 with 166m (6889cd). I’d prefer a slightly more focused beam for an EDC torch but that’ll come down to personal preference.

This is the cool white version and I measured it at an even cooler than spec’d 6956K but it does have an almost neutral tint of -0.0002 (Duv). Ideally you want this value close to zero – and a negative number is generally accepted as better for a rosy rather than green tint.
It doesn’t claim very impressive colour accuracy and I confirmed its spec’d CRI of 70 all with my colour spectrometer. It’s good that Olight have started introducing colour temperature variants for their torches, but I’d really like to see a model with higher CRI.

The UV light is an interesting feature. I wouldn’t say it’s that useful for the majority of people but it can come in handy. I have a UV light on my RovyVon Aurora A8 and this did prove very useful recently when someone bought an expensive item off me in cash. In the UK at least you can use it to identify counterfeit notes and this torch also works well for that. It can also be used for stain detection and Olight also lists ringworm detection! I’ve also used it to dry areas of 3D prints off resin printers that cure with UV light, and check any leaks of tubeless sealant in my bike tyres that have a UV dye.
I perhaps would have liked to see an option for this additional LED. Some people may find a red, blue or green LED more useful.
Conclusion
The Olight Seeker 4 Mini is a compact, fairly bright torch, with typically good Olight build quality and a user interface that is quick to pick up.
I’m not sure how useful the UV light is for most people, and it is quite chunky. It’s too big for a jeans pocket so would be best in your jacket pocket or on a belt. This is partly due to the thicker 18350 battery which does allow for a pretty decent 600 lumen high mode – something a lot of small pocket torches don’t have.
If you’re after a UV light mode, a decent 60 lumen high mode and a long lasting 120 lumen medium mode in a compact form this is a good option. In Olight’s range the Arkfield also has a UV light option, in a rectangular format although both its white and UV LEDs aren’t quite as bright as the the Seeker 4 Mini.

If you want more reach (250m in turbo!) I’d look at the Fenix PD25R which is slimmer and lighter with its 16340 battery but a similar length. It also has a tactical tail switch. But its runtimes aren’t as good and I prefer the Olight user interface.

If you’re after a much more compact 18350 torch take a look at the slightly underrated Thrunite T1S – a great little torch for the price.
In Olight’s range for a lot of people the Baton 3 or Baton 3 Pro will make more sense if you don’t need the UV light.
Overall the Seeker 4 Mini is a nice addition to the Olight EDC family of torches if you need a UV LED. If you want a few more options to consider do take a look at my roundup of the best pocket torches for EDC.
Buy direct from Olight (which helps support this site and my YouTube channel!)
September Sale now on with up to 40% off!
They do have some genuinely good offers and freebies during these sales so it’s worth taking a look.
Olight Store: https://geni.us/kjOSZK (choose from UK or US store)
Olight Seeker 4 Mini: UK: https://www.olightstore.uk/s/4JXNJO US: https://www.olightstore.com/s/52L1A6
If there’s no sale on you can get 10% off using my code TTM10 at checkout which helps support this site and my YouTube channel.
Leave a Reply